
Every Single Phoenixborn - Ninja's Tier List and Guide
Recently I've completed my ten wins on Ashteki with every phoenixborn in the game. I thought I'd share my thoughts on each one, how powerful I think it is, strengths and common combos.
A Tier
Hope
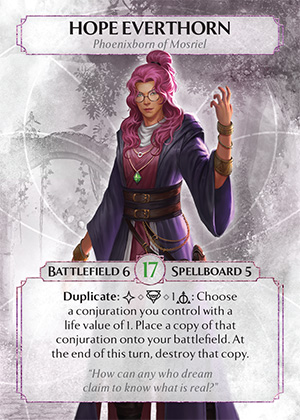
How to Win: Duplicate is unbelievable value. You should definitely be using it every round to apply pressure with key 1 life conjurations especially those that have 2 or more attack. Combo this aggression with Void Pulse to take out enemies and either hit face or control the battlefield.
Deck Styles: You generally want to max out Void Pulse damage so swarming and playing lots of cheap units is a good plan. Taking out a 3 or 4 health unit can be amazing value, but don't get too greedy and wiped by card like Nature's Wrath. Start your deckbuilding by choosing what 1 life conjurations you can duplicate. You can utilize your giant spell board to insure you still have multiple different 1 life units you could duplicate, should your opponent take one of them out. Duplicate and Void Pulse together do make for a pretty aggressive package, so an aggressive attacking deck strategy will work well here.
Common Combos: What makes Hope so powerful and my number 1 PB is the flexibility they provide with Duplicate. Common targets for the ability are Shadow Hound, Vampire Bat Swarm and Light Bringer. Shadow Hound is the most expensive conjuration with 1 life so it makes sense you get a lot of value from duplicating it. Vampire Bat has a great on destruction ability you can trigger and Light Bringer can really help with your aggressive strategy, forcing your opponent to attack when it's least beneficial and then hitting back hard when they exhaust their units.
Proven Competitive Lists:
Carl's LKA V Winning Shadow Hounds deck: https://ashes.live/decks/50100/
Killercactus's Collection 2023 Top 4 Aggro Burn deck: https://ashes.live/decks/share/8534a00b-f6ff-487d-acbd-90cbf4742ab6/
Brian B's Pod II Top 2 Shadow Hounds PACT deck: https://ashes.live/decks/share/975e32d4-cea7-4b2e-b2d8-ef7f540078ec/
My Best Homebrew: https://ashes.live/decks/44410/
Helping me get my 10 wins with Hope is this Shadow Hound deck which combines the time dice Fighting Spirit spellboard package with classic Hope Shadow Hounds.
With so many 1 life units to choose from I have a lot of options during the game. Every card I draw helps me build up my spellboard with focus effects, so quite often I duplicate the Wishing Wing instead of the Shadow Hound, depending on if there is a juicy target to stalk and kill. Build up your Fighting Spirit with tokens and hit your opponent with a big attack, using some combination of Void Pulse, Accelerate, and Stand Still to ensure your opponent cannot block the beatdown. Just be careful to avoid getting clogged, always leave a battlefield slot open for a Seafoam Snapper to eat something or a conjuration to duplicate into!
Harold
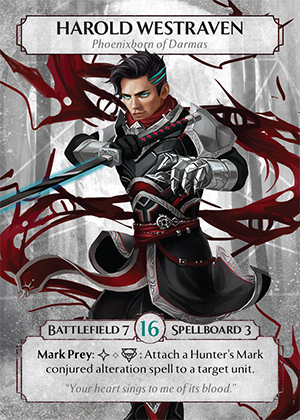
How to win: Harold is the master of controlling the battlefield, and outvaluing your opponent in combat. Hunter's Mark is versatile and can be used in several different ways to ensure victory. First you can use it against high life enemy units to trade efficiently. Put the Hunter's Mark on an opponent's 4 life knight unit and attack with literally any 2 attack unit to take them out. There's usually nothing the opponent can do as every round Hunter's Mark allows you to go up at least 1 dice in combat every round.
Another combination is to use direct damage to take out the enemy with the mark. Any main action direct damage in particular can be used with Hunter's Mark on the same turn to take out a 2 health unit.
Trying to taking out a large enemy unit with a big attack usually means the opponent guards with their PB, using their life as a resource. Hunter's Mark can be used to deny that play so try putting large attack units and combos into your Harold deck, knowing that you can use the large attacks without fear of PB guarding.
Deck Styles: Harold is amazing at dominating and "winning" the battlefield, so your focus should be on what to do with that control. Stack your deck full of knights or burn cards, just remember you have to actually win at some point by attacking your opponent's PB once you have control of the battlefield.
Common Combos: There are many cards which combo with Hunter's Mark. Old Salt is already a great value proposition of a body and a ping damage made even better when combined with Hunter's Mark. River Skald can seem like overkill but allows you to discard 2 cost cards for 4 damage or take out something with annoying Root Armor. Use Hunter's Mark and knights with combat kill effects like Sonic Swordsman to ensure those effects get triggered.
Proven Competitive Lists:
Carl's Collection 2023 Winning PACT deck: https://ashes.live/decks/share/3a12679a-bfab-4847-a9ec-cbdc58bcbdf0/
Killercactus's Pod I Top 2 PACT deck: https://ashes.live/decks/share/236d8dd9-44b7-4875-9be9-4224cc3c75e4/
Brian B's Collection 2023 Top 2 PACT deck: https://ashes.live/decks/share/6600553b-6cc7-4a2d-870d-e27d31f4103a/
The Treatment's Pod II Top 4 Spindown deck: https://ashes.live/decks/share/763330d1-ff15-4889-aa8e-d8fd49fac398/
My Best Homebrew: https://ashes.live/decks/43621/
Helping me get my 10 wins with Harold is this knight heavy battlefield control deck. The key card of the deck is Glory Aspirant which can be used to pull out Light Swordsman, Silver Paladin or Sonic Swordsman. In round 1 the deck usually plays double Sonic Swordsman, by pulling the second copy from the deck with the Glory Aspirant. Sonic Swordsman is a nasty combination with Harold's Hunter's Mark ability. Your opponent may have some way to play around it but once you play the second copy of Sonic Swordsman and combo it with Pride late in the round your opponent should be in real trouble. Ideally your 3 dice cost knights heal damage and survive for round 2 and the game snowballs into your control. There are a lot of powerful options in the deck as well, Light Swordsman can pressure a Phoenixborn guard by attacking something with 2 life. River Skald can pitch one of your many costly cards like Silver Paladin for massive damage and then Shepard of the Lost Souls can bring it back, or vice versa. Chant of Transfusion and Old Salt is as good here as any deck, moving the damage with a side action from Old Salt to take out enemies and heal in one go. Finally I like playing Mirror Spirit as a possible threat, not necessary summoned every round, but if the battlefield clogs up enough via Sonic Swordsman exhausts, it suddenly becomes worth it to summon.
Rin
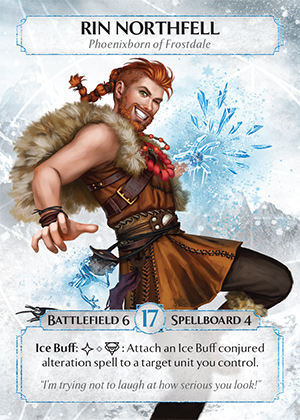
How to win: Winning with Rin is all about using his Ice Buff ability on the unit which benefits the most from it. Changing a 2 life unit to a 3 life unit can have the largest impact since placing your unit outside of double ping removal range can make a big difference. An already tough unit to take out with 3 or more health like a knight becoming even more difficult to kill can also work well.
In general Shattering Fist is a much more powerful removal card than the more situational and expensive Rin's Fury which can admittedly catch an opponent off guard attacking with a knight, since it's rarely played. Note the side action cost for this event and get your Ice Buff or other disposable alteration out early so that you have the option to shatter an enemy whenever is best. A good move to exploit this side action destruction can be attacking a 4 life knight unit with a 1 attack ally. If your opponent doesn't guard the single damage then the extra 3 from shattering fist is enough to destroy their 3 dice investment and make them regret their decision.
Deck Styles: With superior unit health and a powerful removal spell Rin is best suited for controlling the battlefield to his advantage and converting that control to PB damage later. I find Ice Buff is generally more powerful when combined with higher health units, so focusing on making kills without losing your units in the attack can give your opponent very awkward combat math to deal with. However there are also some 1 life units with powerful effects that usually don't get triggered since they die so quickly, you might want to consider building around buffing them instead.
Common Combos: The main reason Rin is in my A tier of PBs is how Shattering Fist combines with Adaptodon for amazing round 1 value. The downside of Shattering Fist removing an alternation turns into a positive since you can trigger Adaptodon's Adapt ability again, and conjure another Adaption alteration. Altogether this can combine for 5 direct damage and a 2/2 unit just for 3 dice, split up however is most useful.
Other common combos are units that benefit from the extra 1 life. Frostback Bear is already a great value proposition that can get even harder to remove with 4 life instead of 3. Ruin Dweller is an example of a 2 dice summon that is often the target of removal, so getting it up to 3 health is great protection against direct damage. Shadow Spirit often doesn't get to even trigger its spindown effect before dying to 1 direct damage so 2 health might just be enough to see it actually attack. It's worth mentioning Ice Golem as an obvious choice for the Ice Buff to trigger the additional life from Skin Morph, but even so the investment of 3 dice into a large unit can be underpowered, so I don't recommend this unit unless you're fine with playing something janky.
Proven Competitive Lists:
Fred's LKA II Winning Adaptodon Deck: https://ashes.live/decks/49763/
Chaos Theory's GenCon 2023 Winning Forstback Bear Deck: https://ashes.live/decks/38694/
Carl Diaz's LKA VII Top 4 Battlefield Deck: https://ashes.live/decks/share/467f6072-73e8-4f9d-a7ab-c36584974d77/
MBauer's LKA I Top 4 Spindown Deck: https://ashes.live/decks/48695/
MBauer's LKA IV Top 4 Spindown Deck: https://ashes.live/decks/share/662608d1-a5c2-4511-8986-68c2ca458e41/
Ninja's LKA II Top 4 Adaptodon Deck: https://ashes.live/decks/48880/
My Best Homebrew: https://ashes.live/decks/48880/
Helping me get my 10 wins with Rin and Top 4 at LKA2 is this extremely fun to play big beastly deck of large units and alterations.
Use the now classic Rin combo of Adaptodon and Shattering Fist to blast your opponents units in round 1. Then tactically decide which of your four summons best suits the Ice Buff in any given round. With 8 dice every round spent on summons the rest of the deck is full of situational actions and alterations. Pump value into your 2 dice beasts by giving them just the right amount of attack, or extra ping to dominate the battlefield. Don't worry to much about losing your large units, just make your opponent waste energy and attacks to take them out!
Odette
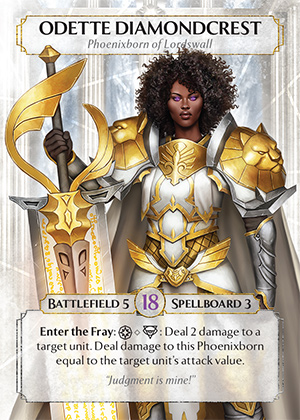
How to win: That sword isn't just for show! Odette brings consistent destruction down upon the enemy. Enter the Fray is the bane of every 0 attack 2 life unit out there, and can also be used aggressively against anything that needs taking out asap regardless of damage to PB. It doesn't get more removal than simply destroy an unit than Sword of Virtue, the ultimate send off for any high health enemy.
My advice, if you suspect a 0 attack unit will get played, like the Raptor Hatchling or Ruby Cobra then hold off on your Enter the Fray, but don't be afraid to use your PB health as a resource and take out that 2 life Winged Lioness or pesky Adaptodon. Between PB guarding, Enter the Fray and destroying a unit with Sword of Virtue you should be able to establish control of the battlefield quickly, just make sure you have a plan to convert that battlefield control into big PB damage in later rounds before all that Enter the Fray damage adds up.
Sword of Virtue is 2 dice for removal, so if your opponent plays a 3 dice knight round 1 its a fantastic trade for you. However what if they play all cheap units round 1? By also playing a large unit yourself you can make the most of the sword's flexibility, take out their knight, or refresh your own.
Armor of Valor is great value over the course of the game, so you may wish you consider play it over Sword of Virtue, especially in round 1 where it will get the most value over the course of the game. Now your PB life total wont take quite the same hit from enter the fray so you can use it even more liberally than usual. Just don't overplay the Armor of Valor, if your opponent summons a 0/2 like Ruby Cobra it might still be the right play to Enter the Fray on them, wasting their 1 dice summon for free. Playing the Armor of Valor will potentially slow down your game plan a little compared to round 1 Sword of Virtue, so consider having a plan B strategy for victory in case your opponent plays very passively, walling up with defencing units and refusing to attack you.
Deck Styles: With the ability to take out key enemy units round after round Odette is the perfect home for combo decks that require protecting specific special units. Combo Enter the Fray with side action damage and you can take out most threats before they can attack. By sacrificing your PB health you can establish control of the battlefield, so even if you don't play big unit combo consider running high attacks units that can convert that battlefield control into enemy PB damage.
Common Combos: Bypass decks are a common combo with Odette, starting with the cornerstone bypass card Frostback Bear. Take out their units with attack high enough to block your fearsome ursine friend, and leave the rest to scramble as you hit their PB. Unit Gaurd summons can make things even more awkward to navigate for your opponent, like Turtle Guard or Butterfly Monk. With only 3 spell board slots you have to make those summons count!
Then there is the question of what units will benefit most from protection and Sword of Virtue refreshing. Realm Walker is always a frustrating threat for your opponent if you can keep it alive long enough. Massive Growth or Wallop can turn your Frostback Bear or other attacker into a unit worthy of attacking multiple times.
There is a possible specific combo with Odette and Shining Hydra you may wish to consider. Use Enter the Fray on the Hydra while it has 1 attack, then give it Massive Growth while you use Regenerate Heads to heal the damage. With just a 2 card combo your Shining Hydra will end up as a 7 attack Terrifying 2 unit, quite possibly enough to win the game with multiple attacks against your opponent's PB health.
Proven Competitive Lists:
Brian B's LKA VIII Winning Silver Paladin Deck: https://ashes.live/decks/share/21181aa6-f6e1-455e-b9cd-4e870404fe5f/
Mbauers' LKA VIII Top 4 Spindown Deck: https://ashes.live/decks/share/3b0d553e-fd22-4e55-a4d7-4241ffbdc89c/
Clu's SB LCQ Winning Realmwalker Deck: https://ashes.live/decks/share/dfda61e5-a82a-4dd2-9f91-1506b3b97775/
Shadowfire's Phoenix Pod I Top 4 Battlefield Deck: https://ashes.live/decks/share/32f91b2c-1ec6-42f4-b304-4a703ac1279d/
My Best Homebrew: https://ashes.live/decks/37819/
Helping me get 10 wins with Odette and first place at the Sunhold Webcam Tournament is my personal variation of the bypass deck, with Steadfast Guardian. Root Armor on the Guardian can make it very difficult to deal with, and if they deal incremental damage Sword of Virtual refresh can be devastating.
Use the classic combo of Shining Hydra, Enter the Fray and Massive Growth to close out the game. To add consistency to the deck, Polarity Mage can pull either Root Armor or Massive Growth from the discard. Use Light Bringer to make your opponent attack awkwardly into the armoured Steadfast Guardian. You can even play Call To Action in response to get another attack out of your bypass Bear or Hyrda. A fun unexpected trick unique to this version of the deck is to play the Massive Growth onto the Steadfast Guardian if you need to. This can really put your opponent in a bind.
Finally, when it comes to closing out the game don't forget those charm dice! Using a charm dice power to reduce an enemy unit's attack below the terrifying threshold of my bear has won me several games!
Tristan
How to win: Tristan's 1 basic side action Magnify ability is a bit like Hope's Duplicate with slightly less flexible aggressive power and more about specific combos with units. Nevertheless, getting the most of out Tristan is usually also about playing aggressively, you want to be able to proactively unitise your ability every round. Tsunami Shot is quite possibly the best unique in the game, with the flexibility to take out whatever combination of enemies you want. Don't be afraid to use it on enemy 4 health knights, it still trades nicely with 2 dice against their 3. Whatever you decide to hit with the 4 deathly arrows, make sure to destroy your opponents units before they have exhausted them, for maximum value.
Deck Styles: Start your deck building by choosing which unit or units you can combo with Magnify. You can diversity you spell board with multiple summons that trigger from the ability, but committing to a single unit having a backup for the dice spend can also work out well. With the second largest battlefield in the game, you can afford to go extremely wide with your units. Just beware the board wipe, and make sure to take whatever aggressive opportunities you have.
Common Combos: For an instant swarm of fish, Prism Tetra is a classic staple of Tristan decks. With magnify on all 3 of them, the 6 attack for 3 dice can be an efficient attack, just keep in mind this locks you into a super aggressive strategy since the fish don't stick around from round to round. Ruby Cobra can supplement or form the backbone of a Tristan deck. The extra attack and mill combine for something fairly high value, especially if you boost it situationally to attack into 2 health units, or combo the Magnify with a second, 1 health unit. Vampire Bat Swarm and Raptor Herder are common options for simply boosting the attack or your wide swings. Frost Frog can be an interesting option to magnify and exhaust a troublesome blocker impeding your aggro progress. Frostback Bear offers something completely different from the other attack boosting options, powerful bypass, since your opponent is far less likely to have a 3 attack unit than a 2 (especially if you focus on killing them!).
Proven Competitive Lists:
Brian's LKA III Winning Agro 0 Attack Deck: https://ashes.live/decks/share/4a01dae3-5bed-4458-ac0b-7097b940231a/
Carl's LKA IV Winning Agro Burn Deck: https://ashes.live/decks/share/96baba07-63a1-48bb-97f1-c8772eee9210/
My Best Homebrew: https://ashes.live/decks/53361/
Helping me get my 10 wins with Tristan is this pretty straightforward and extremely aggressive deck. Magnify the Prism Tetra and throw in a Vampire Bat Swarm if needed to hit your opponent hard and fast. Play Sleeping Widows when they board wipe you for even more attackers. Guilt Link is perfect for trading your exhausted fish for their... not useless unit. The burn in the rest of the deck can close out the game while you never stop applying pressure with attacks.
The key here is not to wait for a perfect swarm attack opportunity. The moment you can trigger any of your group tactics you should swing, otherwise a single Nature's Wrath can set you back significantly. Keep the Tsunami Shot for anything that smells like a unit with alert, like a 4 health 3 dice knight, which may otherwise be a problem for our go wide plan.
Dimona
How to win: Dimona has a lot of moving parts and working out how to sequence your attacks and mounts can be tricky. Promoting an exhausted ally into the Empyrean Mount is a pretty sweet deal, but you need to get an exhausted ally that doesn't die to damage or a combat trade. Allies with exhaust abilities, or quickstrike can help you out here. Understanding the strange details of the combat phase can help you get the most out of your Empyrean Mount. Since it forces a unit to block instead of using stalk to prevent guarding it can be used in combination with other units attacking. It's also rather unusually for a summon has recover 3 which means trading into something smaller and leaving it wounded can force your opponent into really awkward plays to either get rid of it or allow it to heal up.
Divinity Mount is a pretty crazy card and can win you games with aggression and damage. The side action summoning is key to taking out your opponent's board at the most inopportune time. By playing Take to the Skies and then immediately attacking, you can quite often take out an unexhausted 1 life unit on your opponent's board. You really want to hit your opponent's life total with the Divinity Mount and avoid trading. To do this you can sequence the dragon to attack at the end of the round, combo it with the Empyrean Mount which will deal with 1 blocker, and prioritize killing anything with more than one 1 life before the dragon arrives.
On the other hand, Rayward Knight is not a particularly strong card, though it does have some limited uses. For a knight, 3 attack and 3 life isn't a great statline without a super powerful ability. Recurring allies from the discard into your deck can be useful to combat a a very particular problem, running out of allies, and the 3 basic cost can help avoid meditations against fatigue decks as well, so it can be a worthy include for Fallen decks which may have a problem running out of allies.
Deck Styles: Dimona's options are pretty aggressive, and her decks tend to follow. You want to play quite a hefty number of allies to guarantee the Empyrean Mount has a target that hasn’t been removed by your opponent. Divinity Mount is extremely powerful, but it can also lock you into a very specific play pattern of all out aggression, trying to take out enemy 2+ lifers and hitting your opponent’s life total hard. Quick tip here, in a pinch you can even exhaust Dimona without a valid target to set it up for the Divinity Mount the next turn. It’s obviously unideal since you don’t get a Empyrean Mount, but with a committed dragon strategy and no available allies to mount it might be the right play in some circumstances.
Alternatively, a more control style of play is possible with Dimona. Empyrean Mount can provide a lot of value if it trades into the right units, and forcing the block with Battlemaster can deny your opponent the PB guard that usually gives them a leg up on the battlefield.
Common Combos: Combining Dimona with Summon Fallen creates an entire deck archetype. The theory here is that Dimona forces your opponent to choose between two problems, either take out your units and fuel the Fallen engine or allow them to quickly trigger the Empyrean Mount and Divinity Mount chain. If your opponent miscalculates may end up with both anyway!
When it comes to mount targets for the Empyrean Mount, there are a few common options worth concidering. The ally needs to be exhausted which changes things a little from the usually unexsausted mount. Light Swordsman can become exhausted without dying by attacking something with Quick Strike. Raptor Herder or Ptera Herder can go wide enough with swings to avoid dying when they attack, something Light Bringer can also help you with. Rose Fire Dancer is an interesting pick for a more control style deck. Consider spamming enough 1 cost units in general as a potential solution.
Once you have the Empyrean Mount or Divinity Mount you may wish to get more value out of it. Unexhaust cards like Call to Action or Adrenaline Rush can give you a powerful double swing, especially with the dragon, and since they are conjurations, Resummon also works.
Proven Competitive Lists:
Ebfritz's LKA VII Winning Dragon Aggro Deck: https://ashes.live/decks/share/93d5e825-291d-4ee7-af8a-2dd3536dc73f/
Nosuchmethod's Phoenix Pod II Winning Fallen Deck: https://ashes.live/decks/share/9fc800f1-92ff-4947-8cca-fc7b44a762bb/
My Best Homebrew: https://ashes.live/decks/57775/
Helping me get my 10 wins with Dimona is this go wide version of Dragon Aggro. The aim here is to spam Raptor Herder as much as possible, a classic architype of itself. Then, after swinging wide with all your units, play down the surprise summon Mirror Spirit who should come out pretty large. Throw in another classic, the Chant of Transfusion and Old Salt combo and you should be able to get a lot of removal value in later rounds. Hopefully with enough allies getting played and replayed with Shepard of Lost Souls you should be able to summon the Empyrean Mount and then drop the Divinity Mount at the last minute of the round. Get your opponent's life total low enough and you can finish them off with Final Cry and Sympathy Pain. Regardless, keep the aggression up and keep constantly attacking, hopefully this deck can get it done.
Astrea
How to win: The combination of Astrea's consistent and removal-like Beguile and the ultimate destructive power of Judgment makes her my top rated slow control style PB. Use Beguile on anything that looks like key threat, a 3 dice knight ally perhaps, or an important expensive conjuration. Even if you don't actually use Beguile, the threat of it can prevent your opponent from overcommitting on a single unit. Nothing entirely wipes the board quite like Judgment does, so play slowly, and punish your opponent from overcommitting on controlling battlefield.
Mark of the Goddess can also be a nasty surprise, even if its hard to justify giving up even 1 of your Judgments. What seems at first like a downside of the card, burning your opponent instead of destroying a unit, can be amazing value for 1 dice if your opponent is foolish enough to leave a high attack unit as their only unexhausted unit.
Deck Styles: Unlike previous PBs so far in this tier list the key to success for Astrea lies beyond the battlefield, using her control tools to prevent your opponent from gaining a large advantage while you burn, mill, or combo your opponent to death. Astrea can give you a lot of time between board wipes and slowing down your opponent with Beguile, you just have to make the best use of that time to seize victory.
Common Combos: With a small battlefield her as main weakness make sure to pack ping or AOE cards like Nature's Wrath. It might seem like overkill with Judgement in your back pocket but you'll want to wait for a better moment to play the almighty obliteration than when your opponent simply plays a Raptor Herder.
To Shadows can combo in the same turn with Beguile for a 2 dice removal of any unit. Chant of Revenge and Frostbite can provide a slow burn engine to work with Astrea's slow game plan, Abundance or other ready spell mill cards can work well with a slow mill plan. Orchid Dove works well with a Judgment wipe as well as being a mill staple, and Shimmer Wing can give you the card draw you need for the big wipe.
Using Strengthen but on your opponent's unit for a big Mark of the Goddess hit is a great fun combo, though Strengthen itself is generally a large dice investment so you'll want to maximize the value it provides even when you don't have Mark of the Goddess.
Proven Competitive Lists:
Ninja's LKA I Winning Burn Deck: https://ashes.live/decks/53108/
My Best Homebrew: https://ashes.live/decks/53108/
Helping me get 10 wins with Astrea, first place at LKA I tournament and top 4 at LKA V is this slow burn control deck.
Use Ritualist in round 1 to setup the Chant of Revenge burn engine. Every card in this deck is extremely important, either burn or something to discard for Judgment, so don't be disappointed when you never get to trigger Ritual Flames on your Shimmer Wing, its just there for the card draw!
Between Frostbite in later rounds, recurring Fire Archer with a ceremonial dice power and Chant of Revenge, you should be able to close out any game that lasts long enough, the trick is not to lose the battlefield too badly while you drip feed damage.
Use Judgment at a crucial moment just after your opponent has control of the battlefield! If you've still got blockers and Beguile you can hold out for a long as possible for resetting your opponent's progress.
Finally once your opponent is within lethal burn range you can go for the kill. Completely abandon the battlefield in favour of burn cards like Sympathy Pain and Final Cry, to finish off your opponent before they can attack your life point with the units they've foolishly invested time and dice to play.
B Tier
Maeoni
How to win: There are two main flavours of Maeoni, split between classic combo builds for exploiting the best conjuration in the game Silver Snake with the goal of turning it into a game winning attacker, and less tried and tested alternative strategies with Venom Strike or some other exploitation of Maeoni's Command Strike ability.
With Silver Snake employed on the battlefield you can make your goal a multi stage plan: protect, grow and then finally strike. Use allies with Unit Guard to protect your snake from getting killed early while it has no attack. Then use direct damage and removal, or even something like stalk attacks, to take out enemy units and stack those status tokens high on your snake buddy. Finally when they are big enough, the snake can attack with a fearsome total.
Command Strike can be used in combination with the Silver Snake as well. Once you have enough tokens your snake's attack value will kill whatever you desire and fuel the growth of your serpentine monster even more. Just be careful of Fate Reflection!
Deck Styles: With the classic Maeoni combo deck you can grow your snake to a massive attack value and then use bypass tools to hit your opponent's PB life total. Most games of ashes reborn are a back and forth of PB guards and incremental damage, but with a big enough snake 2 or even 1 attack can be enough to clinch victory.
Alternatively you can focus less on comboing the destructive power of the snake and build a more well rounded battlefield deck. With only a couple enemy deaths the Silver Snake is an amazing value proposition on its own with 4 life for only 2 dice. Your opponent may overspend resources removing the snake threat before they realize you have backup options for victory.
Instead of waiting for your snake to grow, Command Strike can also be used in conjunction with units that already have high attack, so consider adding a 3 dice knight ally to your first five for example.
Finally you can go in a completely different direction and focus on the less traditionally powerful Venom Strike unique action card, spamming out Charm Dice across your opponent's battlefield before burning and milling them. Spam those Charm Dice as early as possible in the round and avoid actually killing their units with a more passive game plan.
Common Combos: Maeoni isn't my favourite PB, in part because I find the tried and tested cards that work so well with her Silver Snake don't leave as much room for the creative deckbuilding Ashes is known for. Gilder is an amazing conjuration for both protecting the Silver Snake with unit guard, slamming direct damage into enemies and even more status tokens for the snake when the Gilder dies. Explosive Growth is also almost a must in any snake deck, the multiplication factor can provide your snake with insane amounts of attack. Finally Hypnotize is usually the go to bypass combo card to guarantee your massive attack is the game winning move.
Proven Competitive Lists:
Kaile's SB5 Winning Bypass Combo Deck (Old): https://ashes.live/decks/share/de331ca9-2626-4615-82d3-4ec1c7558776/
Carl's SB3 Winning Bypass Combo Deck (Old): https://ashes.live/decks/share/751e31fd-1c5b-4b01-8a2e-f96d241dd709
My Best Homebrew: https://ashes.live/decks/53294/
Helping me get 10 wins with Maeoni is this divine heavy take on the classic snake deck. It's got the usual suspects of Summon Gilder, Explosive Growth, and Hypnotise to feed the Silver Snake, power it up and then bypass for victory.
Additionally Royal Charm is a nasty combination with Silver Paladin which can be recurred with Glory Aspirant and Shepard of Lost Souls. After killing something to feed the snake with the Silver Paladin, 4 attack is perfect to combine with Command Strike.
This deck is quite tricky to play, keep an eye on your dice and avoid running out of cards in the round by spending incorrectly. The key to success here is to try and predict your opponent based on their dice spread. If they are running 2+ divine dice themselves be wary of your opponent playing their own Silver Paladin to eat your snake. You can get away with summoning your Silver Snake later in the round. If your opponent has an illusion or time dice power side be wary of a Fate Reflection and keep back your command strike combo in reserve or spend your dice elsewhere. Finally, don't forget to use your royal charm dice before the end of the round, don't pass early without putting it on an enemy unit, or you'll be stuck with only 9 dice to spend next round.
Coal
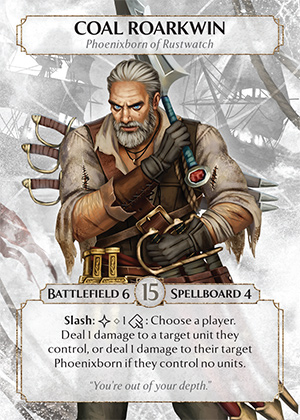
How to win: Coal is often times a tricky to play yet has to potential for a very high damage ceiling if you become master of the ping damage. Slash is an oddity amongst the PB abilities, costing a card instead of a dice and being repeatable during the round. To win with Coal the question often becomes how to get the most opportunities and value out of your slashes, without milling yourself to fatigue with card draw, or running out of cards in hand to actually play with your dice. Either you need to be a little more conservative than you might expect, slashing at key moments to remove 1 life enemies, or alternative go for the win quickly with Coal, spamming Slash as much as possible before running out of a deck becomes a problem.
In general main action direct damage pairs nicely with the additional side action Slash. You always want to be spending your resources on killing enemy units before they have a chance to exhaust for any value. One Hundred Blades is generally the superior option Final Stand and can nicely to combed with slash to simultaneously take out 2 and 1 life remaining units. Nonetheless, I like Final Stand as a nasty surprise for taking out an expensive unit when your opponent thought they were somewhat safe.
Deck Styles: There are two main ways to deck build around Coal in my opinion. To best use the Slash ability you going to need cards, so one way to build your deck is around a card drawing engine. The sheer amount of dice-less direct damage can be extremely hard for your opponent to deal with. Alternatively with a more expensive spell board of conjurations you can Slash more with the 5 cards you draw every round, since you already have something to spend your dice on.
The side action nature of Slash means you can play a strange mixture of aggression and control with Coal. Take over the battlefield and destroy your enemies by flinging cards at them, but also use the windows of opportunity your slashes open to attack the enemy PB. If the game is a close one with both players low on health, Coal can put pressure on early in the round by dumping their hand at the opponent and swinging an attack in for the win.
Common Combos: There are a few different options for extra card draw in a Coal deck, but Wishing Wing has the highest potential, since the more tokens you stack on it, the more cards you draw. You can include whatever parts you want of the entire time dice ready spell token support package. Time Hopper and Tidal Crab to add extra tokens, Seafoam Snapper to ensure the Wishing Wing dies and you get the card draw when you need it, and Fighting Spirit as a payoff for all your units inevitably dying. Even with only one source of extra tokens or the focus 2 effect on its own card, Wishing Wing can be enough card draw for a lot of Slashing.
Abundance on the other hand offers a very different kind of card draw, one that strangely leans Coal into mill. Without this card playing for fatigue damage seems like an odd choice for Coal, since you might Slash your way out of a deck faster than you can mill your opponent, but the consistency of Abundance's extra 2 cards per round is a hard opportunity to pass up so you might as well also try to leverage the potential burn damage if your opponent runs out of a deck and you can get all 3 copies into play.
Fester is another common card worth mentioning. The side action slash followed up instant death can be the cheapest removal in the entire game, and a worthy inclusion in any Coal deck.
Proven Competitive Lists:
Mbauers' LKA V Top 4 Battlefield Control Deck: https://ashes.live/decks/share/ddade9ae-5036-4292-93b0-04ee5d7ad688/
Brian's SB Worlds 2022 Top 2 Wishing Wing Deck https://ashes.live/decks/share/759bff2a-1634-4b67-a663-2073ff8a1558/
Mbauers' SB Worlds 2022 Top 4 Spindown Deck: https://ashes.live/decks/share/cf330532-27e3-445f-aa05-0364f36cdb75/
My Best Homebrew: https://ashes.live/decks/share/96dc4827-514c-449c-9ec5-6bed9ac9ae24/
Helping me get my 10 wins with Coal is this tricky but incredibly fun wound token deck. Use Tidal Crab and Wishing Wing for some classic Coal card draw ammunition. Then in later rounds, the spell board and allies are so expensive that you should be able to toss quite a few cards away from hand for Slash. With only 2 time dice just make sure to summon the Wishing Wing first before the Tidal Crab!
Combo Infuriate on the Dread Wraith with Flute Mage for multiple attacks. Adept Duelist can be key for removing your opponent's annoying Root Armor and Slash Fester for anything else large enough to be a threat. Blood Brawl is the key to the deck, between Dread Wraith attacking or blocking an enemy unit, Old Salt and Phoenix Attendant you should be able to set up a nasty 3+ damage wipe on your opponent, and finish the stragglers with a Slash.
Jessa
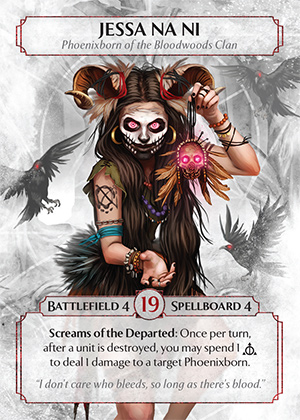
How to win: Jessa's Screams of the Departed offer a strange inversion of most PB abilities which usually help you establish control of the battlefield or empower the rest of your deck. Instead Screams offer a way to close out the game, adding inevitability to your strategy. The key is to identify when and how much to Scream, too early and your opponent will covert their battlefield advantage into victory, too late are you'll struggle against an opponent with a different powerful PB ability that's helping them win the game.
Fear is a fantastic removal card which can even avoid your opponent's on death triggers as a bonus. The downside of killing your own unit can be turned into an advantage with your own cards that trigger on death. Playtime in contrast is a generally much less powerful card but for a more prison focused blood puppet deck is a great inclusion. 1 dice for 1 Blood Puppet is the normal ratio for your summoning book which isn't that amazing value. Avoid deliberately killing the unit you attach this card to and play it on a fairly large unit, locking down down the board and frustrating your opponent.
Deck Styles: The ratio of 1 dice for 1 burn Screams of the Departed provides isn't as good as the best dedicated burn cards you can play in Ashes Reborn. There's 2 ways to deck build around this fact, focus on your deck providing a means to control the battlefield and use Screams to finish off your opponent in a close game once their health drops low, or go all in on burn, spending your dice in later rounds not only on more efficient burn cards but also on Screams, for a big burst of direct PB damage.
Besides the burn Jessa always provides to finish off your opponent, a great number of styles are available. You can play super aggressively and try to hit your opponents life total as quickly as possible, though you'll need to focus on bigger units like 3 dice cost knights, since your battlefield of 4 prevents you from going wide. You can alternately play prison, with blood puppets or even a kneel deck. In general your plan is to slow the game down enough for your Screams to eventually win the game. If you really play your prison cards right your opponent might have leftover dice each round while you've spent yours on Screams.
Whichever deck strategy you play, don't Scream too early! You'll want to avoid any in round 1 for example while you setup your board, which will put you at a disadvantage vs an opponent with a powerful ability they get to use while yours is irrelevant. However, stabilize in time and Jessa can make it look easy, screaming your way to victory.
Common Combos: Chants are often used in conjunction with Fear, since you'll be killing your own units. Chant of Revenge is the common choice, and you can double down with Ritualist round 1 for maximum burn. As well as Fear you can also run Blood Chains or Reclaim Soul. These cards will ensure you don't get clogs as well as triggering your chant engine. Since you're slowing down the game and can't afford to play too aggressively mid round with such a tiny battlefield, Butterfly Monk or Turtle Guard are often used to try to survive while you Scream. Then of course there is the usual duo of hyper efficient burn cards, Sympathy Pain and Final Cry often included to match Jessa's general burn victory plan.
Alternatively you can try to get maximum puppeteering with all three Playtime, Summon Blood Puppet and Blood Puppeteer. Mix in Chant of Transfusion to remove wounds from your opponent's puppet "friends" and some self sacrifice tools to ensure your Puppeteer actually dies at the right time.
Proven Competitive Lists:
Brancus' LKA IV Top 4 Burn Deck: https://ashes.live/decks/share/25601f86-829b-4652-a5e2-6fff91982a55/
Ebfritz's LKA IV Top 4 Burn Deck: https://ashes.live/decks/share/5343b4de-910e-4789-a151-c21e9a695969/
Brancus' LKA II Top 4 Burn Deck: https://ashes.live/decks/share/43a5002a-9510-44e9-9105-1244c9439e39/
My Best Homebrew: https://ashes.live/decks/37164/
How much burn can you burn? The answer is yes. Helping me get 10 wins with Jessa is this slightly silly and a little evil version of Jessa burn. Other decks take time to setup and use Chant of Revenge or something else to gain board control. Bah, who needs any of that stuff where you are burning your opponent all the time every time!
Start with the Light Bringer book and then play Hunt Master. The goal here is you then summon the Light Bringer, force them to attack (which you guard) and then hit their PB with everything you've got. After the goal is simple, survive and Scream!
In round 2 you'll obviously draw 1 copy of Meteor and all the burn spells. Wipe the board at exactly the right time just before your opponent swings for damage and finish them off with some burn and also some more burn. Law of Fear also works to slow down your opponent from actually achieving anything while you spend everything else on burn. Bonus points if your opponent is playing a low life total PB like Coal, it might be a short game.
Leo
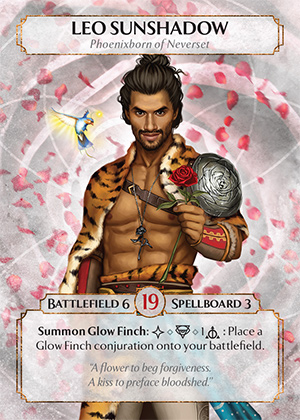
How to win: The Glow Finch is an extremely high value unit, a basic dice sink to provide flexibility to your other cost, often sought after unit guard and when it dies you're actually pretty happy since you get to mill 2 cards and summon it again next round. The key to getting the most out of the Glow Finch is therefore in 2 part, the cheap and easy guard and the mill.
Anguish is an interesting card, since you might think its also a mill card of sorts, forcing your opponent to discard cards and lose dice. In reality your opponent usually simply cannot afford to lose those dice and cards, so Anguish actually ends up being a fairly powerful burn card instead! This puts Leo on a strange third trajectory. If things weren't confusing enough for Leo,
Gifted Rose represents another potential line of play, making key big attacks you really want to hit their target, essentially Harold's amazingly powerful Hunter's Mark (he is the number 2 PB in the list for a reason) but at a cost of 1 dice.
Its worth noting here that neither unique card is particularly powerful compared to other PBs, the value of Leo is mostly in his Glow Finch. Some players will even build decks with neither card included if they don't suit the deck.
Deck Styles: With all these different powerful yet different elements deckbuilding for Leo can be tricky but rewarding. The most obvious place to start is the 2 mill you get from the Glow Finch. With an all out mill list you can also use the Finch to protect your other mill units. Slow the game down enough and your opponent will eventually (or quickly with what they call Turbo Mill) lose to fatigue. Alternatively you can focus on the unit guard of Glow Finch, with the mill an incidental nicety if the game turns into a longer slog. Control the battlefield with Gifted Rose, and play big key attackers you know you can protect and hit hard with. Finally with Anguish you can even play a strange mill burn hybrid. After all, what is fatigue damage if not burn that takes a while to kick in?
Common Combos: If spamming the Glow Finch is your kind of thing, then consider the common inclusion of Generosity to summon it more than once per round. If your opponent refuses to kill the Finch or perhaps even more annoyingly exhausts it, Redirect or Natures Wrath can be nice ways to ensure it dies anyway and you can resummon it.
Charm dice in general are a good fit for Leo mill decks, with the usual suspects of Farewell, Rile the Meek, Flock Shepherd and any combination of the 0 attack charm summons for your spell board. Abundance can also work well if your goal is to mill your opponent as quickly as possible.
For getting value out of Gifted Rose the same logic here applies that it did for Harold's Hunter's Mark. Units like Sonic Swordsman that benefit from ensuring their attacks don't get guarded can be a nasty combo.
Proven Competitive Lists:
Brian's LKA VI Top 2 PACT Battlefield Deck: https://ashes.live/decks/49061/
Brian's LKA IV Top 2 Mill Deck: https://ashes.live/decks/50977/
Carl's Gifted Rose Deck (LKA VI Top 4 by Alfred): https://ashes.live/decks/share/7f174d8d-e0ba-460b-abff-911a40ac82c4/
Killercactus' LKA I Top 4 Turbo Mill Deck: https://ashes.live/decks/share/bb7aaf92-5dc0-454e-9d93-3ced8d865833/
My Best Homebrew: https://ashes.live/decks/46398/
Helping me get my 10 wins with Leo is this 0 attack spam deck, pumping out enough units in round 1 to give anyone trouble!
After summoning all your 0 attack units in round 1, play Gates Thrown Open to do it all again! you'll lose a few units to attacks of course, but hopefully not before you mill your opponent with a Glow Finch guard. Time it right and you can summon Shimmer Wings back to back, threatening the Eternity Flame. After banging their head against your wall, the opponent will run out of cards from hand and deck and have no option but to start attacking fatigue damage.
Saria
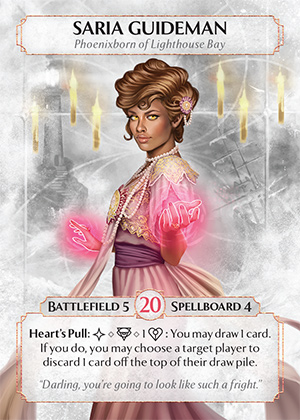
How to win: With a massive life total of 20 Saria is going to be in the game for a while, and threaten some explosive power and some subtle power while doing so. In most cases you want to play with Seaside Raven one of the best summons in the game. Your opponent will inevitably try to play around their units getting eaten, but the threat alone can be powerful. And of course, given the option snaking on a lovely 2 health 2 dice unit doesn't get much sweeter with Prey. For later rounds, Willpower is just an incredibly high value removal card, you don't even really need to deck build around, just play it early in the round to take whatever you feel like off the board. Hearts Pull is where things get a little tricky since on the face of it mill 1 and draw 1 for 1 dice is pretty good but not exactly what you need every round. Should your opponent pass before you, is a really nice side action ability to trigger before passing yourself, just like a frog dice power.
Deck Styles: Seaside Raven is a powerful unit on the battlefield, but often you have to wait for the right time to play it. Hearts Pull also leans into a more long term plan with incidental milling. I find therefore Saria usually suits a control style of gameplay, not so extreme to give up control of the board, but something that is happy to pass early in the round and force your opponent to make mistakes. Having 3 basic sinks with Seaside Raven is something you can utilize to play a more particular dice spread without leftover awkward dice and nothing to spend them on.
Common Combos: Seaside Raven offers some fun combos to get the best value from the super powerful prey ability. Body Inversion can be used to swap the stats of a low attack unit and feed them to the hungry bird. Resummon can get you double the bird each round. Attacking with quick strike often leaves the Seaside Raven alive for resummoning and if your opponent kills the Raven, at least you can summon it next turn and get the Prey effect again.
Proven Competitive Lists:
Ninja's LKA III Top 2 Burn Deck: https://ashes.live/decks/49140/
Carl Diaz's LKA VIII Top 2 Paladin Deck: https://ashes.live/decks/share/896fd751-f0ab-49fd-944f-fa0d702f034e/
Ninja's LKA VIII Top 2 Battlefield Mill Deck: https://ashes.live/decks/share/a3f53845-740d-445a-ab21-504cc2ea4b84/
Mbauers' LKA III Top 4 Control Deck: https://ashes.live/decks/share/5298a54a-da73-4656-a84e-8c14f3e67885/
Mbauers' SBI 2022 Top 4 Mill Deck (Old): https://ashes.live/decks/share/c560530f-be57-4a60-a59f-3b49b7cf67ed/
My Best Homebrew: https://ashes.live/decks/49272/
Helping me get my 10 wins with Saria is this hybrid mill battlefield deck with tons of removal. Each type of threat has an answer, Farewell and Willpower can take care of large units, Seaside Raven and Ice Trap can eat mid-range units like nothing else can, and between Ruby Cobra and the ping damage from Adaptodon, Enchanted Violinist and Return to Soil you've got something for 1 life units as well. Should you need to, you can lean into bypass with Clashing Tempers to take out blockers for an attack, or the classic Wallop on a Frostback Bear.
The idea here is that while destroying your opponents units and trying to control the battlefield, you're also milling your opponent slowly, so a long game can benefit you as well as your opponent goes to fatigue. Don't focus on mill too much though, the priority here is battlefield control. If you can afford to get a cheeky Heart's Pull in before passing in a round, all the better but don't feel like you have to use the ability if you can spend your dice elsewhere.
Xander
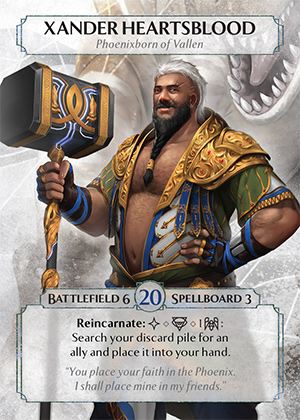
How to win: Another Phoenixborn with maxed out life points of 20, Xander can outlast a lot of damage, and the recursion of Reincarnate make him somewhat mill resistant as well. They key then for Xander is to play the long game, a nasty counter pick against burn and mill, but with a semi-one sided battlefield wipe Earthquake, unlike other Phoenixborn Xander doesn't have to rely entirely on alternative win conditions or strange play styles to win, he can play the battlefield pretty effectively.
Reincarnate isn't something you want to incorporate into your first five, its just too inefficient. Instead you can build your deck around a key ally, and bring it back when it dies, using Reincarnate as the ultimate backup plan. If that ally is important enough to your strategy, then your opponent will get frustrated when they see it return, even though it cost an extra dice. Reincarnate also allows you to leave the ceremonial dice type behind without losing out on ally recursion, something that's worth considering when deckbuilding. Earthquake is a super powerful card to be able to rely on to wipe your opponent of cheap swarming enemies as well as a large unit. Consider running units with Armored or simply higher life totals that 1 to survive the damage and make the wipe even more one sided. Try to time the Earthquake to hit something big enough with the 4 damage and watch out for a illusion or time power side showing in your opponent's dice pool, they may have first fived Fate Reflection against you.
Deck Styles: Since Xander's power is quite generic, with excellent stats and resistant to both mill and burn strategies, he plays best with a solid plan B and a pivot depending on matchups. Against a PB trying to mill you out to fatigue damage, you can focus on reducing your meditations, putting on battlefield pressure the while game, and recurring allies with Reincarnate. A key Earthquake might be enough to secure you the battlefield. Against a burn deck you can focus on pumping out as much attack as possible, with big units and the extra time your high health affords you in the matchup. Your plan B needs to be pretty solid however, since against the powerful battlefield focused PB like Harold and Rin, you may struggle to obtain an edge. Instead, you can develop your own plan B alternative win condition incrementally, while not giving up too much battlefield presence.
Common Combos: For an insane amount of survivability, Heal, Butterfly Monk and/or the classic PACT Phoenix Attendant and Chant of Transfusion combo can be used to heal your life points. Just make sure you actually have a plan to somehow win while surviving damage. Frostback Bear or Turtle Guard can work well with Xander since a unit with 3 health can thrive in an Earthquake rich environment. If you do run a bunch of high health units that can survive the Earthquake, Blood Brawl can be a powerful follow up the next turn.
Proven Competitive Lists:
Ninja's LKA VI Winning 0/2 Fatigue Deck: https://ashes.live/decks/share/7c8802d7-585b-4a26-9317-e96fbed9593c/
Brancus' LKA V Top 2 Burn PACT Deck: https://ashes.live/decks/52072/
My Best Homebrew: https://ashes.live/decks/share/491775c3-d59f-407e-978d-943c2297ee43/
Helping me get my 10 wins with Xander and win LKA VI is this removal heavy 0/2 mill list. Each of the 3 summons have 0 attack and 0 health, so they can benefit from Flock Shepherd's protective abilities. Try to sequence the Flock Shepherd after you have a Gilder in play, who then should be able to protect you from at least 1 lethal attack to the Flock Shepherd. Later in the game, you can recur the Flock Shepherd with Reincarnate, which can be very annoying for your opponent if they are expending a lot of effort to kill it the first time.
Shimmer Wing can put a lot of pressure on your opponent to swing at units, which can save you in the long game. You generally want to attack promptly with Ruby Cobra for the mill, unless your opponent only has an alert unit don't be too precious about lining up the perfect attack, you don't want to have the Ruby Cobra attacked itself. Farewell is as powerful as ever, don't waste it on a low health unit if you can help it, taking out a 4 health knight for 4 dice is definitely worth it for the 4 mill. The more you can keep your 0/2 around for the next round the more likely you can pull off a nasty Rile the Meek, 2 damage is acceptable to kill one or 2 key enemy units, 3+ damage from Rile the Meek and you are having a wonderful time.
0/2s work well with Earthquake but there isn't much strategy here, just value, since your 2 health units won't die from the Earthquake. Finally its worth considering using Reincarnate on Rose Gardener if you don't draw into it. Spam cultivate side actions until you have enough class sides for a big Farewell without eating into your own deck.
Koji
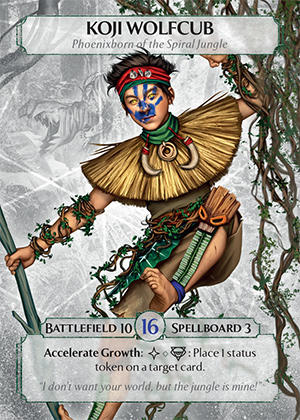
How to win: The boy wonder of ashes is all about status tokens and having a massive battlefield. Accelerate Growth is free, often the sign of a good PB abilities, and can pump out a token every round wherever it is needed. With 10 battlefield (the largest in the game) you basically don't have to worry about getting clogged or stuck in an awkward battlefield prison, so feel free to ditch those self-sacrificing cards in favour of spamming lots of cheap units without a care in the world. Your starting point for exploiting Koji is to work out what will best benefit from status tokens, and building your deck around those cards. Wolfpack Leader provides an inbuilt beneficiary for the Accelerate Growth, but only use it to get an extra Pack Wolf if the tokens run out and you won't hit the conjuration limit. Even without any extra tokens, the Wolfpack Leader is fantastic value and a worthy inclusion in the first five. Lick Wounds is a less obviously powerful option, but does provide the flexibility of even more status tokens from Koji becoming unexhausted, or a unit swinging twice in the round.
Deck Styles: Koji's big problem is his low life point value at only 16, going aggro can be difficult without dying first. Nevertheless, one option for Koji is to fully unitize his large battlefield and swarm the field. For this strategy I'd recommend attacking often, and don't let your battlefield of unexhausted 1 life units build up and get decimated by a Nature's Wrath. Another option for Koji is to focus on the status token combo. Find a card to really exploit with status tokens, and pack the removal, protection and control tools to ensure that it happens.
Common Combos: You can't talk about Koji without talking about the specific cards he can add a status token to. Having a few of these cards in your deck to exploit is the key to success. The most powerful is the Indiglow Creeper who has no in built way of getting status tokens, but rockets in value every time you trigger the Luminous Seedling's Blossom ability and turn it into 2 Brilliant Thorns. With a large, swarming deck, Hunt Master can be topped up, turning your Accelerate Growth into an extra free attack. Sticking a status token on Guilt Link provides a sneaky guaranteed kill, and with Koji you'll probably have a unit you don't mind dying lying around somewhere. Just don't do it if it looks like your opponent will attack and give you the token anyway. Mirror Spirit and Wishing Wing gain attack from status tokens, as does the Emberoot Lizard, so may be worth including. Then you can all the other status token support cards, like the ever valuable Guilder or ultimate spam unit the Time Hopper.
A different direction to take Koji is to combo with Fallen, the slow moving ultimate value engine that's perfect for his massive battlefield. You could also consider a Prism Tetra build for similar reasons, even the janky but fun Radiant Leviathan has a sort of a home with Koji.
Proven Competitive Lists:
Carl's Phoenix Pod II Top 4 Creeper Deck: https://ashes.live/decks/share/c22685b7-610a-459c-a6f0-9c1cbef390b7/
Ninja's SB LCQ Top 4 Creeper Deck: https://ashes.live/decks/share/c22685b7-610a-459c-a6f0-9c1cbef390b7/
My Best Homebrew: https://ashes.live/decks/55382/
Helping me get my 10 wins with Koji is this classic Indiglow Creeper list that's all about cracking open those seeds! Everything is centred around the creeper. The Gilder keeps the Luminous Seedling alive and gives it a token upon death. The Tidal Crab is the ultimate token dispensing machine for the Seedling.
If your opponent refuses to counter the Creeper, use Seeds of Aggression with your exhausted Creeper and take it out along with an enemy. Fate Reflection can protect your Seedling from direct damage effects like annoying Odette and Aradel. Then, should you still have extra tokens, stick them on the Wolfpack Leader or the Hunt Master. Build up wave after wave of Brilliant Thorns and outvalue your opponent to death on the battlefield!
Echo
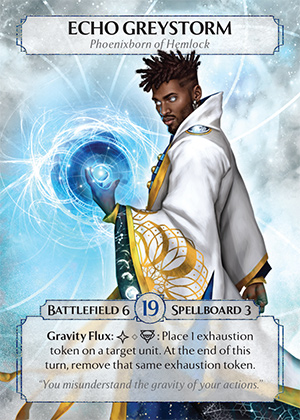
How to win: Echo is all about those nasty blue exhaustion tokens, and manipulating them to your benefit. A good Echo play can leave your opponent feeling helpless, since you're taking away their ability to use their units effectively!
Gravity Flux is a combo ability, having no value on its own (since the token only lasts for that turn), but having value when combined with different main actions. The most straightforward combo you have available to you is to turn any attack into a counter-less quick strike-esque attack. Gravity Flux an enemy unit and then swinging for the kill will be enough to make your opponent Phoenixborn Guard early, or accept a one sided unit death that would normally get to trade with your unit.
Chaos Gravity has the amazing potential value of 3 total exhaustion tokens, the key to getting the best value from it is to build up a battlefield state that benefits from the token shift part of the card. First you want a powerful unit to remove an exhaustion token from. That can ideally be a three dice knight like Sonic Swordsman but it can also be something a little less powerful like a 2 dice summon Winged Lioness or Ruin Dweller ect. Your opponent will no doubt have something worth exhausting, unless they are in real trouble. Moving 1 exhaustion token from a unit to another unit controlled by the same player, is where your deck could actually benefit from weaker units. Working towards a battlefield with 2 exhausted powerful units and 1 weak 1 dice ally like Fire Archer can produce ultimate value from your unique, but it can be tough to setup. Keep an eye out for the same setup on your opponent's board, keeping a weak enemy unit alive can be worth it, to switch their exhaustion token with your opponent's knight!
Deck Styles: Echo decks are usually a unique kind of aggressive control. You want units that are worth unexhausting, so that means beefy units that can survive an advantageous attack or combo with Gravity Flux. You can try to trade out the battlefield in a traditional manner, swinging for the win when you have dominance, or you can focus on bypassing your opponent's units altogether. An Echo with a top of round swing is very scary, since you can simply remove a blocker from the equation using Gravity Flux! This can make end game battlefield maths go very well for the king of blue tokens, since you can also leave an enemy unit left alive the round before.
Common Combos: Chaos Gravity has a few common combinations with powerful knights that get value from attacking. Sonic Swordsman and Realm Walker stand out as the best attack trigger units in the game, Realm Walker in particular can be downright oppressive, but the 3 life total makes them very vulnerable to removal. Hunt Master provides a great target for Chaos Gravity double exhaustion with the Panther Spirit. Light Bringer is great in any deck, and can be particularly good in Echo to force the battlefield into the exhaustion heavy game state you want. Once everything is exhausted, Mirror Spirit is a common inclusion to benefit from all the blue tokens.
There are also a few card specific common combos for Gravity Flux. False Demon can ping something before it has a chance to act. A counter intuitive but very powerful combo is possible with Kneel by using Gravity Flux on your own unit. Because it already has a fake exhaustion token it won't be effected by Kneel, leaving everything else but your unit exhausted once the turn ends.
Proven Competitive Lists:
Apple Sith's Phoenix Pod I 2023 Top 4 Battlefield Bypass Deck: https://ashes.live/decks/share/f3e93161-df95-4c47-93dd-06da4806549b/
Carl's SB March 2022 Winning Battlefield Bypass Deck (Old): https://ashes.live/decks/share/0f614f1e-6402-41a1-90bc-14826b74a6b4/
My Best Homebrew: https://ashes.live/decks/56292/
Helping me get my 10 wins with Echo is this control heavy battlefield bypass deck, which aims to setup a powerful board state and convert that control into massive damage attacks to your opponent.
Wallop is the key card here, the goal is to attach it to something you can then unexhausted with Chaos Gravity or
Flute Mage. Combo Gravity Flux with a False Demon summon, or if your opponent has a 2 life unit, force a nasty non-trade with Gravity Flux and one of your many attackers like Frostback Bear. Wait for the end of round to get the most attack on a Mirror Spirit (if you really need the extra status token you can also do a cheeky Gravity Flux combo here as well.)
If the opportunity arises and you think you can dodge the removal, this deck can use bypass to deal massive amount of damage with Beast Mage, Frostback Bear, one of the alternation cards like Clashing Tempers, and unexhaustion from Chaos Gravity or
Flute Mage. But it can also win by just trying to control the battlefield instead, converting those attacks into dead enemy units.
C Tier
Aradel
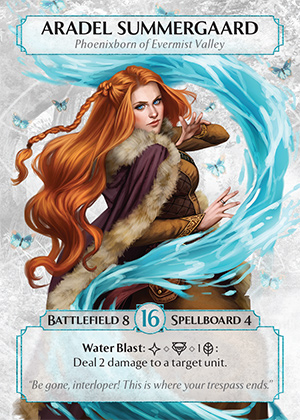
How to win: Aradel threatens powerful and efficient removal. You always want to use her Water Blast ability every round, taking out an enemy unit the moment it gets played before it can provide any value. 2 damage is simply more damage than usual for 1 dice, and if you combo it with other, main action direct damage you can maximize your opponent's loss.
Unfortunately Aradel's lack of super strong unique card holds her back and in my C tier. Blue Jaguar can provide combo value to bypass your opponent's units, but the stats of 1 attack and 2 life for 2 dice are bad for even a non-unique. Rejuvenate has much greater potential in my opinion, unlocking the aggressive power of your conjurations. Once it's powered up with tokens, 1 dice for an unexhausted is definitely a good value proposition, just still not that mind blowing compared to other PB uniques.
Deck Styles: Since getting the most out of Water Blast is key to success, Aradel usually suits a battlefield control style of play. By removing a key enemy unit of your choice every turn, you can put a dampener on whatever would otherwise give you the most trouble of your opponent's spellboard. Controlling the battlefield this way could be the setup for a bypass combo deck, swinging over the heads of your opponent's exhausted units, or it could be something more straightforward, dominating the feild until you have a large attack. Key large attacks in general I think work well with Aradel, since Water Blast can be used to take out a key defender before hitting your opponent's PB directly.
Common Combos: When your opponent plays a 2 dice, 2 life unit on the field for you to Water Blast, you're in for a good time, and up 1 dice on your opponent already when you give them the almighty slap. However, why stop there? Main action direct damage like Summon Guilder is an extremely common combo with Aradel, since you can take out a 3 health unit in one go if the opportunity arises. Even something less straightforward like Natures Wrath or Seeds of Aggression can combo with Water Blast and get you to 3 damage.
Blue Jaguar can combo with other bypass tools like Frostback Bear. For bypass to work you'll need a big hit to your opponent's life total. Massive Growth in a classic to turn your Frostback Bear into a massive bear. Exhortation is the ultimate bypass combo dream and with the right setup can do crazy amounts of damage. Mirror Spirit can also explode into game ending damage land with Explosive Growth. Surprise your opponent's last blocker with a Stand Still or Crescendo and you might just be able to close out a game from nowhere.
Rejuvenate has a bunch of interesting potential targets. You can build your whole deck around Indiglow Creeper as one example. Using Aradel and Rejuvenate allows you to attack twice with the initial Creeper, assuming your opponent refuses to counter it (often the right more versus the annoying summon). As a backup, attacking twice with a 3/2 Brilliant Thorn is pretty powerful as well. Ruby Cobra is a 1 cost unit your opponent often has trouble dealing with efficiently soo will often have the chance to attack more than once. With the right combo of damage or Infuriate, Dread Wraith can be a high value conjuration to attack with more than once, and if Iron Rhino wasn't such a janky investment of so many dice it could work well too.
Proven Competitive Lists:
Brian's LKA II Top 2 Creeper Deck: https://ashes.live/decks/49769/
My Best Homebrew: https://ashes.live/decks/38905/
Helping me get my 10 wins with Aradel is this dinosaur filled deck of big monsters. The plan here is to mount as many times as possible and simply use a constant attack of heavy hitters to take over the battlefield. Archasaurus Mount and Cerasaurus Mount have plenty of targets with all the 1 dice allies that have an on enter ability like Fire Archer and Anchornaught. Use Butterfly Monk to protect your big units and Shepherd of Lost Souls to recur your opponent's removal of your cheap allies. Aradel's 8 battlefield should allow you to spam as many units as you need, and the Water Blast will remove something mathematically problematic for your big dinos. Finally, when your opponent is low on life, you have quite a few ways of closing out the game, with Frost Bite burn, Archasaurus gigantic 2 bypass, Cerasaurus overkill or even just a wide swing with Raptor Herder.
Noah
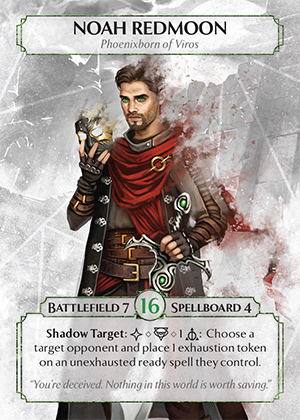
How to win: Noah is a tricky character to play against, since he can disrupt your spellboard plans with his Shadow Target, denying you a key summon each round. Understanding how to exploit this ability the most requires you to think about how your opponent will respond. In round 1 against Noah you'll most likely overload your hand with more cards than you can afford, to offset the lost spellboard slot. You might also keep your most important summon for later in the round, hoping Noah will waste the Shadow Target on the first book you play out. So when playing as Noah himself you can keep these strategies in mind. Consider not using the Shadow Target in round one, you'll still have disrupted their initial plans. Consider waiting, and trying to assess if the spellboard card they played is good enough to Shadow Target. Maybe the best is yet to come, and more expensive spellboard summons will be more disruptive to cancel. Keep the enemy guessing and it will be harder for them to play around your annoying ability.
Summon Masked Wolf is a hard card to justify even though it's a unique. The book tax makes the first time you summon a wolf cost 2 dice, not really worth it for the 2 attack 1 life stat line that usually only costs 1 dice in the ashes card pool. The focus effect is fantastic but the cost here is pretty bad as well since you're paying an extra dice again to play the second and third book! If you get through all that initial cost however there are some powerful swings you can make, utilizing the side action combo to spam out a bunch of units. Focus on trades and with a clear battlefield and the first turn of the next round you can potentially pump out an wide attack out of nowhere for the win. The side action summon of the Masked Wolf also prevents them from being weak to direct damage removal like Frog dice power or Forked Lightning, since you summon and attack with them in same turn the moment a nice target for the attack appears.
Shadowblade on the other hand is great value. Dealing 2 damage for 1 dice is pretty good and the fact that its a reaction spell makes it even better since your opponent can't safely attack with 1 health units without potentially leaving themselves vulnerable. The 2 card draw is a nice additional benefit and allows you to deck build with slightly cheaper cards than usual, knowing you have the draw into more cards to play.
Deck Styles: Noah typically leans into aggressive trickster explosive attack decks or long term fatigue decks. Shadow Target can mess with your opponents plan, but doesn't necessarily give you a mathematical advantage in trades and winning the battlefield. Aggressive decks will therefor have to maximize your opponent's inability to summon the perfect answer for your threat, perhaps by summoning lots of 1 health units and preventing suppressing sources of single damage, or playing big knights and using Shadow Target anything with high attack. Fatigue focused decks will use Shadow Target to force their opponent to play cards from hand, instead of rely on their spellboard. It's a subtle way to mill someone, but in the late game in particular your opponent being unable to summon something can be crippling once they run out of other options.
Common Combos: There are a few possible common deck packages to use with Noah but they are less about combos and more about having a deck archetype that suits his style of play. In fast aggro decks, the classic status token summoning package of Time Hopper, Wishing Wing and Fighting Spirit can be put to good use, since Noah can potentially draw into even more books with Shadowblade. Accelerate can combo off with Summon Masked Wolf, Time Hopper, Fighting Spirit or even Immortal Commander, allowing you to suddenly attack with a massive army out of nowhere.
For fatigue deck and long terms plans, you'll need some way to accelerate your opponent to the end game with no deck, where Shadow Target can start really causing problems. Spindown cards like Shadow Spirit and Dream Fracture can provide pressure on your opponent to meditate, or you can go all in on illusion dice powers with Reimagine and Keepsake. Abundance is always worth considering when playing mill, along with the charm staples like Orchid Dove, Farewell and Three-Eyed Owl.
Proven Competitive Lists:
Lark's Phoneix Pod I Winning Spindown Deck: https://ashes.live/decks/47953/
My Best Homebrew: https://ashes.live/decks/47953/
Helping me get my 10 wins with Noah is this fatigue spindown deck. The starting point of this deck is an Abundance deck that doesn't start with Abundance in the first five. Instead this deck aims to draw into it as end game damage, once your opponent is decked out. With Magic Syphon and the extra spindown effects of cards like Dreamlock Mage and Hollow you can put pressure on your opponent's deck without meditating your own spells. Then, without fuelling your opponent's plan an allowing them to draw lots of cards in the early game, use Abundance to finish off their deck and start dealing game winning direct damage.
James
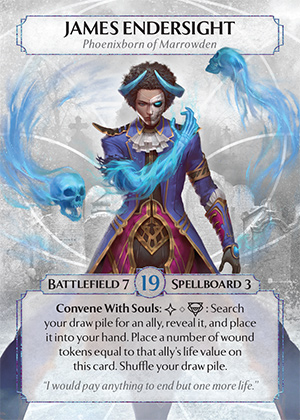
How to win: Getting the most out of James and his Convene With Souls ability requires an understanding of the subtle economics of allies and card draw in ashes reborn. Essentially, allies are generally more aggressively powerful than summons, and cheaper allies can be more cost effective than expensive allies. With 10 dice to spend per round, a theoretical swarm of 10 allies can do insane amounts of statistical damage. With 3 dice you could summon 3 allies with a combined 6 attack and 3 life total compared to the classic 3/4 stat line of a 3 dice knight. There are downsides of course, namely the vulnerability to direct damage and the possibility of self clog. James solves the latter issue at least with a big battlefield size of 7.
Compared to his ability, James's uniques are slightly less exciting. At first glance Vengeance is a terrible value proposition, giving you a measly 1 attack per each destroyed unit, and many decks justifiably ignore it as an option. It can however be used as a finisher for an agro deck to get that last bit of damage through to your opponent by sacrificing already exhasuted units before the loss of board control matter in the next round. Soulfire is a super solid card and for most the obvious better choice. With a deck full of allies you shouldn't have much difficulty triggering for the full 3 direct damage each time, a much better ratio than you can get from non-unique spells.
Deck Styles: Tutoring out units with more than 1 life can start to get a little too costly for poor James's health, which means Convene With Souls lends itself naturally to 1 life units. Finding the unit you want to play is a combination of flexibility and exploiting power. With multiple options in your deck you can flexibly pick the right unit for that round. Alternatively while deckbuilding you want to include units that are worth tutoring, often to play the same unit over and over again, hyper focusing on one particular strategy.
James doesn't really have as large a life total as he seems, that 19 goes down to 16 if you trigger your ability every round for 3 rounds for example. Most 1 life units that are worth exploiting are very aggressive, so James tends to lend himself to very aggressive decks in general, usually swarm of some kind.
Common Combos: Building a James deck is all about picking the units you will tutor with his ability. There are quite a few contenders from 1 life units to spam. Raptor Herder and Ptera Herder give you a lot of statistical value for 1 dice. The first Light Swordsman might be guarded, but every one you play after that in the round gets subsequently more likely to make a super nasty one sided trade. Fire Archer is as ever good option for racing your opponent's life total. Shepherd of Lost Souls is a common choice for James, not just to tutor but to play and spam even more units.
Proven Competitive Lists:
Kaukomieli's SB4 Top 4 Swarm Agro Deck (Old) https://ashes.live/decks/share/d5b4da3b-1e68-4fef-8b46-469186f5762a/
My Best Homebrew: https://ashes.live/decks/58304/
Helping me get my 10 wins with James is this puppet control deck with some classic chant of transfusion exploitation. With chant of transfusion, removing the puppets will be even harder than usual since you can move any wounds they place on the puppets. Additionally, side action chant removal can free up a slot in your opponent's board for a new puppet! But it's not just all about the puppets here, since sometimes you opponent will have a nasty counter to eat them. Try to force a guard from your opponent and then then use the Light Swordsman to play and then attack on the same turn, using quick strike with brutal lethality on a 2 life enemy unit. Spam out damage with the Old Salt classic PACT combo or use the chants with the Phoenix Attendant instead for massive healing. And who doesn't love 1x fire archer to close out a close game. However things are going, there are quite a few targets for James to convene with and pivot to the right strategy for the game state.
Lulu
How to win: Lulu has an odd combination of abilities and uniques. You really need to be exploiting value from both to keep up with other Phoenixborn. Bolster offers both a status token and extra attack to a unit, followed by a possible direct "ping" damage of 1 from Spark. That means Lulu is setup to work well with a unit that desires status tokens and aggressive swings. Even better if the unit can survive the attack and use the Spark ability. Phoenix Barrage is a great action card with excellent efficiency and damage. The flexibility to take out 2 enemy units or choose the same unit twice means you shouldn't have too much trouble finding a good window to play this expensive removal. Some part of that dice efficiency is contained within the burn damage however, which means you're going to want to compliment this Phoenix Barrage with either an aggressive deck on the battlefield, or an indirect burn heavy strategy. Stamina Burst is a trickier card to get value from, and most players second pick for unique but not to be discounted. With enough targets to benefit from the double Spark in a single round, the damage can start to pile up. Give the first player token to your opponent and you can set yourself from 2 top of round swings in a row as well, a fun aggressive option exclusive to Lulu.
Deck Styles: Bolster works well with an aggressive style of control, where key attacks get boosted into lethal range. Phoenix Barrage fits a burn style deck very well and can even be played as the control tool of a very slow deck. Stamina Burst on the other hand can be extremely aggressive, and reward the domination of the battlefield with a top or round attack you normally wouldn't have. My advice for playing Lulu is to first pick the unit or units that will most benefit from Bolster and build from there.
Common Combos: Emberoot Lizard is an extremely common card to pair with Lulu and the Bolster ability. It can be a little slow to get off the ground with a 1 basic cost book tax, but after that, the value from all the ping and attack damage is pretty powerful. Wishing Wing is another fairly common choice to benefit from the status token. Beast Mage and Beast Warrior are a great choice to pair with Stamina Burst, since you can ensure the first player token goes to your opponent and unlock the full potential of your transforming allies.
Proven Competitive Lists:
Carl's SB 6 2022 Top 4 Agro Deck (Old) https://ashes.live/decks/24193/
Bparousis' SB5 2021 Top 4 Bypass Deck (Old) https://ashes.live/decks/share/5b5eff96-07b9-442d-91dc-a7fcec8d096c/
JK007's SB5 2021 Top 4 Burn Deck (Old) https://ashes.live/decks/share/05fedc01-e746-475a-ae67-6e060c4b1520/
My Best Homebrew: https://ashes.live/decks/58380/
Helping me get my 10 wins with Lulu is this card draw focused burn deck. The goal is to establish early pressure against your opponent with aggressive attacks from cheap units, before swapping to a defensive line of play and burning your opponent while avoiding death yourself. The Wishing Wings combo nicely with Bolster for aggressive plays. The Seafoam Snapper can eat your own Wishing Wing to prevent clog and draw cards, or you can time it without an exhausted unit if you'd prefer. Shimmer Wing is also a key point of dice efficiency. With all that card draw, you should hopefully be able to draw into all the burn cards in the deck in later rounds to close out the game while your opponent it still trying to deal with your cheap units.
Orrick

How to win: Orrick has a lot of utility power and a win condition. Insight is an extra card draw, and filtered from your meditations no less. If you only meditate once per turn over the first few turns of the round you can essentially pick a card to draw from the first few on top of your deck with. Concentration gives you an extra card and flexible dice fixing, but at the cost of a basic, not great value if you ignore the win condition of The Awakened State. The key to success with Orrick therefore is to exploit the value of card draw and create a board state where the extra dice your spending on Concentration won't lose you the game. If you can stall out the game long enough, the immense value of The Awakened State will usually be enough to grant you victory, its getting there without dying that's the problem.
Deck Styles: Orrick has an in built win condition and playing him usually feels a bit like playing a fatigue deck, but without the fatigue. Most decks will be extremely defensive, trying to slow down and control the battlefield with a wall of passive units. Prison is a common, archetype, going a step further and trying to exhaust your opponents units entirely, preventing them from even playing anything new once their battlefield slots are all filled. This gives Orrick all the time in the world to spend dice on card draw and Concentration, while your opponent can only watch as you gain enlightenment.
Common Combos: To enable the prison playstyle of Orrick, Kneel is a common card to play, totally exhausting the battlefield. When you don't have top of round to play Kneel, Safeguard can be played the round before. This means when your opponent would be able to swing at you with all their units for the win, it's a pointless endeavour, and the next turn you can exhaust their entire board. It's tricky to time, since you need your opponent to be forced to pass immediately after you play the Safeguard, but if you can pull it off the multiple Kneels at the start of the round are a brutal prison.
Defensive units like Turtle Guard and Butterfly Monk are also common in Orrick. The dice efficiency of Turtle Guard in particular gets better the longer the games goes on after you pay the initial book tax of one basic in the first round.
Proven Competitive Lists:
Lark's LKA 3 Top 4 Puppet Chant Prison Deck https://ashes.live/decks/49894/
My Best Homebrew: https://ashes.live/decks/48492/
Helping me get my 10 wins with Orrick is this summon focused deck that aims to spam out as many 1 life units as possible, overwhelming the opponent with efficiency. The down side to having so many 1 dice power side summons is offset by Orrick's abilities. Insight can draw you back the first book that you meditate and Concentration will fix your dice to pay for those power sides. Make sure not to get clogged and leave space for your Seafoam Snappers to free up a battlefield slot by eating the Wishing Wings. Don't spend too many dice on Concentrations even if you draw them, the inevitable win condition will trigger eventually and until then you want to summon as many units as possible. Its a bit of an extreme deck but for may matchups there is little your opponent can do to handle your endless high attack summons.
Rowan
How to win: Rowan has a win condition built into his character, but a less straightforward path to getting there than others and once you arrive it can even then be tricky to pull off a win. Still, there are few things as fun as summoning a massive Reborn Chimera sooner than your opponent expects and slamming it into your opponent's face over and over again.
The main goal is to draw Discovery as soon and as often as possible without losing control of the game. This can make Rowan one of the less consistent PBs out there, since luck can keep those precious Discovery card away from your hand, but there are a few ways to mitigate the problem. First avoid a lot of meditations, or have some way of pulling a spell card from the discard if you do meditate away a Discovery. You may also want some extra card draw to give you more chances of pulling Discovery. Red Raindrops do make up for the luck of the draw by being pretty good value for dice, even before you combo and bring out the Reborn Chimera. 1 dice for 1 damage isn't that bad at all even if it happens at the end of the round. The dice discard effect can also be offset by all the cards you are drawing to find Discovery. The main problem is fitting all of this into a deck that can survive long enough without any additional PB ability or unique to help you turn the tide of the battle.
Exhume seems almost entirely unrelated to Rowan's long term plan but is a fairly good ability none the less. Include enough allies that trigger well from the ability and you don't have to worry too much about clog.
Deck Styles: Choosing a style for Rowan is usually about the speed you want to find and play Discovery cards. With a dedicated plan to draw lots of card and include Discovery in your first five, you could summon the Reborn Chimera as early as the end of round 2, but you might have spent to many cards and dice in the process that despite the presence of the big beasty you'll still be quickly overwhelmed. On the other hand, take too long and incidentally play Discovery whenever is shows up and you might find that the game is over before you reap the benefits of your investment.
You can also focus on reaping the benefits of the Reborn Chimera once it actually shows up. It can only normally attack once, but with the right cards you can use it over and over again in the same round. With many approaches to Rowan I can't say I know which is the best style but a good starting point is to pick a tempo for your Discovery game plan and build around it, either max out on card draw and getting the most out of the Reborn Chimera, or invest more in traditional battlefield control tools and summon the Reborn Chimera when the Discovery cards naturally decide to show up in a longer game.
Common Combos: To combo with Exhume you have many options, some more common than others. Its hard to get better value than the on enter effect of Silver Paladin just keep in mind you just might have problems triggering it in round 1 if your Paladin likely survives. Crypt Guardian is another great choice for a 1 dice unit exhaust on tap. Knowledge Seeker is a common combo to draw 1 of 3 cards from the top of your deck, its not amazing value for 1 dice normally but can be exactly what you need to find the next Discovery. Rising Horde can be awkward to play and have killed in the first place, but the 2 fallen for 1 dice is a pretty great cost ratio.
Era's End is almost an auto include in any Rowan deck. Triggering the damage from your Red Raindrops or resummoning a dead Reborn Chimera can be combined with the burn damage of cards like Ruin Dweller. For card draw there are a few options, but Generosity is the go to classic for options that usually benefit your slow game plan more than your opponents.
Once you have the Reborn Chimera actually in play, unexhausting it with cards like Call to Action can net a lot of value. Additionally since you'll get it back anyway, sacrificing it with cards like Blood Chains and Reclaim Soul is a common strategy.
Proven Competitive Lists:
Redentor's LKA 9 Top 2 Paladin Deck: https://ashes.live/decks/57301/
Carl's SB Pod Qualifier Top 4 Deck (Old): https://ashes.live/decks/share/67d80e97-a4f3-4a8f-9cd0-ccd95d178249/
My Best Homebrew: https://ashes.live/decks/share/00d7e018-a372-4e1e-be9c-d1861a96dcc7/
Helping me get my 10 wins with Rowan is this prison mill variation of Rowan control. Stall out your opponent with the classic mill prison of Kneel and a wall of Orchard Doves and Shimmer Wings. Don't be too worried about Shimmer Wings not triggering, you can setup a burn win late game and force awkward attacks but they get taken out most of the time and that's ok. To help protect them and to further your prison stall, Emperor Lion can fish out law of fear from your deck every round and really slow down the game. Abundance will not only draw you into discovery but also finish out your opponent when they run out of a deck. Prioritise the discoveries for this deck, with all the card draw you should hopefully be able to summon the Reborn Chimera sooner rather than later and start smashing your opponent before walling up again. The real killer for this deck are meditations, since ideally you don't want to lose any spell board cards or too many discoveries. Use Recollect to specifically pull back either Abundance or Summon Orchard Dove since you need all 3 to trigger your crucial focus effects.
This is a super helpful page for new players, greatly appreciated! Are there plans for a write up of the few missing Phoenixborn — Brennen, Victoria, Namine, Sembali, Fiona, Rimea and Jericho?
No comments to display
No comments to display