
Combat Mastery 2 - Tips to Improve Your Decision Making in Ashes Reborn.
By Timothy Cathcart
Ashes Reborn is fundamentally a game of combat and the battlefield. Many decks attempt to win by a mechanism other than the battlefield of course, spinning down dice with Dream Fracture, or burning your opponent directly with Chant of Revenge, but even then you still need to both plan and react to what's happening on the battlefield.
For this tip of combat mastery I will be focusing on a fundamental principle of summoning and trading units in combat and how to come up on top.
Tip 2: Track Sources of Damage and Sequence Playing Units Accordingly
Your opponent is playing Aradel Summergaard and has not used their Water Blast ability yet. You have a Hunt Master in hand and want to apply some early aggressive pressure. But first you play Summon Light Bringer because it's good to have options, right? Now your opponent on their turn plays Summon Gilder. Oh no!
This a particularly straightforward example of how sequencing matters when it comes to sources of damage and sequencing your plays. Your opponent now has both Water Blast for 2 damage and Summon Gilder for 1 damage in one turn. No doubt they will be happy to kill your Hunt Master with this combo of damage if you play it now.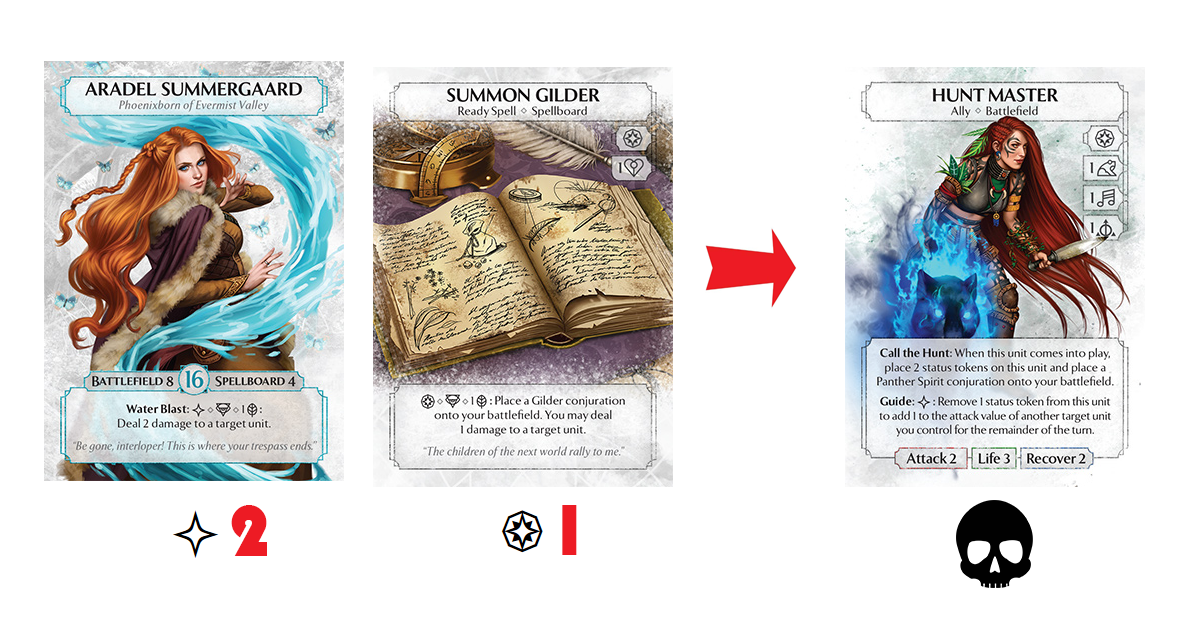
It's possible to predict that they would play the Summon Gilder since it's a common inclusion in Aradel decks. In this case you could have played the Hunt Master on turn 1. Then then they play Summon Gilder, threatening to take out the Hunt Master in one turn, you attack with the Hunt Master before they can kill it.
However this is just one example, it can be difficult to predict what your opponent is going to play and what sources of damage they have!
Don't Play Into Their Source of Damage
Ok, so it happened anyway. Now they are setup to kill anything with 3 health. But they don't know you have a Hunt Master in hand! So simply don't play it yet, sequence playing other units first instead. Do you have a 1 health unit like Summon Salamander Monk or Ritualist? These give you extra value from their cost, even when they die, so having one killed by a Gilder isn't the end of the world. Can you play a 2 health unit on the cheap? Old Salt costs 2 dice so its a bad trade with the 1 dice Water Blast but at least you get to deal 1 damage as well from Old Salt's ability. A 2 health for 1 dice unit like Jungle Forager is hard to come by and your opponent might ignore them.
Find Your Worst Case Scenario and Try To Avoid It
The pure efficiency of Water Blast is hard to escape from. 2 damage for 1 dice is probably going to trade well into one of your units which costs more. However, don't give your opponent the opportunity to pick the best unit to kill with their source of damage. Want to be able to play the Hunt Master without it dying? First summon your Frostback Bear. It will sad to see it die to the damage combo but then you can at least now play your Hunt Master more safely. And the reverse logic is true of here of course. Maybe you play the Hunt Master early, accepting the death blow from Water Blast and Gilder , since you've decided the Frostback Bear surviving is more important.
By trying to avoid your worst case scenario, you leave a lot of room for your opponent to misplay. Present your opponent with targets that aren't as bad for you to lose and hopefully they'll waste their damage. And if they hold off waiting for a better opportunity? Start putting on the pressure and making attacks with the units you already have and remember, passing is a legitimate option. If your opponent has 2 dice left at the end of the round, set aside for Gilder and Waterblast and you have 3 dice set aside for Hunt Master consider if the outcome of playing your unit is worth it or not. After the dust settles you'll end up with a Panther Spirit and your opponent will get a Gilder. You may think that passing here is a good idea, forcing your opponent to either also pass or spend the Water Blast and Gilder on something else, thus enabling you to play the Hunt Master. But be careful about side actions and passing! In this example your opponent will possibly Water Blast something and then also pass, preventing you from playing your unit before the round end. In any case try to assessing the outcome of passing. When in doubt you may have to simply accept an unideal trade.
Attacks Are Sources of Damage
Lets move away from this specific example and see how we can apply this theory to all sources of damage and sequence units accordingly.

When understanding your opponent's sources of damage its super important to consider what is available to them next turn. If your opponent has a Battle Seer in play then don't play your Blood Archer, their attack and your life total is a match made in heaven! However remember that it unusually takes a whole turn to summon something before your opponent can attack with it. They have a Summon Winged Lioness book, waiting to be triggered? Feel free to summon your Mirror Spirit anyway. They might summon the Winged Lioness to take it out, but then you'll have a turn to attack first with the Mirror Spirit against whoever you want!
Attack with units that are about to become the negative side of an efficiency equation so that your opponent gets less value from taking them out. Avoid summoning units if you can see your opponent has an answer for them on the battlefield already.
On the flip side, you want to setup as a few different answers to take out your opponent's cards with efficient trades. If you only have sources of 1 damage in your hand and on the battlefield you'll struggle to deal with a large knight your opponent might play. Mix it up with different attack and damage values to give yourself options and put your opponent in a bind!
Of course, its inevitable that your opponent will get some efficient trades (unless you are absolutely crushing them on the battlefield). The key is to avoid the worst case scenarios and sequence your units to make that efficiency difficult for your opponent.
Your Guard Is a Resource Not an Excuse To Badly Sequence

A mistake I used to make a lot is to play whatever units I felt like, knowing that I could just guard the first attack I didn't want to go through. However while this approach to using your guard can work for playing an extremely aggressive deck that immediately giving up battlefield control, for most decks its a trap to use your guard so liberally in the round.
Each round is a series of attacks, some better for one player than another and you can only cancel one efficient trade with your guard. Just one! If your opponent has an Ancestor Spirit on the battlefield and you summon a 2 life unit like Emberoot Lizard, sure you might be able to guard the inevitable attack the next turn from the Spirit against your Lizard, but now you can't guard anything else, maybe an even better attack for your opponent later in the round! Instead, try to leave summoning the Emberoot Lizard and take out the Ancestor Spirit first with a different unit or source of damage.
My Advice.
In summary my advice is to constantly assess your opponent's sources of damage when deciding how to sequence your unit plays. Try to predict what sources of direct damage they might have in hand and what attacks they have available on the battlefield. Avoid playing units with life totals that nicely match sources of damage your opponent currently has available. Attack with units you already have in play before they get taken out by an efficient source of damage.
Its an impossible task to perfectly sequence your units in a way that prevents any of them from getting taken out by your opponent's attacks and removal. However your should aim to sequence your unit plays to make it as difficult as possible for your opponent to get the most out of their damage sources.
No comments to display
No comments to display