One Collection Battlebox Decks

One Collection Battlebox (OCB) is a format designed for quick pickup play, using a complete collection of Ashes Reborn cards as of the end of the Red Rains cycle (11/2025). It includes a fixed, preconstructed deck for each of the 28 Phoenixborn printed up to that point, and requires only the cards available in a single collection. There are no overlaps in the cards used by each deck, so a player can have all of them built at the same time.
These decklists are based on several physical battleboxes of this type created by veteran players in the Ashes community. Each of the decks have been heavily tested in both PVP and PVE game modes by the discord community, but I anticipate continuing to refine and update them in the future.
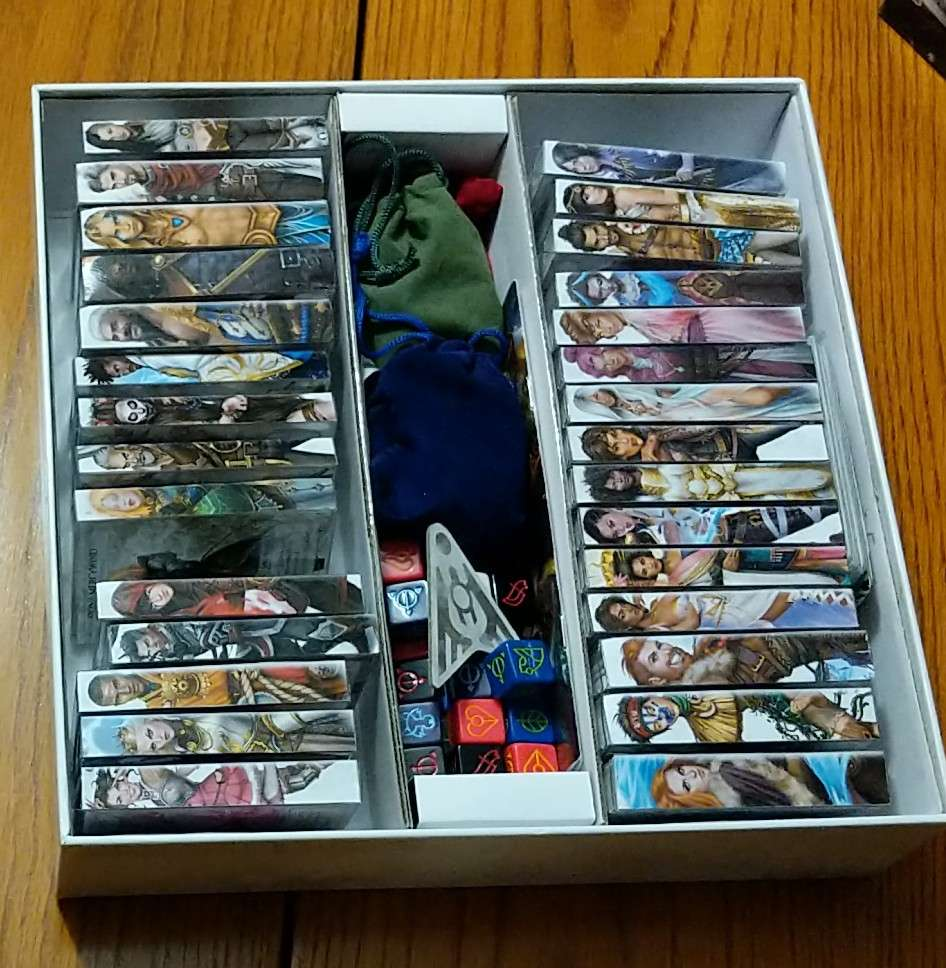 The assembled battlebox ready to hit the table!
Because this is a preconstructed format, OCB deviates in a couple respects from standard constructed play:
#1 - Any Chains or Bans From The Organized Play Document Are Not In Effect
Simply put, the balance controls used for constructed play are not required here. Problem combos or balance issues that make themselves known can be addressed by simply adjusting the decklists.
#2 - Restrictions on Phoenixborn Uniques Are Not In Effect
This means it is permitted for these decks to include more than 3 total uniques (ie phoenixborn signature cards), and it is permitted to put two different uniques in your First Five. This is a pragmatic change; Allowing more unique cards to be played in total means that, in effect, the cardpool has 28 more basic-costed cards than it would otherwise contain. A bonus is it also gives veteran players a chance to explore combinations that are not available in other formats.
The Decks
Each of the decklists below is given on a printable reference card. These are the same dimensions as the dividers that come with the Ashes Big Box storage. They can also be cut or folded at the dashed line to make them card size, for sticking on a deckbox or in a sleeve. I've included a quick overview and some tips for each of the decks to help players get started.
|
|
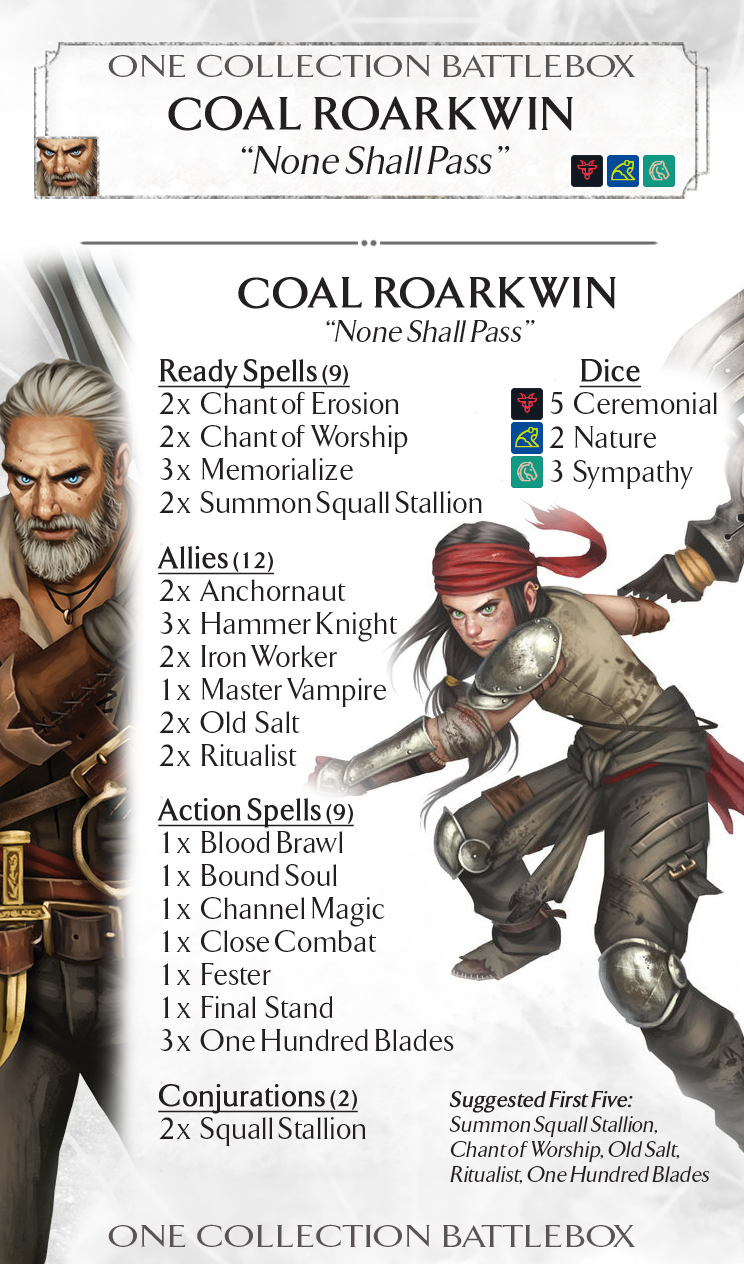
Coal: None Shall PassNo phoenixborn enjoys drawing cards as much as Coal, and this deck is built around letting you draw and use a ton of cards, put them back in your deck, and then draw them and use them again.
The deck is oriented to the battlefield, with Squall Stallions and beefy allies giving the opponent a lot of threats to worry about. They're backed up by a toolbox of spells, made more useful by the recursion engine letting you play the most needed spells over and over. Once the spellboard is set up, a single ally death will fill all copies of Memorialize and Chants. The spellboard provides plenty of Main actions, so Coal always has ample time to slash, build up stallions, or use memorialize. Ritualist is good for both chant search and recursion, and a chant that you can painlessly bring back with Ritualist is among your most reliable slash fodder. The deck has the ability to recur all of its cards in one way or another (provided you've played at least one Memorialize) and figuring out what to play, slash and recur is key to getting the best out of it.
Coal is capable of some incredibly cheeky plays late game by recurring then immediately drawing and replaying key spells to dig himself out of a hole. Humble spells like Channel Magic or Bound Soul start to feel like an engine if played repeatedly, and if you're in dire straits there's always the option to meditate or slash away your hand and play Final Stand a few times! If in doubt though, just keep bringing back One Hundred Blades - it's almost never bad.
The Suggested First Five a middle-of-the-road option, giving you the core of your draw engine with some units to hold down the fort. However, this deck's first fives are very flexible. Going aggressive with Hammer Knight and Master Vampire in Round 1 is an option, as is going slower by playing more of the spellboard. |
|
|
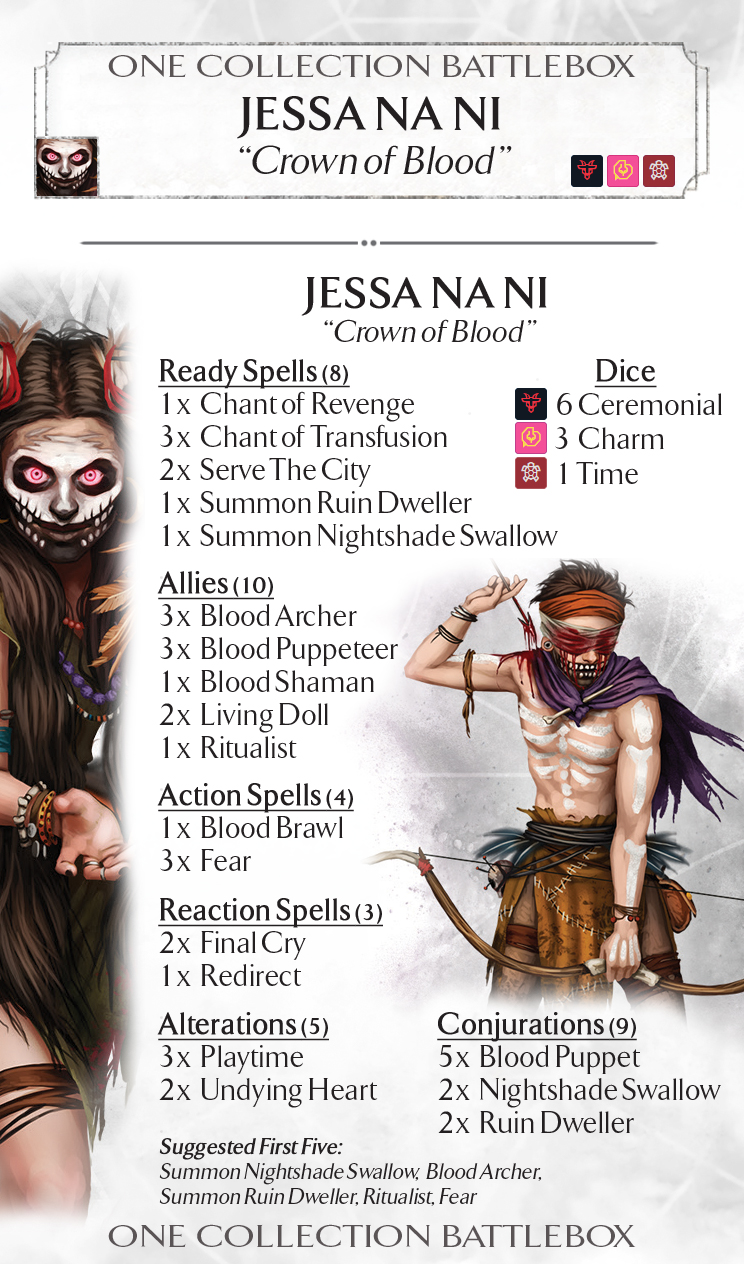
Jessa: Crown of BloodThis deck offers the most focused burn plan of any deck in the battlebox, rooted in Jessa's powerful Screams ability. That makes it very dangerous in PVP, although it also means the deck can be tricky to pilot against the chimera.
Jessa's gameplan relies on controlling the flow of the game and deal incremental damage to the opponent until they are in range to be finished off with Screams. Blood Puppets and Playtime offer the potential of burdening the opponent with ongoing damage, while Living Dolls combined with Serve The City and Chant of Transfusion can send wounds from the battlefield directly to the phoenixborn. Screams and Final Cry further punish the opponent as units are killed, making death slow but inevitable.
When dealing with aggressive opponents - especially the chimera - you'll need to do more than just burn. Chief among your control options is Blood Archer which can hand out a ton of damage, especially when combined with Chant of Transfusion. Given enough time, the archers can clear an entire opposing battlefield, and it's well worth using the ceremonial dice power or Undying Heart to get them back into your hand if they're killed. Nightshade Swallow is a solid defensive unit, and in a pinch the Blood Puppets from Puppeteer can be kept on your side to be used as blockers or spell fuel. Your ace is the Fear spell, which can be held back to deal with larger units that your allies can't effectively handle.
The Suggested First Five is one of several possible FFs this deck can run, and Jessa needs to be a bit more flexible than most - especially when shifting to PVE where the burn plan takes longer to deliver results. Blood Archer and Ritualist delivering Chant of Transfusion are likely to find their way into most Fives, but any of the other 3 cards can be considered for flexing out for cards like Blood Puppeteer or Fear. |
|
|
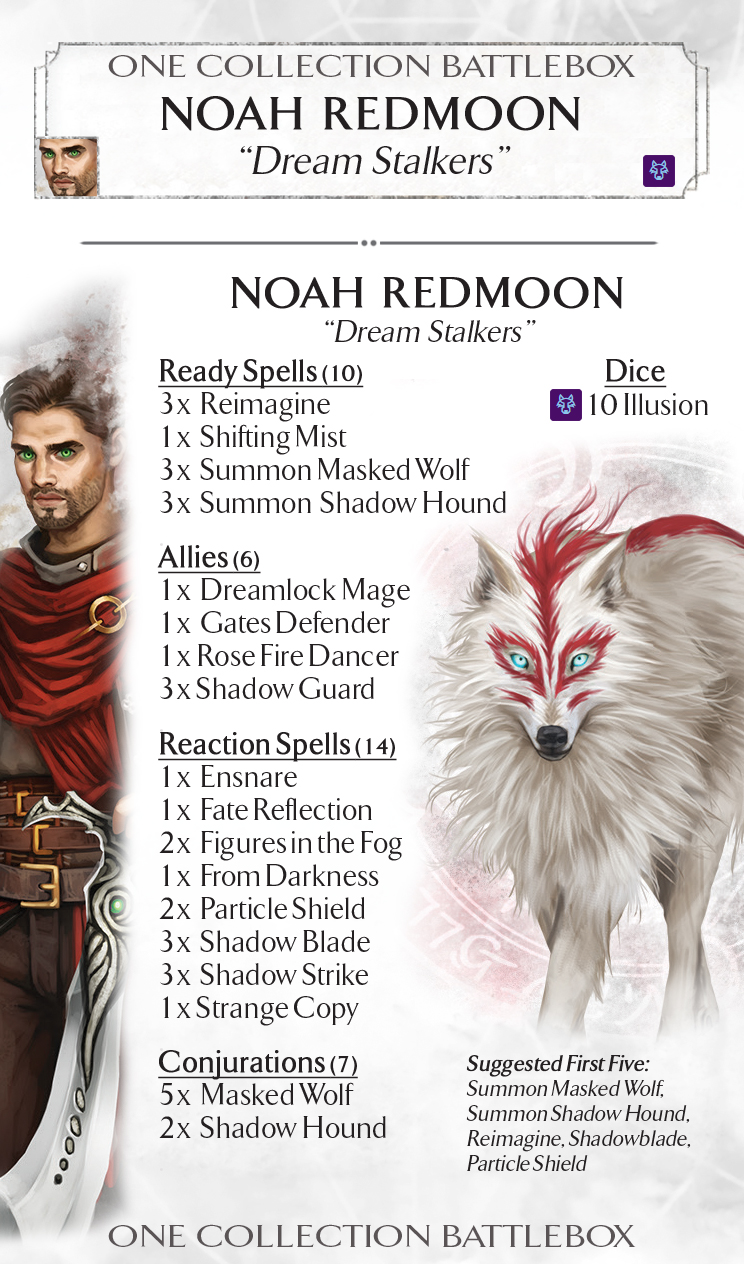
Noah: Dream StalkersFeaturing a whopping 14 reaction spells - plus 4 allies that can be played at reaction speed - Noah's deck leverages Reimagine's synergies with illusion dice to simultaneously dominate the battlefield and pressure fatigue via dice spindown.
The deck is relatively unit-light, but the units it brings pack a punch. Masked Wolf is one of the rare side-action summons, able to be declared as an attacker the same turn it comes in to play. They won't stick around long, but the Wolves are guaranteed to do some damage while they last. Shadow Hound, by contrast, is one of the hardest conjurations for opponents to interact with since it can't be targeted while unexhausted; but watch out for AOE effects that don't target. Shadow Hound becomes even deadlier late in the game, when the focus effect on its summon book can pick off small units for no extra cost. These two hunters are backed up by a small selection of allies.
Using Reimagine to stretch your dice is what sets the deck apart. The illusion dice power should be used aggressively provided you have reactions in hand to spend the stored dice; With a total of 18 cards that can be paid for with Reimagine, you usually will. Chief among these is Noah's lethal Shadowblade unique, but all the spells have useful applications. Don't forget that Shadow Guard and Gates Defender can also be paid for with Reimagine dice if they are played using their blue box ability! This combination is one the rare examples in Ashes where it's possible to get a unit on the table for less than its full dice cost, and doing so can quickly turn the tide in your favor.
The Suggested First Five for this deck only gives you a couple units to start, relying on Shadowblade to help check early aggression and draw in to more threats. Particle Shield, fueled by Reimagine, will also draw a card and help ensure both your wolf and shadow hound have a chance to do some damage. While most Fives will start the books, any of the other cards can be flexed out to add an ally or two for matchups where you expect to need more blockers in Round 1. |
|
|
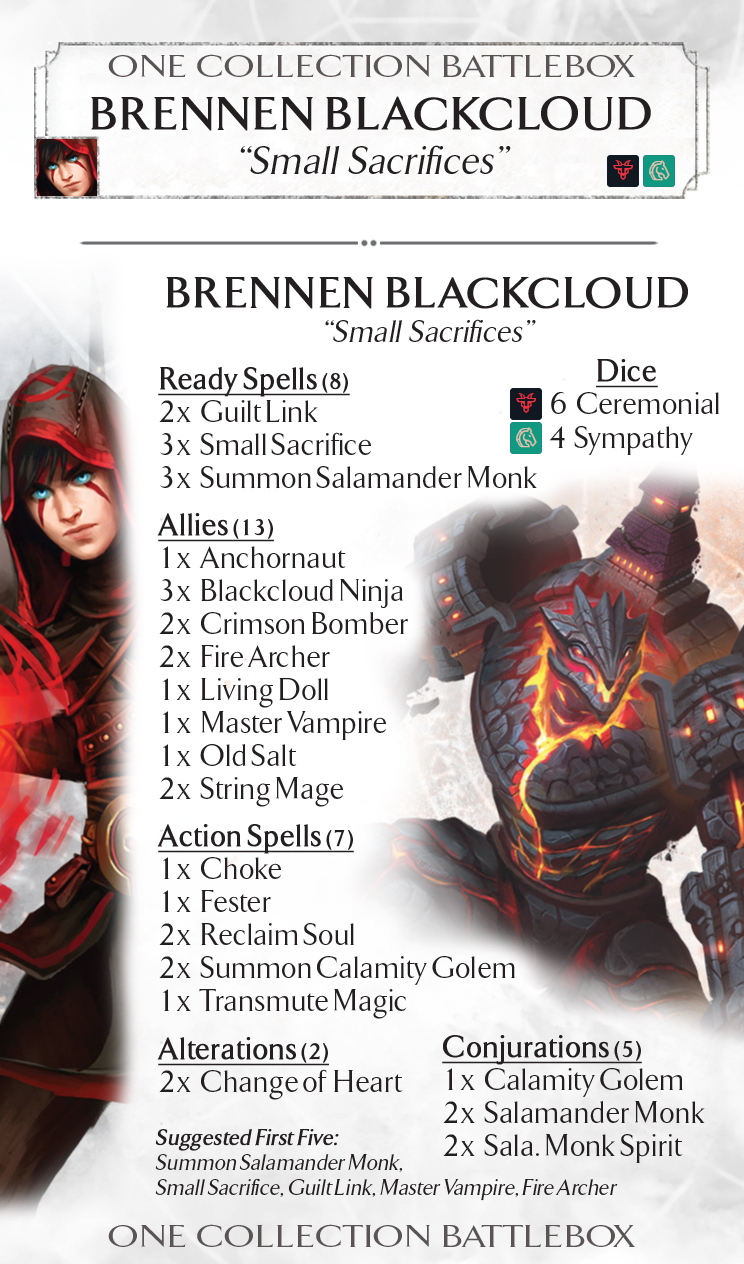
Brennen: Small SacrificesThe philosophy of 'easy come, easy go' is at the heart of this agile engine deck. Brennen can play a lot of units, but few of them will stay on the table long. The deck can play aggressively to the battlefield supported by synergistic removal tools, but it has a capable burn-based plan too.
Salamander Monk and Guilt Link form your first line. The Monks ensure a steady supply of blockers and spell fuel, and Guilt Link will both punish early aggression and give you a way to deal with big threats later. Small Sacrifice is the real star of the show though, especially working alongside String Mage or Living Doll who can throw the extra wound at your opponent in the same turn. This can be supported by Change of Heart throwing even more damage while letting you use allies' enter-play abilities over and over again. Note though that you won't always want to use Change of Heart; if your opponent is vulnerable to being burned down, Brennen's default ability Spirit Burn can be more useful.
An important aspect of playing the deck is recurring allies via the ceremonial dice power. You will almost always meditate and recur allies in Round 1 since, while the spellboard is inexpensive to set up, it does require three cards of your first five. Late game, recursion is important to keeping key allies like String Mage on the field. Reclaim Soul can provide the little bit of extra HP to recur more allies when needed. Calamity Golem won't see play every game, but can be a game-winner in some matchups, and Small Sacrifice and String Mage can move wounds on to and off of it as needed.
The Suggested First Five sets up the full spellboard, but it will require meditating for some allies to recur to make use of all your dice. An alternate First Five can be built around starting Change of Heart with an ally you'd like to play multiple times. It's also possible to open with Calamity Golem, which can put the opponent on the back foot right out of the gate. |
|
|
Aradel: Death in the MistAradel heads up a conjuration-centric battlefield deck. Its spellboard is very efficient, allowing you to out-value opposing decks simply by making more units every round, and frequently by removing their units for less dice than they cost to play.
The core gimmick relies on getting repeat value out of Shade Prowler using the Rejuvenate ready spell. Prowler is frequently able to kill two opposing units with a single attack, and since it disappears at the end of the round anyway the opponent does not have a strong incentive to clear an exhausted prowler. Don't worry about using Rejuvenate every round or on every prowler, but always be looking at opportunities to capitalize on the extra attack. If you get a lot of tokens on rejuvenate, it's possible to buff prowler with Massive Growth and get multiple swings with it - this can do a ton of damage very quickly.
The deck includes a selection of spells to help Aradel deal with threats her units can't easily handle. Mist Typhoon and Steady Gaze are straightforward answers to other swarms or taller threats. Meditate ahead if you plan to use Out Of The Mist; since it's a side action you can summon another unit and play a bigger OotM on the same turn. In a pinch, Hidden Power can also give you the dice for an untelegraphed OotM. From Darkness can give opponent's a nasty surprise fueled by a Sleeping Bear or a Massive Prowler that's already attacked. Mist Typhoon, OotM and Hidden Power also all draw a card, helping Aradel find more of the summoning books that fuel her battlefield.
The Suggested First Five works equally well for PVE or PVP. Lead with fox spirits, who will help by charging up rejuvenate for a prowler later. Mist Typhoon is generally useful, but don't be afraid to flex it out for another 2-cost card. Note you will have an extra die unless mist typhoon draws something useful; Keep an eye out for chances to make use of a dice power. |
|
|
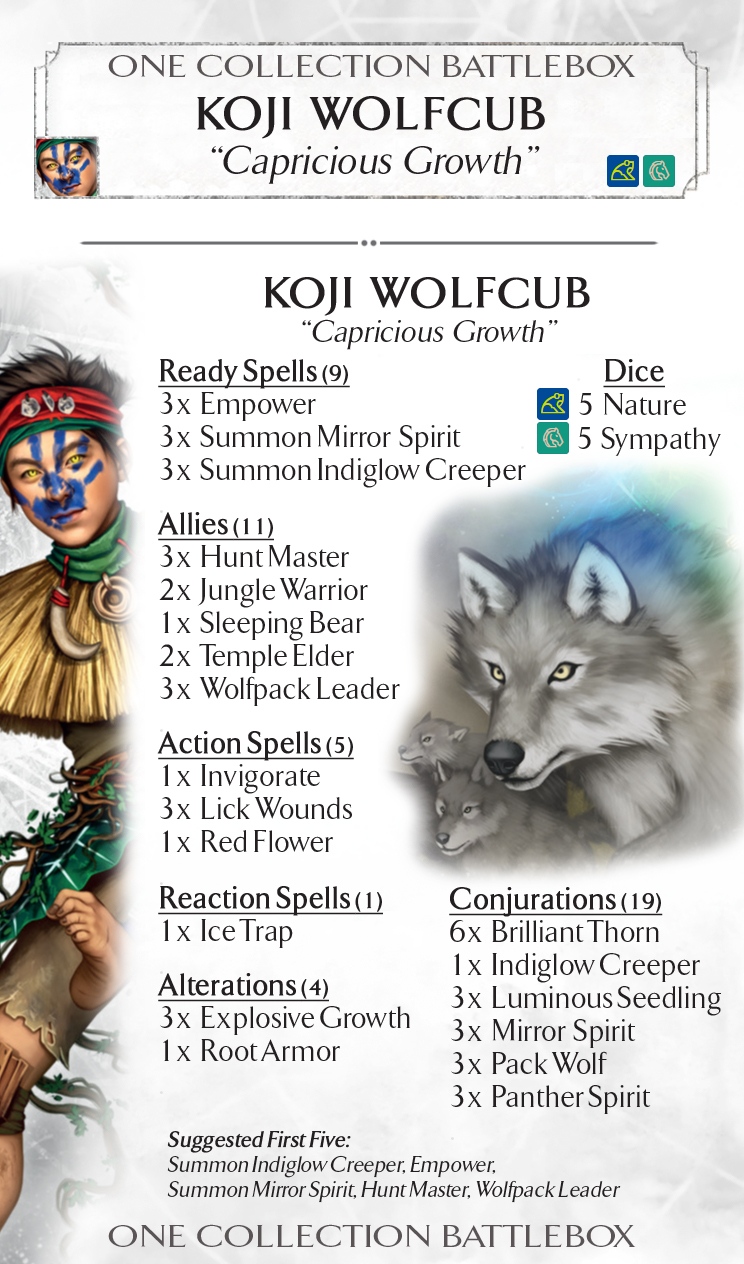
Koji: Capricious GrowthThe first true status token engine in the battlebox is Koji's army of medium-sized conjurations and allies, which starts slow but can quickly grow into an avalanche once the engine gets turning.
Central to the deck is Indiglow Creeper, which like a pokemon evolves from a modest beginning in to an unstoppable monster. The opponent has some limited opportunities to suppress the build up of creeper while it's in its creeper or seedling form, but once things get rolling and you have multiple seedlings on the table, it becomes almost impossible to check. Backing that up are the Mirror Spirits, a low-cost high-threat X/2 that serve as a useful outlet for any excess status tokens produced by the engine. Empower is included as an extra status token producer when you're in a pinch, and if it gets Focus online can double as a powerful source of direct removal.
Your allies and spells are there to keep pressure on, especially in early rounds, and to support the main plan. Hunt Master and Wolfpack Leader both bring additional conjurations with them, capitalizing on Koji's wide battlefield. Lick Wounds keeps Koji alive but it can also get an extra turn out of your units, and Explosive Growth threatens to turn any token-holding unit in to a one hit kill.
This straightforward First Five sets up your key engine pieces, and then gives you a couple allies to help protect them. You will generally open the round with either Indiglow Creeper or Hunt Master, and Mirror Spirit will usually be held until late when there are a lot of exhaustion tokens on the table to fuel it. If you can, try to get Empower down before the creeper dies, as it will allow you to fuel up the seedling in a single turn with Koji. The opponent is likely to focus on the more immediately threatening Wolfpack Leader and Hunt Master, which can provide an opening to use Blossom in Round 1. |
|
|
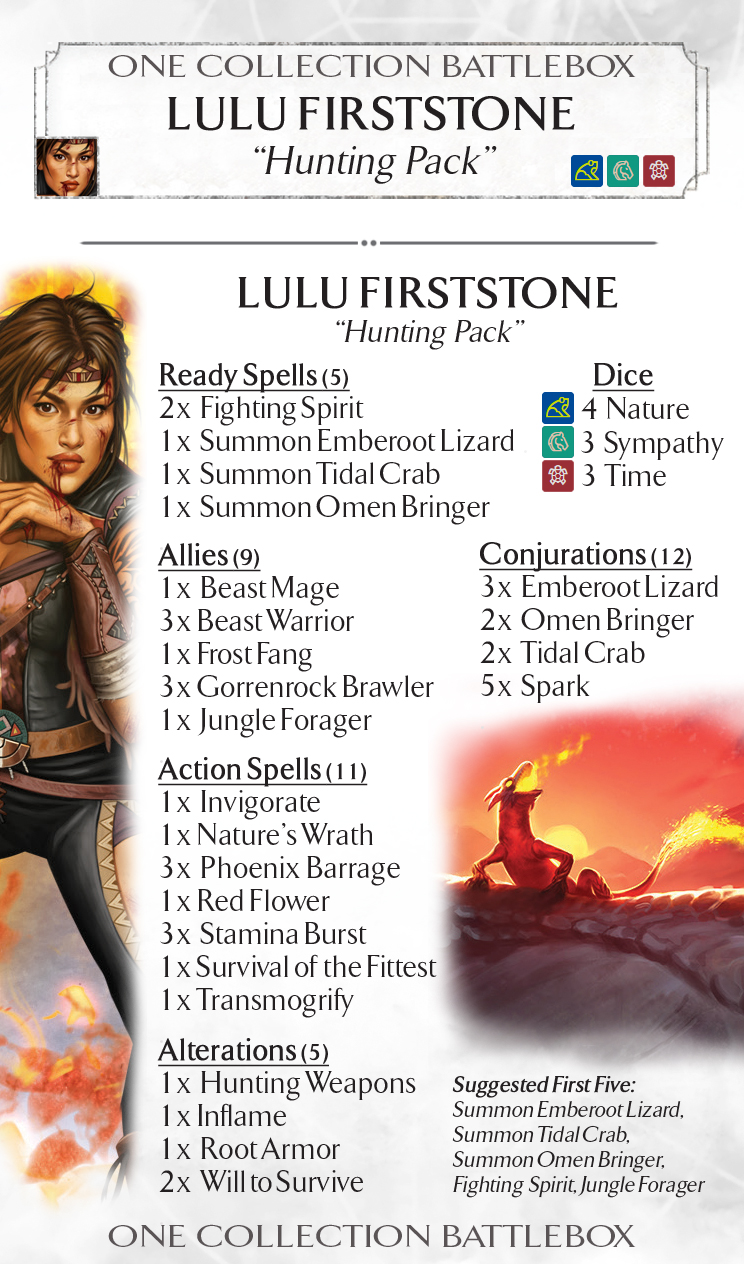
Lulu: Hunting PackThis midrange battlefield deck sports another variation of the status token synergy package, this time built around Fighting Spirit.
The spellboard is fairly slow to set up, with 3 dice sunk in to playing ready spells in Round 1. But the deck is stacked with durable units and punchy removal spells, and can reclaim momentum quickly. Emberoot Lizard and Omen Bringer both want the status tokens provided by Tidal Crab and Lulu's ability, and all your units with tokens will feed the growing threat of Fighting Spirit when they die. Backing up the conjurations are the Gorrenrock Brawlers (which are a great place to dump extra status tokens, fueling their refresh). And the beast allies, normally only at full performance every other round, get to be "on" much more often thanks to Stamina Burst.
Ultimately the deck's goal is to dominate the battlefield, clear away any opposing blockers, and kill the enemy phoenixborn with big swings. The deck's many large units are good at making positive trades, and get even better when Fighting Spirit lets them trade up in to something more expensive. Omen Bringer is especially good at this, as its ability allows it to unexhaust the Fighting Spirit powering it on the same turn, feeding its token right back in to engine when it dies. The battlefield-centric plan is backed up by a small suite of removal and buffing, including Lulu's own Spark and the expensive but deadly Phoenix Barrage.
The Suggested First Five is all about getting the spellboard set up and holding the line during Round 1. Jungle Forager can fetch whichever alteration is likely to be most helpful, often Root Armor. An alternative option is to forgo summoning one of the units to start with Phoenix Barrage or Survival of the Fittest, a good counter to the opponent starting a big, expensive unit. |
|
|
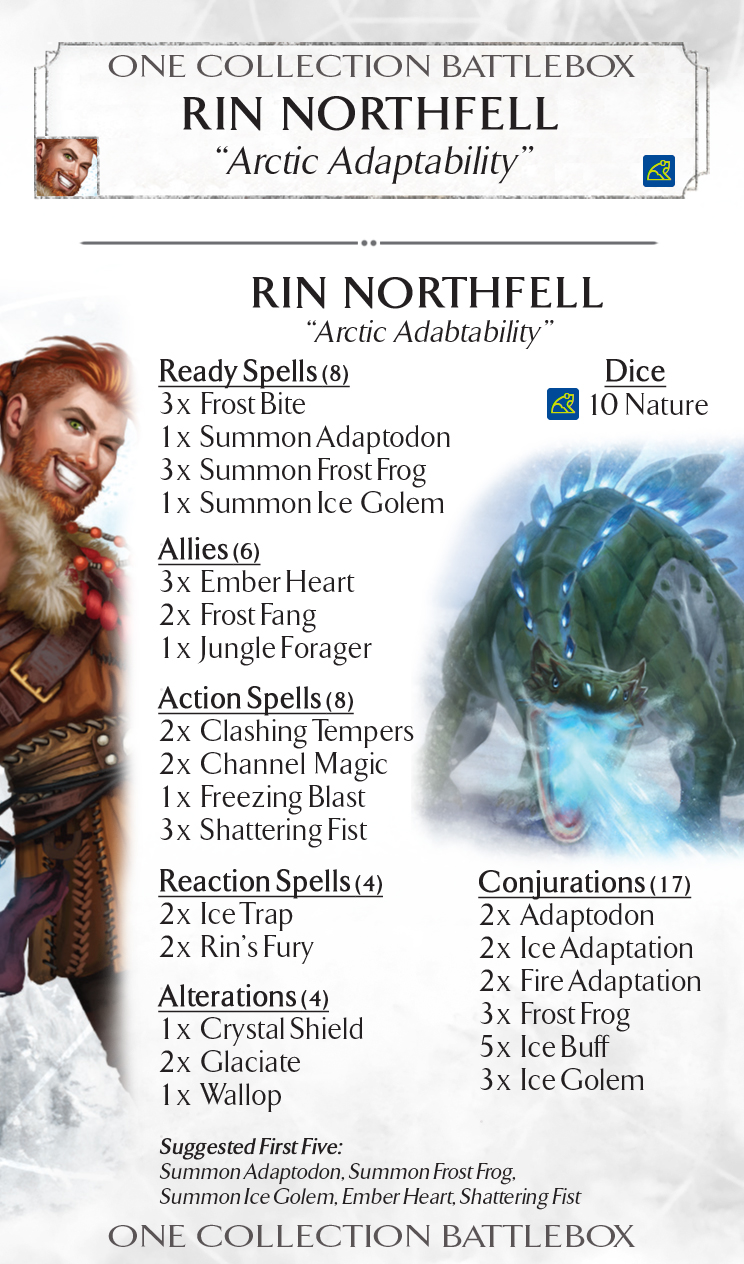
Rin: Arctic AdaptabilityRin comes to the battlebox with a conjuration-heavy midrange battlefield deck, backed by a range of alterations that can be moved from unit to unit as needed.
First among the three conjurations is Adaptodon, whose Adaptations both give it versatility and serve as fuel for Shattering Fist and Emberheart. The adaptations can also be placed with Clashing Tempers, but keep an eye on the conjuration limits - there's only 2 of each! Frost Frog gives you a smaller unit, but one with an attack the opponent can't ignore. Ice Golem (provided you can buff it) is a super tough anchor for the line, sporting a whopping 5 Life with Ice Buff. Ember Hearts and Frost Fangs make up the second line, and can be incredibly difficult for the opponent to deal with, with the Ember Heart letting you get extra use out of alterations on your exhausted units.
The remainder of the deck is a mix of additional alteration spells and direct removal. Shattering Fist, Freezing Mist and Ice Trap give Rin options for dealing with small to medium units, freeing your heavy hitters to focus on the tearing apart whatever's left of the opponent's battlefield. Rin's Fury punishes attempts to trade up in to your units. Crystal Shield and Wallop can make your big beaters even scarier. and Glaciate can be used to both take an enemy unit offline for a round or to protect one of your own from being removed by the opponent's attacks or damaging spells.
The Suggested First Five gets your spellboard set up, starts you off with a solid battlefield and backs it with a little removal in Shattering Fist. You generally want to lead with the books, ideally use Shattering Fist to remove an Adaptation, Adapt again, and pick up the second Adaptation with Ember Heart. Rin's Ice Buff will generally go on golem unless you plan to trade it. For a less sequencing-dependent FF, try flexing out Shattering Fist for Jungle Forager. |
|
|
Maeoni: Slow PoisonThe battlebox's version of the infamous Silver Snake deck backs the deadly serpent up with charm dice synergies and a secondary path to win via fatigue.
Silver Snake is one of the scariest units in the game, capable of growing over multiple rounds the point where it can swallow a phoenixborn whole. And if you can keep it alive long enough, Hypnotize will all but guarantee it reaches its target. The snake is also incredibly resilient, capable of tanking multiple hits and then healing back up with Recover 3. Its most important support piece is the Gilder, who both feeds and protects the snake. In combination they're a threat that opponents need to play very carefully to avoid. Though lacking the gilders' synergies, Biter supplements the plan by providing a reliable unit you can use for Command Strike from the beginning of the game.
While Snake is growing, your other units and spells control the game and grind down the opponent's resources. Charm dice power debuffs are cheaply available with Royal Charm, Snakebite and Chimera Charmer, with the later two getting extra benefit from using them. Once the charm dice are placed, Venom Strike layers on the pain; It's a reasonably good return even with only a couple charm dice out, but scales quickly to very dangerous levels. The rest of the spells support the snake in various ways, providing removal, refresh and protection as needed.
While Maeoni has some flexibility with her Suggested First Five, virtually any Five will start with Silver Snake and Gilder, one of the game's classic power combos. This variation focuses on building up the rest of the spellboard first. Open Memories can be used to grab whatever seems most needed, but if in doubt go for a second copy of Summon Gilder. That will ensure you have a plentiful supply of unit guards to handle whatever your opponent throws at you. |
|
|
Saria: Enthralling AuraThis versatile control deck brings a mix of units and tools that can win the game on the battlefield, via burn or fatigue, and do it in any combination.
Abundance, in combination with Saria's Heart's Pull ability, gives the deck incredible draw power, allowing you to rapidly find engine and combo pieces. Saria likes having a big hand to keep Willpower live, and draw ensures you can find tools when you need them. Raven and Badger round out the spellboard, giving options to control the game and remove threats as needed. The final spellboard slot can be flexed between Owl or Magic Syphon depending on the matchup.
The deck's allies fill gaps and help deal with opposing units to which the conjurations aren't especially well suited. The deck is spell heavy, and uses them to both keep the opponent locked down and to advance Saria's win conditions. Farewell and Return to Soil deserve special mention for their ability to rapidly reduce the opponent's draw pile, in concert with the slow inevitability provided by Heart's Pull. Sympathy Pain can be used to burn away an opposing phoenixborn's life total, but it's equally useful when dealing with units, and its trigger window means it can sometimes kill attacking units before they have a chance to resolve their damage. Lastly, Willpower offers an answer for anything too big to fight; its damage is capped only by your hand size.
The Suggested First Five starts off by getting your spellboard set up, and has some flexibility in how it spends its dice. Each of the spellboard pieces is a matchup call, and can be flexed for more useful options from the toolbox of spells and allies. Farewell is a flexible removal pick for the Five if you’re not sure what you might face. Druid can be used to get a second Owl or Badger in Round 1 if you meditate the book after summoning and then pull it back to hand. |
|
|
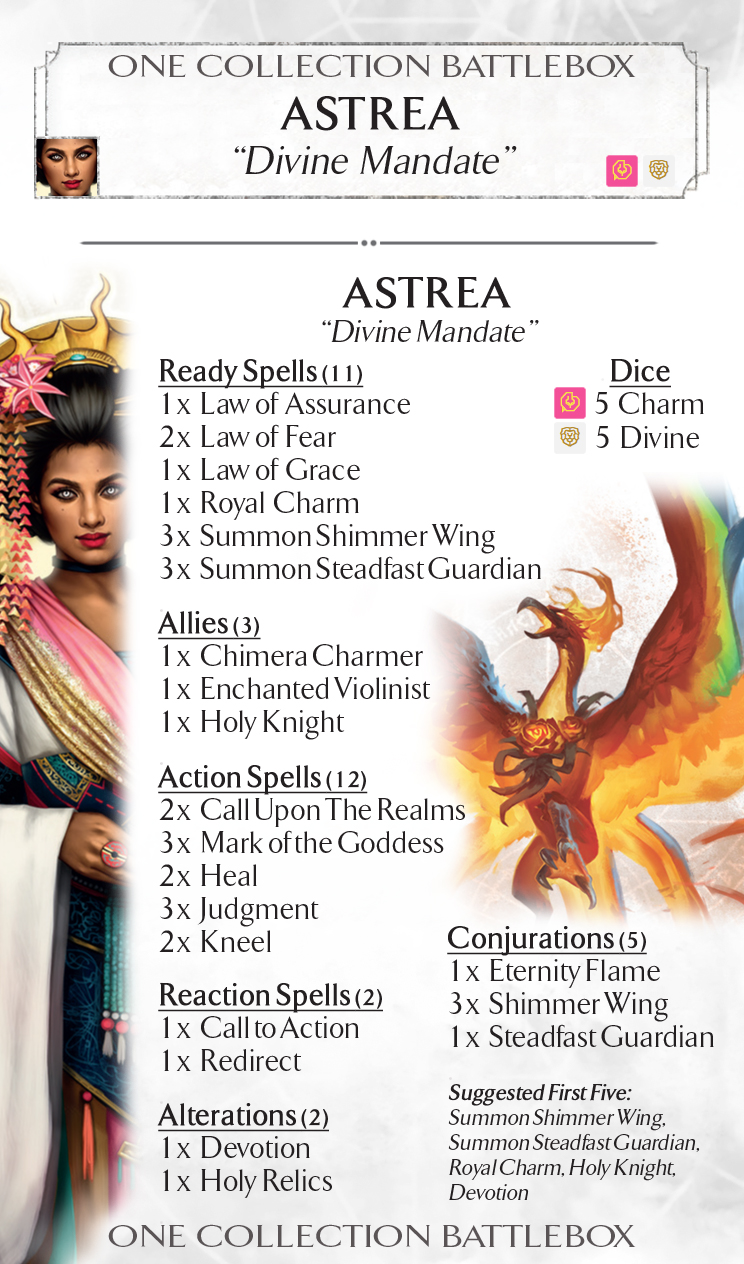
Astrea: Divine MandateAstrea sports the hardest control deck of the battlebox, with multiple ways to stifle (and infuriate) opponents. Its units are tough to engage effectively, and spells like Law of Fear, Kneel and Judgement mean it's a challenge for opposing battlefield decks to capitalize on any small lead they do manage to create.
The deck has two ways it can win: either via direct damage with Eternity Flame and Mark of the Goddess, or on the battlefield by getting repeat value out of a buffed Steadfast Guardian. It's possible to pursue both of these simultaneously and then lean toward whichever is bearing fruit against a given opponent. If the opponent has few blockers it can keep on the table, a focused Steadfast Guardian can get a divine die or Holy Relics and attack up to 4 times per round if it started on the table, healing itself each time.
While most of the deck's spells are straightforward, a few interactions bear mentioning. Mark of the Goddess requires careful timing, but it can be potent as either a removal tool or to directly damage the opponent. Most opponents will work hard to keep high value units from getting exhausted, and that can leave windows for big Mark plays. Judgment is your panic button, and even the threat of it can keep opponents from pressing an advantage. The Laws offer a versatile choice for the 4th spellboard slot, allowing you to temporarily shut down a range of opposing gameplans.
The Suggested First Five is fairly conservative and focuses on getting the foundation of your battlefield set up. Devotion on Holy Knight makes for a roadblock that many decks will struggle to remove. You won't usually be summoning an Eternity Flamt in Round 1, but getting the book down and starting to make Shimmer Wings is a threat your opponent has to try and answer. |
|
|
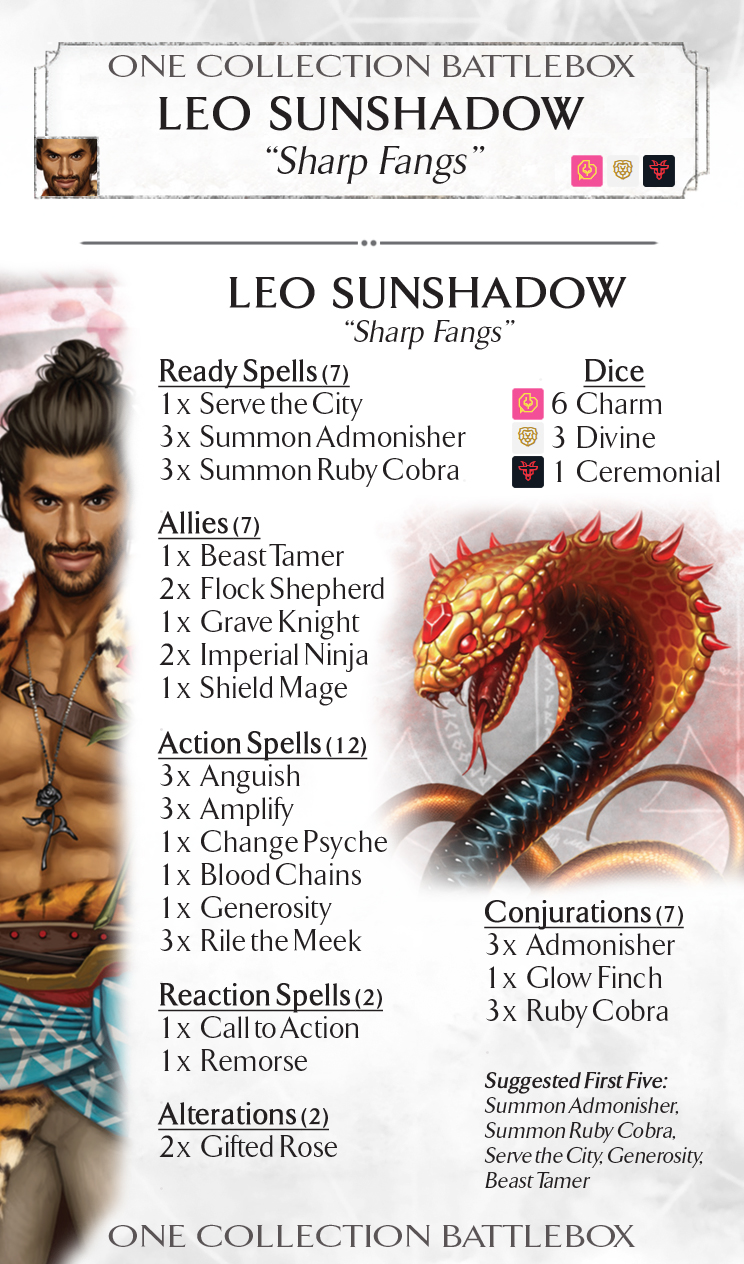
Leo: Sharp FangsLeo's deck brings a hybrid burn/mill deck to the battlebox, using a range of humble units to grind down the opponent and controlling the battlefield with the dreaded 0-Attack Swarm.
Admonisher, Ruby Cobra and Glow Finch each keep pressure on in their own way. Admonishers will punish the opponent continuously for failing to remove them, while Ruby Cobras and Finch guarantee an empty deck if they're not countered. Both can be given an attack buff from Serve The City as needed, and with Amplify + Serve a Ruby Cobra can threaten Attack 5: a very dangerous threat, especially if a Gifted Rose is left sitting on the phoenixborn. Serve The City can also be used to kill your own glow finch, providing some extra fatigue pressure in games where your opponent isn't polite enough to kill it for you.
The spell that casts the biggest shadow is undoubtedly Rile The Meek. Rile offers incredibly efficient direct removal, provided your 0-attack swarm is permitted to flourish, and it's a spell the opponent needs to fear in every round of the game. Anguish is a spell that requires careful timing, but when played at the right moment it reliably lives up to the name, giving the opponent agonizing decisions where both choices lead to a game loss. More than most, this deck also uses a lot of meditation and dice powers. Don't be afraid to burn through your deck - as long as you burn through the opponent's life total too!
The Suggested start sets up your spellboard and gives you a Beast Tamer to help stabilize in Round 1. Generosity is used to refill the hand as the FF only spends 7 dice otherwise. Some options for flexing the FF include Anguish (which opponents will usually just take as 4 damage in R1), Flock Shepherd and/or Shield Mage to get the wall going early, or Rile The Meek for removing an early threat. |
|
|
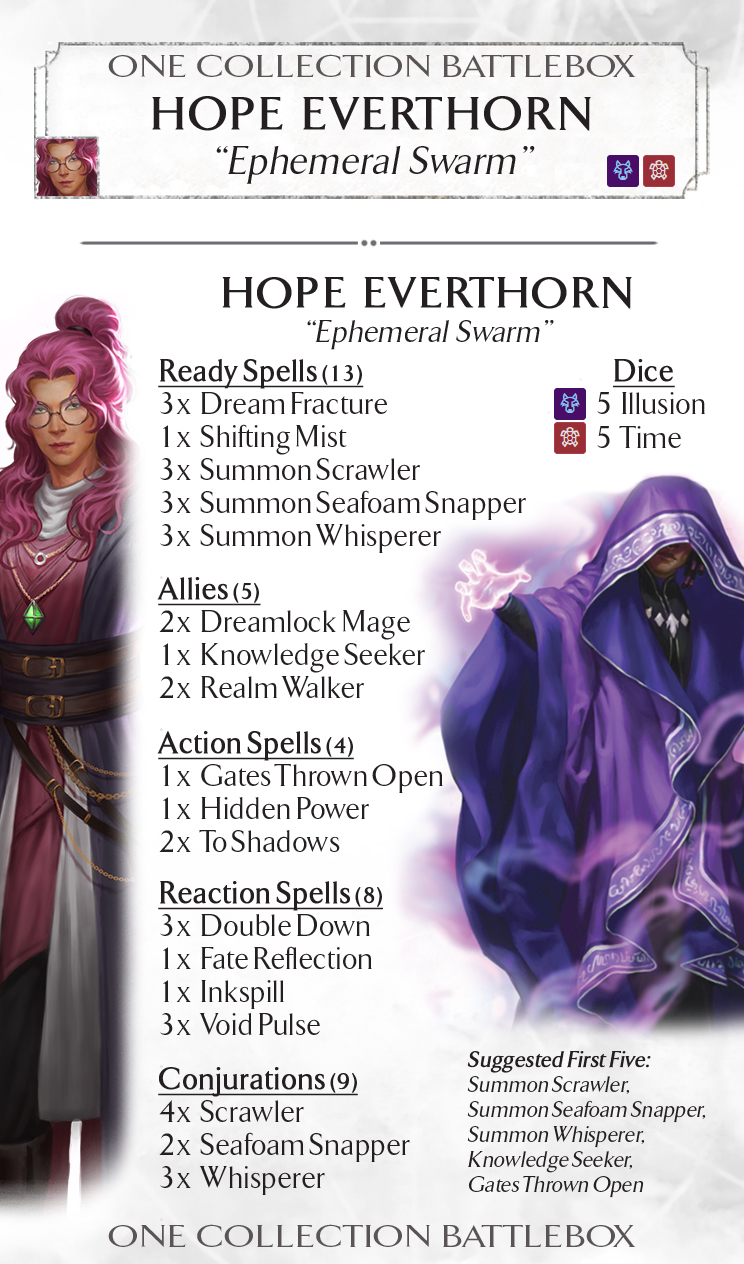
Hope: Ephemeral SwarmFeaturing three different 1-die conjurations, Hope's deck is a balanced swarm that brings a ton of pressure to the battlefield and backs it up with a secondary spindown-based win condition.
Scrawler, Seafoam Snapper and Whisperer are, die for die, three of the game's most effective conjurations, and bring utility besides. Scrawler’s careful timing takes practice but offers the promise of exhausting opponent's units on enter, especially when paired with Hope's Duplicate ability. Snapper is a highly-efficient combat machine, and it helps manage your battlefield by clearing exhausted conjurations so you can keep summoning. and Whisperer, in concert with Dream Fracture and Dreamlock Mage, will slowly grind down your opponent's decks and life total - offering a second path to victory.
The spells and allies included are all in service to the goal of overwhelming the opponent with the swarm. Realm Walker and Inkspill compound the exhaustion threat that Scrawler brings. Void Pulse and To Shadows give you options to deal with bigger units that your swarm would struggle to take down, while Double Down will continually frustrate your opponent's attempts to curtail the swarm.
The Suggested First Five is a fast opening designed to put pressure on your opponent immediately. Gates Thrown Open allows you to use each of your books twice in Round 1, bringing no fewer than 7 conjurations to bear with Hope's duplicate. Knowledge Seeker provides an extra blocker and helps dig for more of the summoning books you'll need to keep things rolling in later rounds. |
|
|
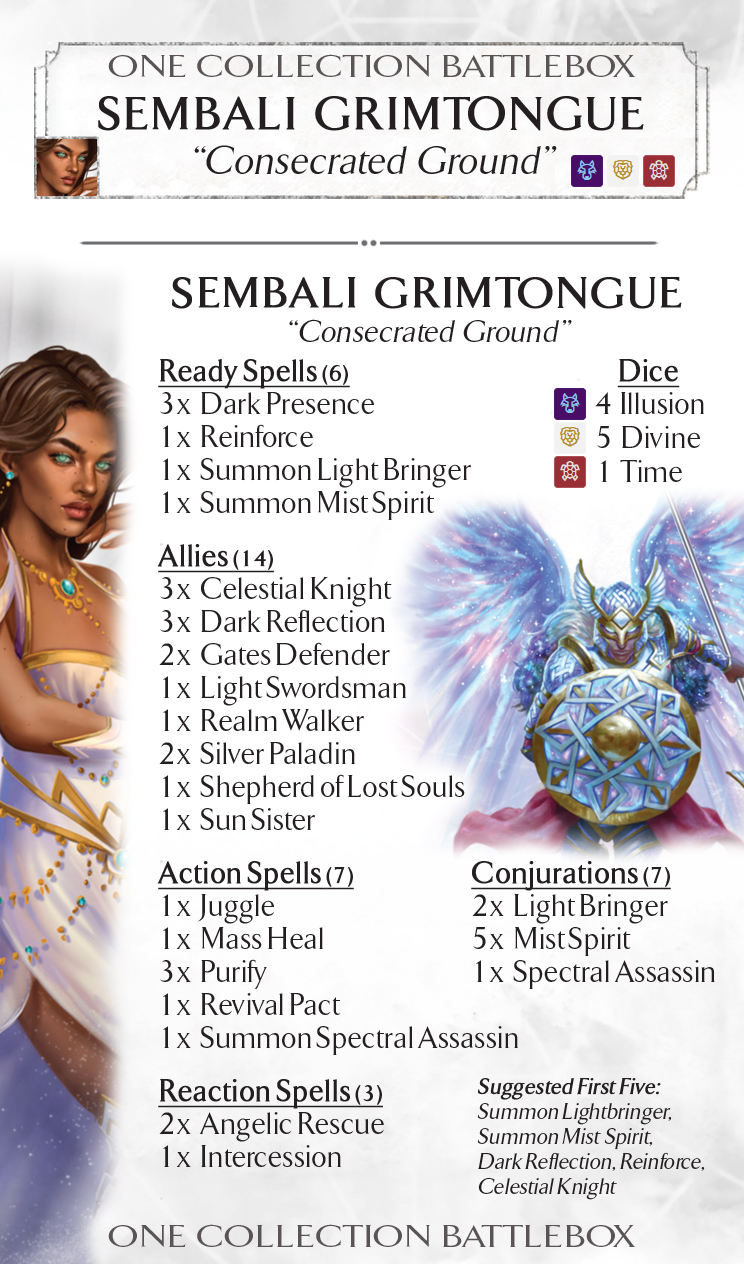
Sembali: Consecrated GroundSembali brings another of the deck's fighty midrange decks, this time built around the efficiency of the large, expensive "knight" allies, supported by tempo and bypass tricks.
The deck aims to win by bringing a density of large, powerful allies that opponents will struggle to remove and then stretching their value as far as possible. Celestial Knights and Silver Paladin are among the game's toughest, and her unique Dark Reflection is (situationally) one of the game's most cost-efficient killers. The key to using them is making every effort to keep them on the table, getting round over round value, while keeping pressure on the opponent. Gift of Wings, though expensive, is useful for all of them to get a refresh and guarantee an extra good trade each round.
The conjurations are used to support the core of allies, pulling opponent's units out of position, trading for other chaff, and occasionally threatening a big counterpunch. Reinforce smooths out draws, while Dark Presence provides an avenue to get to the opposing PB against a swarm. Focused Presence can also occasionally lower units' attack in to range for Paladin's Smite ability. The deck also includes Purify and Spectral Assassin, which can return an ally to hand for benefit and help free up the limited battlefield slots, giving you a chance to replay exhausted allies later in the round.
Th Suggested First Five sets Sembali up with a solid foundation, bringing 5 units to the table and the possibility of a pivot depending on what Reinforce finds. Sembali can hold off summoning one of the conjurations in Round 1 to use Gift of Wings. Against opponents who can't respond well to a more aggressive opening, it's possible to flex the first five to play 3 (or even 4) of the larger allies in Round 1. This can quickly snowball into an insurmountable advantage if sequenced correctly. |
|
|
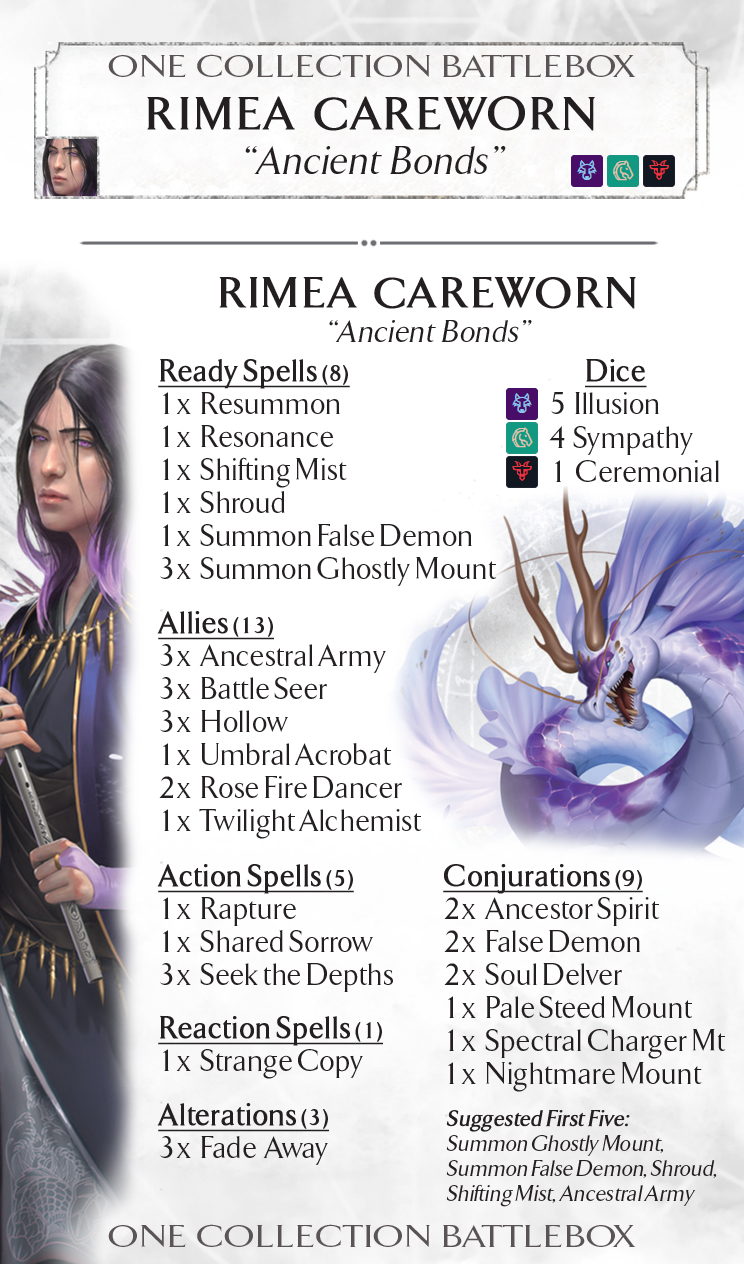
Rimea: Ancient BondsThis unusual engine deck takes control of the game early and applies ever-increasing pressure on the opponent from multiple angles. Its battlefield is surprisingly robust, anchored by Rimea's unique units, Ghostly Mounts and a mix of allies. But even if the opponent can hold the line, they'll soon find themselves on the clock from spindown effects.
The deck's heart is its versatile spellboard. With 6 ready spells not counting Resonance, it is up to the player to use the spells best-suited to the matchup. Ghostly Mount is slow to set up but brings a ton of power to bear in the mid-to-late game, and offers multiple vectors to a win. Shifting Mist is best for a longer game, saving valuable meditations for the deck's many power costs. Resummon offers the tantalizing possibility of getting repeated use out of the powerful mounts and delvers, while Shroud ensures they get a chance to attack whenever summoned.
Rimea's Armies and Delvers are you most reliable units, offering quantity or quality as needed, and the Army will often also be your first choice to mount. But don't count the other allies out. Battle Seer is a monstrously efficient unit on both defense and offense. Hollows give weight to the spindown plan, and are a good choice to mount up when that is looking like your best way to win. Alchemist provides a little extra smoothing, while Dancers and Acrobat each bring tools well suited to dealing with other problem units.
The Suggested First Five is a slower build intended to set Rimea up for the long game, but don't be afraid to flex cards as there are many ways to play her Round 1. Battle Seer and an Ancestral Army (usually mounted on Pale Steed) will give you some much needed staying power in the opening of the game and give Rimea a chance to get her engine built. Common flex cards for the Five include Shroud and Alchemist. |
|
|
Victoria: Knives in the DarkThe tempo-oriented hybrid deck exploits the stat-flipping mechanic to eliminate opposing units, make your own units perform far beyond their usual limits, and enable highly unpredictable play lines.
Magnificence, Umbral Acrobat and Body Inversion all offer options to temporarily reverse units' Attack and Life stats. This versatile effect can be used to remove 0-Attack units directly, to shift combats in your favor, make damage effects more dangerous, and to turn units like Dread Wraith or Phoenix Attendant into monstrous threats. Supporting this is a range of spells that can remove or negate blockers, often in unconventional ways, and the pressure Victoria puts on the opponents' dice pools makes it tough for them to respond with their own reactions in kind.
Among the units, Dread Wraith deserves special mention due to the stratospheric damage numbers it can reach, especially with Infuriate. Shadow Spirits and Mist Spirits round out the spellboard with more humble units that nonetheless can often get value out of proportion to their cost. The allies are more focused tools, but each contributes both to the battlefield and to the deck's internal synergies. Psychic Vampire and Stormwind Sniper pressure the deck and phoenixborn's life. Acrobat and Phoenix Attendant are both outsize threats with stat flipping, with the Attendant also giving massive value via its heal.
The Suggested First Five sets Victoria up with units that can be used to deal with opponent's threats or put pressure on the opponent early depending on what you're facing. The starting Keepsake can reliably be charged early in the round with Surprise. Note that all five illusion dice are needed in Round 1, so spend a ceremonial dice for basic costs. Keepsake can be flexed for body inversion in some matchups, and the sniper can be exchanged for another ally if needed. |
|
|
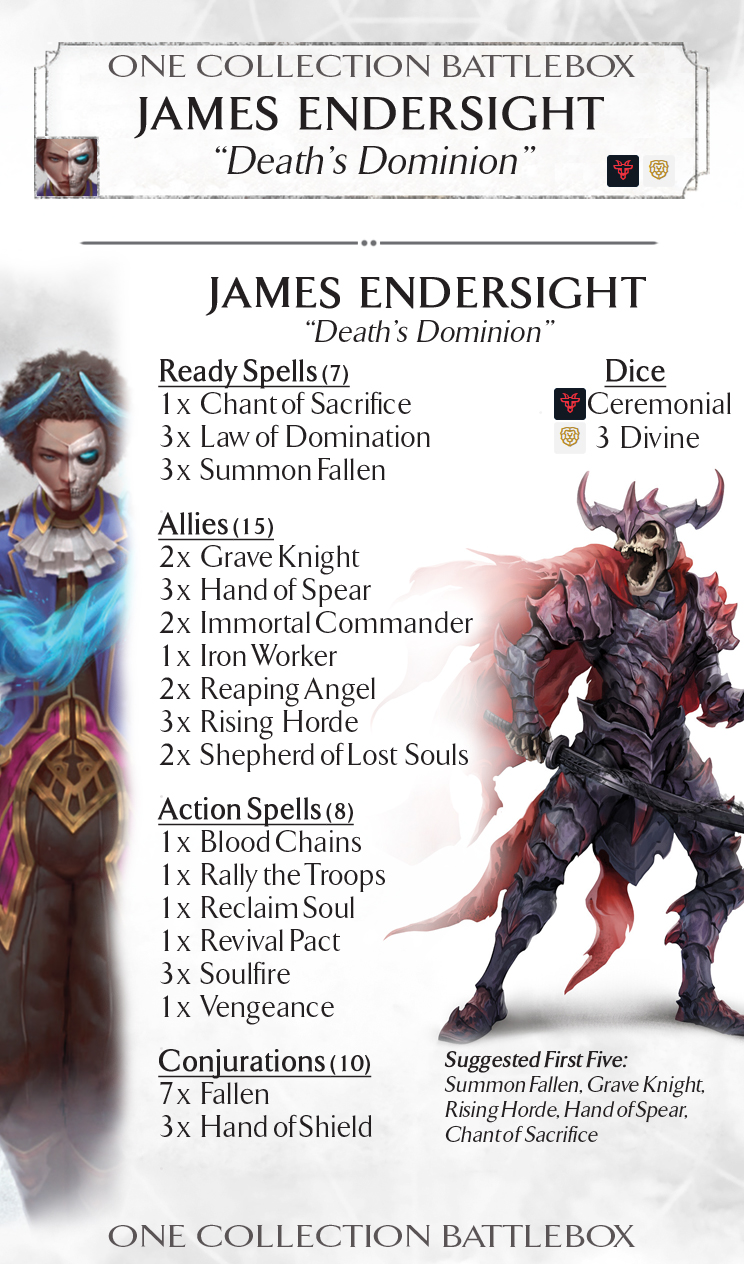
James: Death's DominionThe ferocity of the living army that serves James is matched only by the inevitability of the undead one that follows in its wake! This slow-building, aggressive swarm deck will smash through most opposition on sheer weight of numbers.
The core of the deck is the wide selection of allies, backed up by the endless hordes of zombies provided by Summon Fallen and Rising Horde. James can get a critical mass of allies quickly with his convene souls ability, and your opponents attempts to kill them will just result in more fallen to fight. There's an ally for every job, and they support eachother in a range of ways. The key to getting the most of it is good sequencing, and always being wary of running out of battlefield space. BF 7 might seem like a lot, but it fills up quickly.
To that end, a number of spells in the deck are included to both get extra use out of your units and get them off the table to make more room. Chant of Sacrifice will free up a slot every round. Law of Domination, when timed right, can clear a unit and kill off one of the opponent's, and is especially threatening with Grave Knight on the table. Blood Chains, Reclaim Soul, Vengeance and Rally each offer their own unique variations of battlefield unclogging with a secondary benefit.
The three allies in the Suggested First Five will give you a well rounded start, supported by more allies brought to hand via Convene With Souls (usually a shepherd or another rising horde) and the dice power. You can use the summon fallen in R1 if it gets charged up, or just hold it for later rounds. Chant of Sacrifice is there mostly for the PVP game - the chimera will generally chew through your units rather than letting you clog up - so that slot can be flexed for another card in PVE. |
|
|
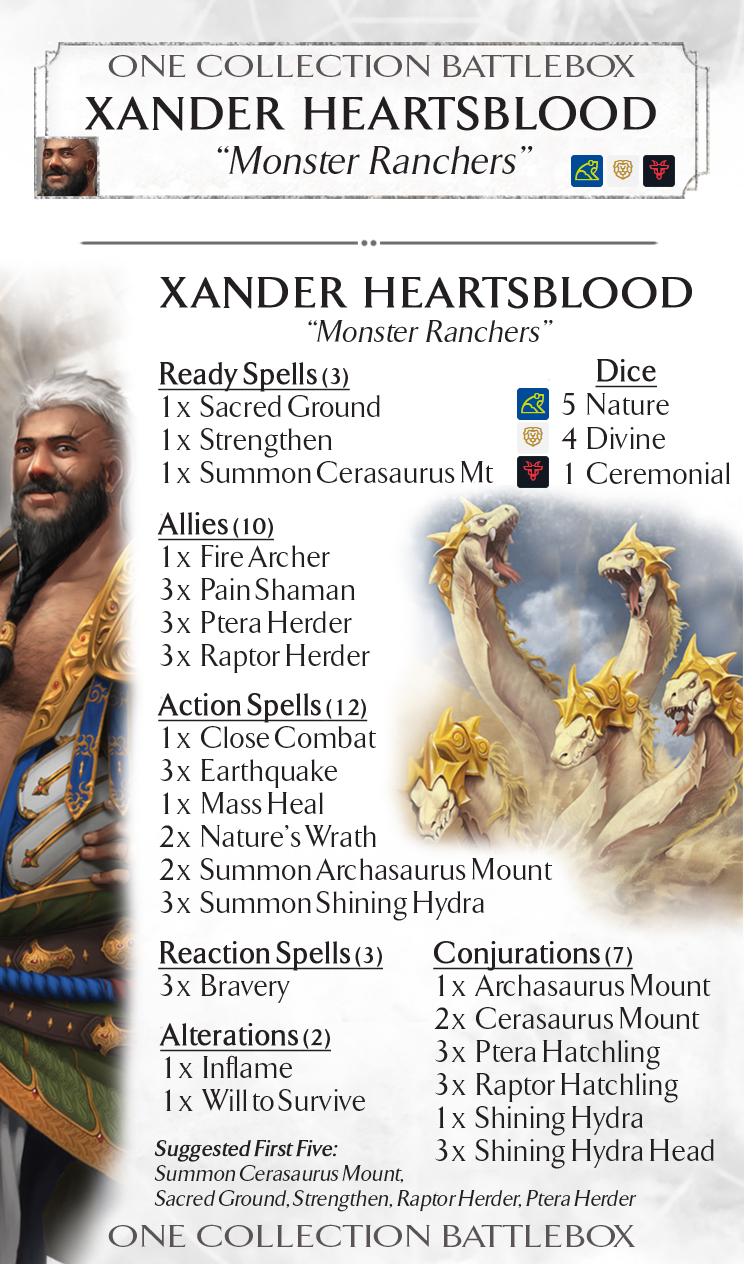
Xander: Monster RanchersThis ally-heavy midrange deck sports some of the game's most efficient units, bringing swarms of herders and their charges paired with larger mounts and monsters.
The heart of the deck are the herders, 1-cost allies that bring a pet conjuration in to play with them when they're played. These cheap-and-cheerful units are prime targets for the deck's two Mount spells, as they'll return to hand when the mount is destroyed. And if lost, they can be recurred via Xander's Reincarnate ability, ensuring you'll get to play them again and again. The dinosaur mounts themselves, along with the deadly Shining Hydra, give the deck some more durable and much harder-hitting options. This is a deck that wins by making a lot of units, and it does it better than most.
On occasions you do face wider swarms and big units though, Xander has powerful AOE spells in the form of Nature's Wrath and his own Earthquake. Those spells can even be rendered one-sided by using Sacred Ground on the same turn. You won't always want to though: that AOE damage can also clear exhausted units from your battlefield, and Shining Hydra can turn the wounds in to more heads.
The Suggested First Five gets Xander's basic setup online. It only creates a few units initially, but note that it also only spends 8 dice, freeing Xander to replay a herder after it's returned by Dismount or Reincarnate. In a pinch, you can simply meditate to find another ally to Reincarnate. A common flex is to swap Earthquake for Ptera Herder or Pain Shaman, ensuring you have removal to answer a larger threat. |
|
|
Dimona: Radiant HostThe army of Rayward is coming this way, and they've brought the cavalry. This aggressive, ally-centric battlefield deck supports the units with multiple mounts and layering synergies around use of the divine dice power.
The deck's foundation is its 14 allies, which will feel like even more thanks to the mount options and the recursion ability of Rayward Knights. Key to the deck are the Glory Aspirants, who can both fix dice and pull needed cards to hand, and these are often the first choice to ride a Shining Stag Mount. And all of them get much more threatening when backed by Piercing Light and Radiant Light on the spellboard. Getting the spellboard online will cost dice and time, but when even partially set up the efficiency of Dimona's units gets out of hand very quickly. When to play Radiant Lights is the hardest to judge: two in a round can make your units near unkillable, but it's also nice to be sure of one every round. Sinking dice in to Piercing Light early can feel counterproductive, but in a list with so many divine buffs the spell can quickly account for a lot of damage.
The spell suite is small but punchy, including Fork Lightning and Meteor. But Take To The Skies takes center stage as one of the most infamous spells in Ashes. It can be the ace in your sleeve, but it can also win a game almost single-handed if played in Round 1 against an unsuspecting opponent.
This deck has very flexible first fives thanks to its single dice color, but this one is a good middle-of-the-road setup that can adapt to the opponent. Use glory aspirant to dig for another ally, then mount it on shining stag. Ideally you want stag to die fighting, which will give you back your aspirant allowing it to be played again to pull your first Radiant Light. that will turn the glory in to a 2/2 and the rayward recruit that follows it in to a 1/3. |
|
|
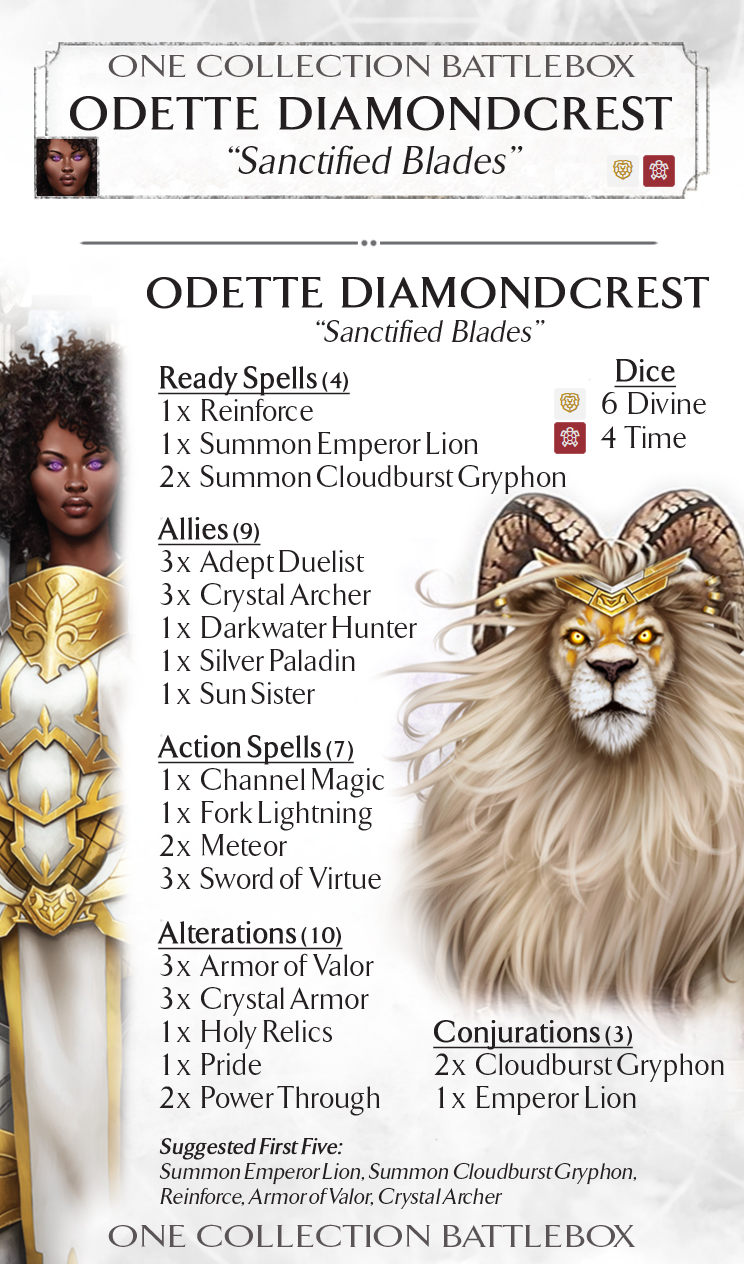
Odette: Sanctified BladesThis punchy midrange deck relies on a mix of hard-hitting conjurations and allies, in combination with Odette's own martial prowess, to take the battlefield by storm. Once the advantages start snowballing, the deck quickly becomes unstoppable.
Emperor Lion and Cloudburst Gryphon each offer excellent value for dice, favoring defense and offense respectively. The Lion is an alert blocker with a sturdy 2/4/1 stat line, while the Gryphon's attack allows it to threaten positive trades and pressure guard like few units can. These are supported by a solid cadre of allies, including the swarm-slaying Crystal Archers, Adept Duelists and a mighty Silver Paladin, all of whom can be searched for with Reinforce. The deck also includes 10 alteration spells - also searchable with Reinforce - to increase the survivability and hitting power of Odette and her forces.
If that wasn't enough, Odette brings some of the most powerful battlefield abilities and spells of any phoenixborn. Enter The Fray allows her to get in the thick of things and kill units herself, and with Armor of Valor up she'll take less damage for using both ETF and her Guard. The two-sided Sword of Virtue lets her destroy nearly any unit, or refresh and heal one of her own heavy hitters. and with a few Meteors and Fork Lightning, she has little to fear from wider battlefields either.
The Suggested Five gets Odette set up hits the table running with 3 units in R1 (and a possible 4th from Reinforce). and Odette's ability to take down a unit herself with Enter The Fray makes it feel like more. The goal in Round 1 should be to make good trades with your opponent's units, remove threats as they appear, and hopefully have a unit or two survive to the second round. If you can get that momentum going, it will be hard for the opponent to stop. |
|
|
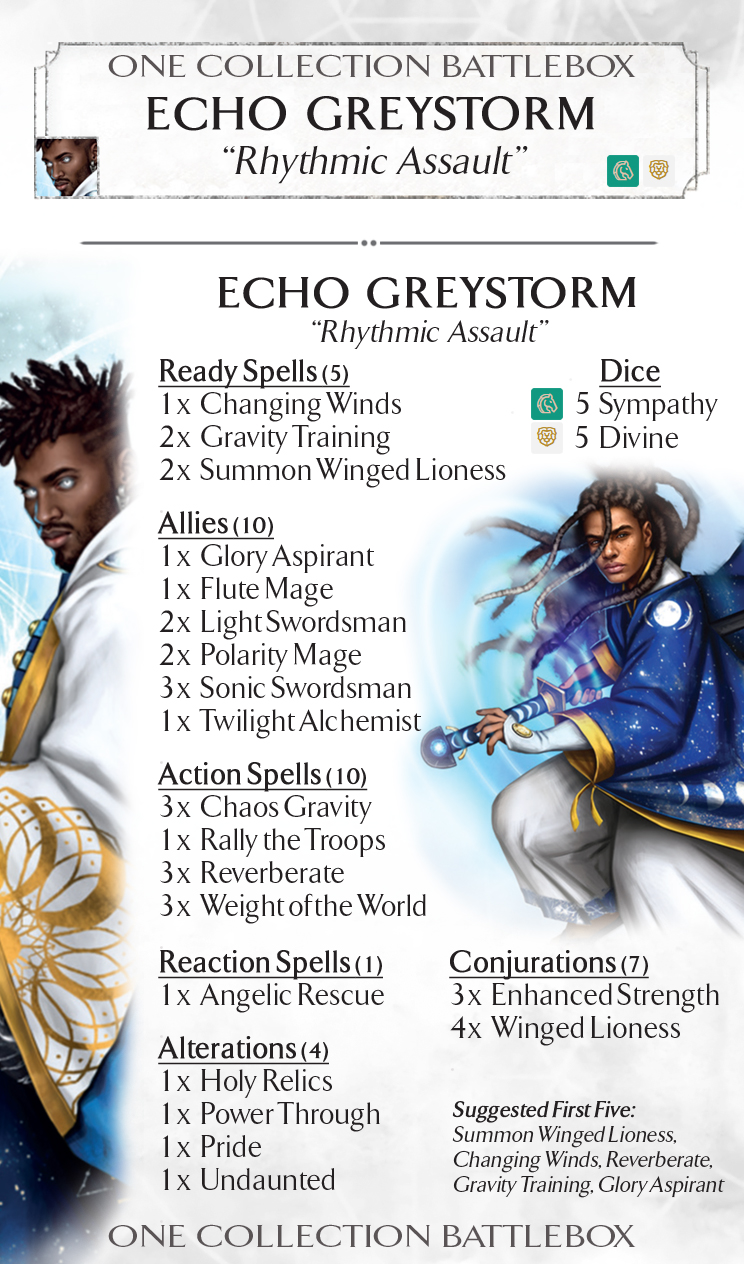
Echo: Rhythmic AssaultThis comboey battlefield deck is all about powerful units, buffing those units, and manipulating exhaustion tokens to get the most out of them. Dominating the battlefield with big swings of both units and tempo is the name of the game.
The spellboard plays a support role here, but it's an important one. Winged Lioness is a solid anchor for your battlefield, and its stalk can become a huge threat if it's buffed. Gravity Training is a key source of those buffs, made much easier to use by Echo's abilities. And Changing Winds, while a bit of a dice sink, provides much needed dice fixing and card sequencing in a deck that very much wants to control the sequence of the game. Your allies will do most of the heavy lifting, lead by the mighty Sonic Swordsman, and getting multiple swings out of a Sonic (especially a buffed one) will often decide a game decisively in Echo's favor.
Echo's uniques are at the heart of the deck, and being able to play them together in this format is an absolute blast. Weight of the World encourages you to use the Flux ability aggressively to control the flow of the round, while Chaos Gravity is a blowout spell once the battlefields get larger. The unit buffs love to be piled on Sonic, but Lioness or Light Swordsman can make great use of them too. Reverberate gives you some much needed ping against swarm decks that might otherwise stop your attacks getting through.
The Suggested First Five is a straightforward, balanced start that lets you set up your spellboard and creates a formidable battlefield in Round 1. Feel free to experiment with FFs though; this is a very flexible deck that can open in a huge number of different ways. It's possible to start double knight with Glory pulling a 2nd Sonic, to stack multiple refreshes on the Sonic, or even do a low-to-the-ground ally rush with Glory pulling Light Swordsman. |
|
|
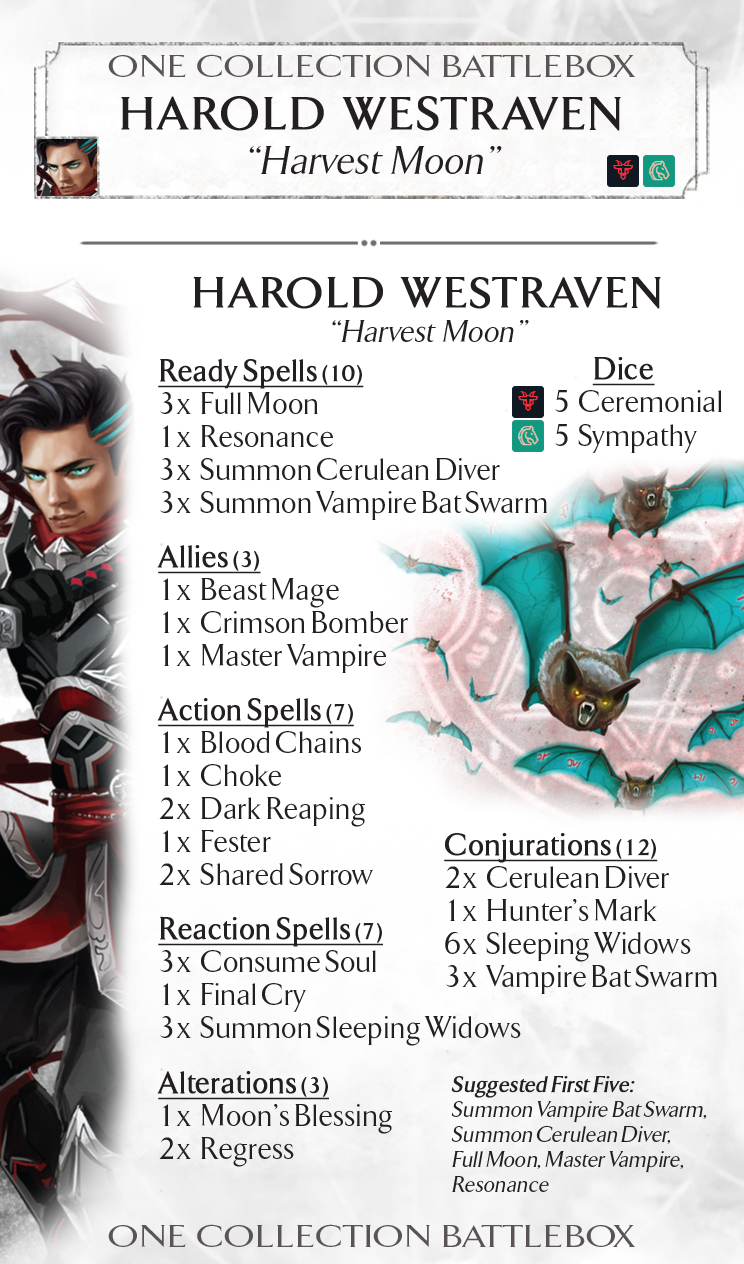
Harold: Harvest MoonHarold's deck is an aggressive swarm that takes control of the battlefield through advantageous trades and then wins with wide swings.
Cerulean Diver and Vampire Bat Swarm are two of the game's most efficient small conjurations. Backed by Hunter's Mark and the attack buff from Full Moon, they can reliably remove nearly any unit the opponent threatens you with. They're supported by a handful of allies and the powerful Sleeping Widows, which allows the deck to threaten wide, high damage swings early and to do so without advance warning. Harold will typically spend the first couple rounds trading for opponent's units and building advantage, then win with a big swing turn when the opponent can no longer field sufficient blockers.
The spell selection provides some existing utility to support the main plan, with special attention going to Dark Reaping which provides a way to create sleeping widows without the opponent's help and swing with them on the same turn. Full Moon once focused can act as a force multiplier for your entire battle line, while a toolbox of spells offer options for dealing with opposing units too big for your swarm to handle.
The Suggested First Five sinks a die in to Resonance to get focused Cerulean Diver from Round 1, which gives Harold a range of options for how to use his Mark. The cards will only use 8 of your dice, which leaves some flexibility to swarm the vampire bats or use a dice power. |
|
|
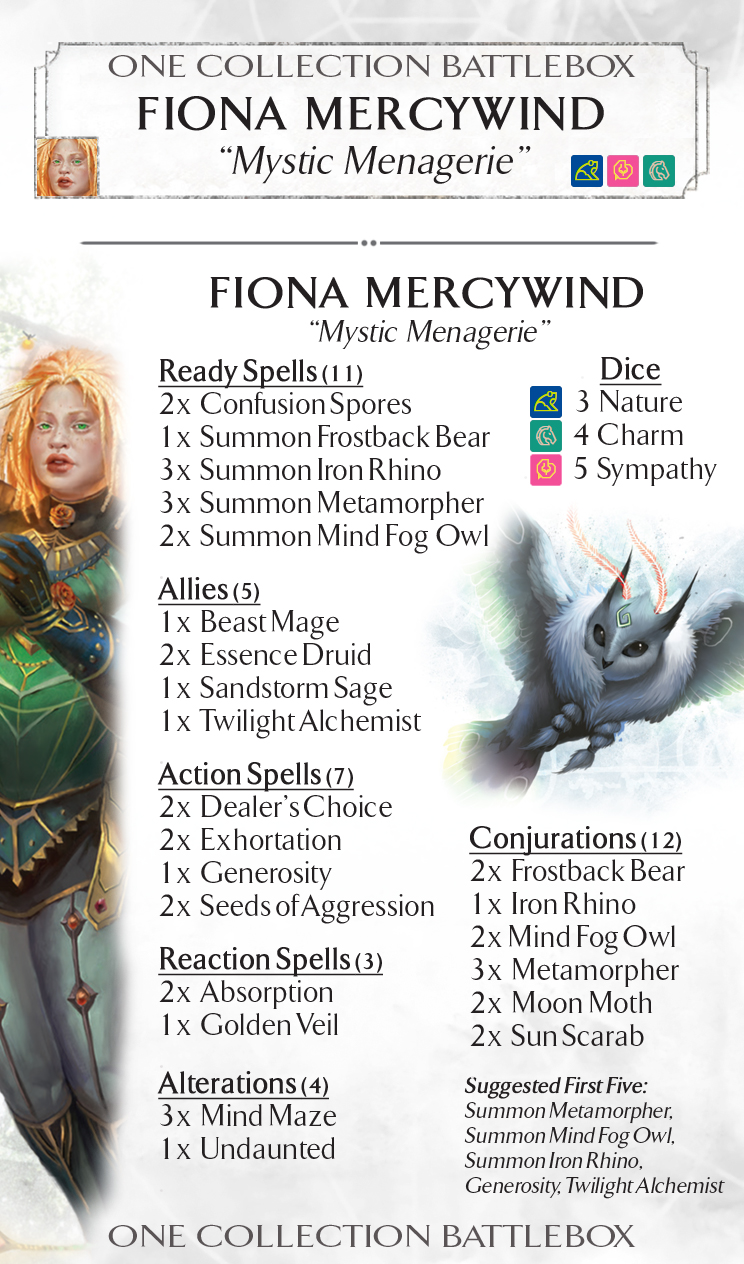
Fiona: Mystic MenagerieLike Aradel, Fiona's deck is built on a bedrock of efficient conjurations that let her build up an intimidating battlefield cheaply. That core is supported by a lethal set of bypass and attack buffing synergies that can end the game in an instant if opponents let down their guard.
Most games will see Fiona summon large numbers of Metamorphers, refreshing the book when necessary via Ingenuity or Essence Druid, and drawing lots of cards once focused. The meatier frostback bear and mindfog owl give the battlefield some heft, and working together can be tough for battlefields of smaller units to block effectively. Iron Rhino is not used every game but getting down a book or two early provides a gigantic threat in the latter half of games that run longer.
While some games can be won by simply trading for value on the battlefield, the bypass abilities of Frostback Bear, Iron Rhino, Mindfog Owl and Confusion Spores synergize to make it extremely tough for opponents to keep out every threat. A copy of Exhortation in hand can end a game the second such a window opens, allowing the Owls to put massive damage numbers on the opposing phoenixborn while defending units struggle to block the other attackers.
The Suggested First Five gives Fiona three of the lower cost books that compose her engine, plus a substantial amount of card draw to find more components and to fuel her Ingenuity ability (to refresh one of those books and summon again). This creates a fairly fast start that will put the opponent on the defensive immediately and hopefully lay the groundwork for snowballing battlefield advantage in later rounds. |
|
|
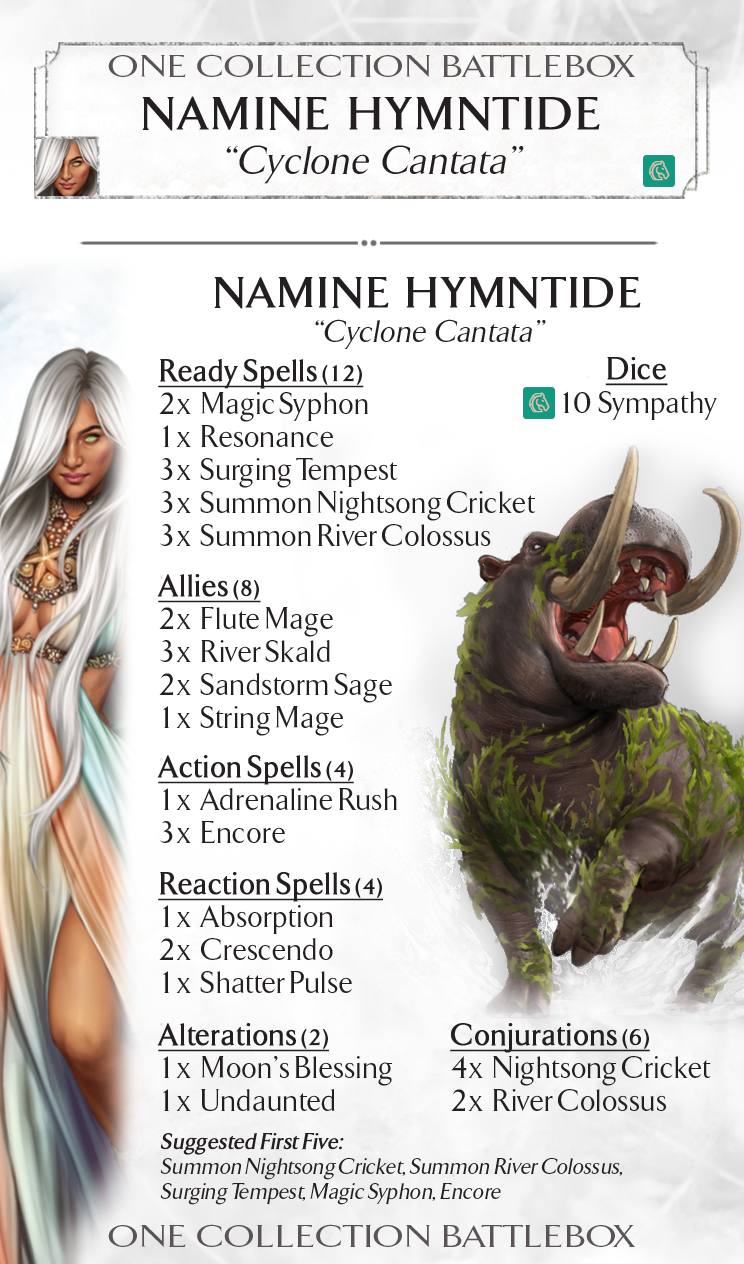
Namine: Cyclone CantataNamine's card-fueled spellboard engine is built around her unique Surging Tempest, supported by spindown, recursion, and a toolbox of useful spells.
Surging Tempest starts the game as a simple draw and dice fixing tool, but once focused it gains the ability to convert discarded cards to damage. On its own it's an ability you'd use sparingly, but Nightsong Cricket's recursion effect will see you get those cards back and keep the Tempest spinning all game. River Colossus provides a meatier conjuration that can block for multiple rounds and threaten big attacks, with Magic Syphon guaranteeing you have plenty of dice fixing to buff hippo. Syphon also provides a source of spindown pressure combined with Crickets, which balances out that you're recurring cards for them too.
The remainder of the deck is filled out by a mix of allies and spells that allow Namine to deal with any situation that crops up. They include plenty of card draw effects to quickly get the big spellboard online, and a number of secondary effects that discard cards for benefit. In PVP, it's important to carefully curate your discard pile as you play so that when Crickets die, your opponent is forced to give you back cards you can use. Encore assists with this, letting you use the same single card multiple times and being something in your discard your opponent never wants to let you recur, since it can then become whatever card you need.
The Suggested First Five gets your spellboard set up with some flexibility. You'll draw a card off Surging Tempest (and optionally the dice power and Namine's ability), and if you meditate Encore can give you a choice of cards from the discard. If you need a more aggressive start, you can also meditate off the Colossus book after you've summoned it, return it to hand, and play it again, allowing for 2 of the hippos in Round 1. |
|
|
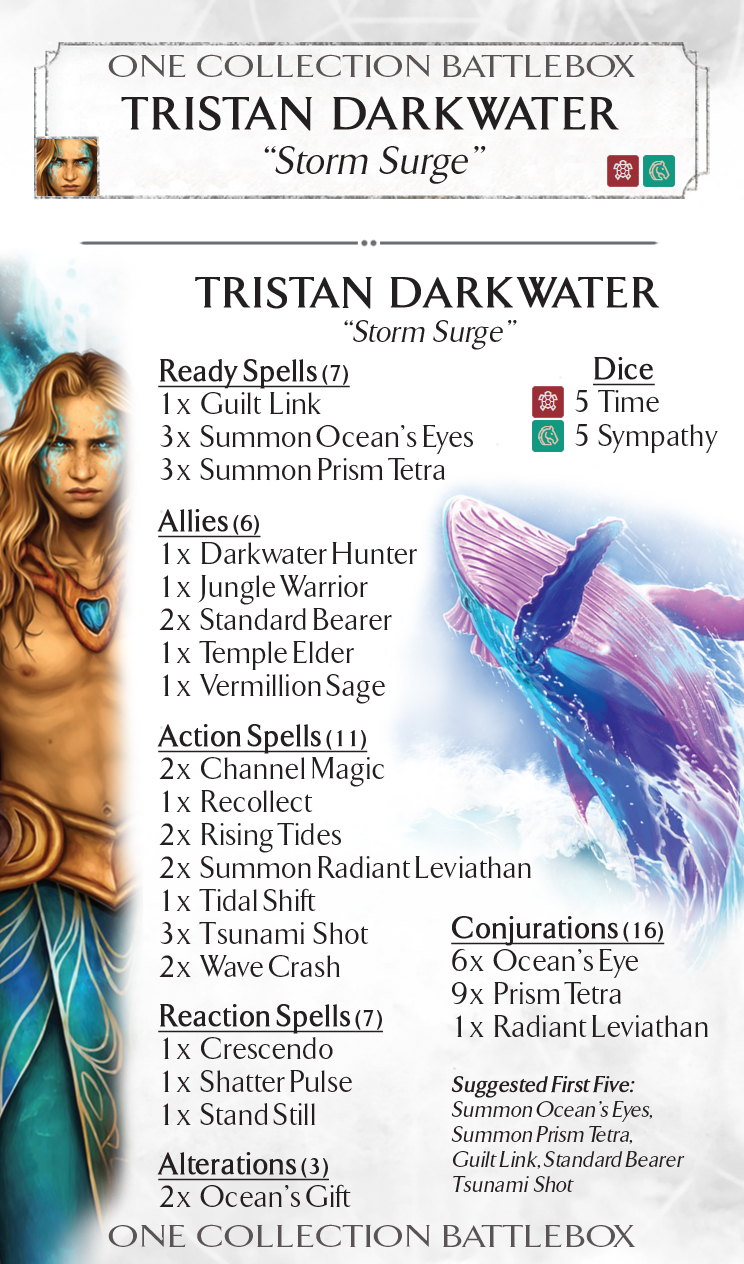
Tristan: Storm SurgeBringing a swarm that is rivaled in size only by Koji (and in speed by no one), Tristan's deck epitomizes the rush strategy: get units out fast, get lots of them, and never let up the attack.
His multi-summons, Ocean's Eyes and Prism Tetras, allow him to set up a battlefield extraordinarily quickly. Wishing Wing plays a supporting role here, often hanging back as a blocker until needed. All can benefit from the Magnify ability, but in most rounds it's most threatening on Tetras. The allies support the strategy, with Standard Bearer being especially important as it can allow your battlefield to put up staggering damage numbers in later rounds. Radiant Leviathan brings a heavy hitter, but also serves as an insurance package, both protecting your units from easy removal and threatening a massive Tetra counterswing if it's removed.
The spells are selected to smooth draws and rolls, and to provide a range of tempo/bypass oriented tools to help more of your big swings connect with the opposing phoenixborn. Crescendo, Shatter Pulse and Wave Crash can all remove blockers in the same turn as a swing, and Wave Crash can also let you drop Darkwater Hunter at reaction speed. Against another swarm, Stand Still will make it easier to get through. The new Rising Tides is also useful here, both for killing opposing units and for clearing your own exhausted ones.
The First Five comes out of the gate swinging with a pile of units in Round 1, and it's possible to go wider still by flexing out Tsunami Shot or Standard Bearer for Tidal Shift. By threatening so much damage early, the opponent is on the back foot immediately, and Tristan can win games just by keeping the pressure up from that early start. Care needs to be taken when sequencing the FF however, especially when facing decks that have a lot of AOE or ping since most of your units can be taken out fairly easily. |
|
|
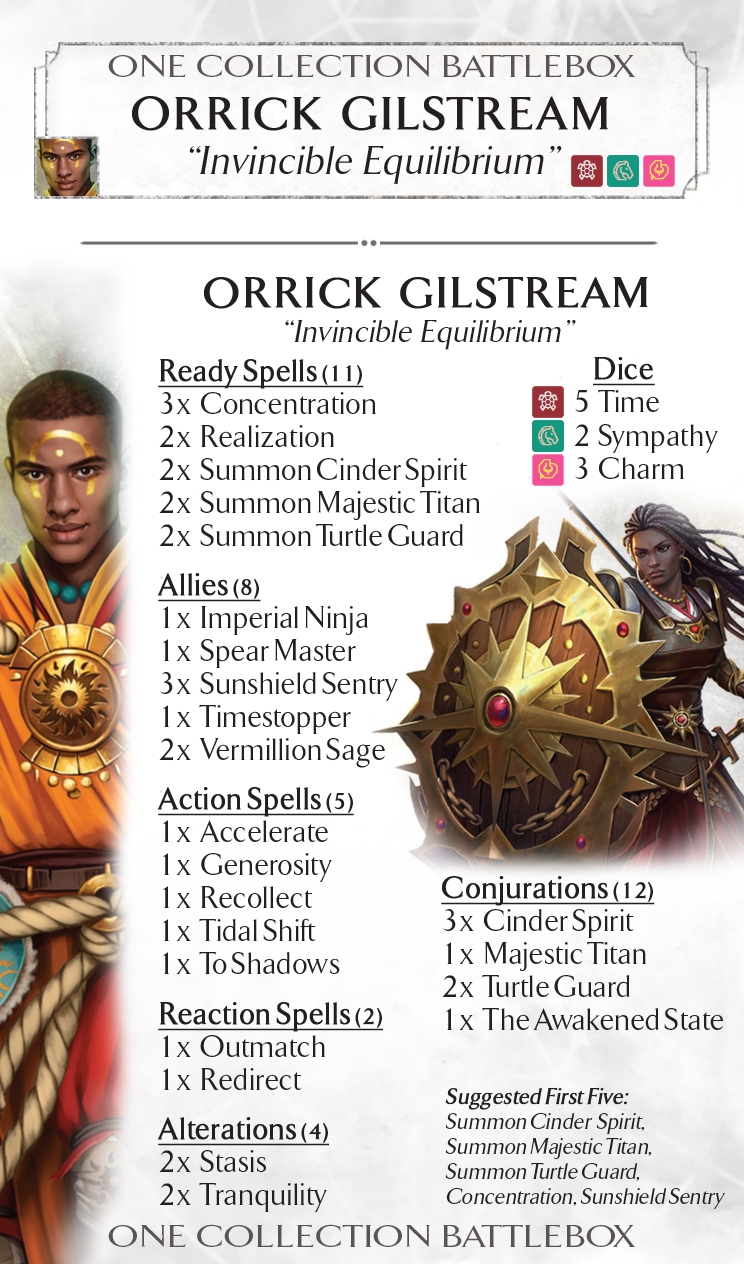
Orrick: Invincible EquilibriumThis unusual control hybrid excels at locking down the battlefield and then grinding the opponent down. Its primary wincon is attrition using its efficient units, one it can bring to bear surprisingly quickly. But if that doesn't work in securing a win, Orrick's Awakened State will bring things to a quick conclusion once it comes online.
The combination of units offers a balanced selection of offensive and defensive options, which can both chew through your opponent’s forces and buy you time to get your spellboard assembled. Cinder Spirits are the more aggressive choice, able to strike fast or trade for multiple opponents, while Majestic Titan’s large body and bypass threat backs it up. Turtle Guard anchors the line with a hardy unit guard. Realization offers some extra draw power, and a chance to re-use some cards later in the game.
Concentration forms its own distinct minigame, initially just a source of draw and dice fixing, but always be aware of how soon you can feasibly get Awakened State online. The allies and spell suite are focused around dealing with threats the conjurations cannot. Sunshield Sentry and Spear Master are there to give you options against wider battlefields. Flock Shepherd and Timestopper can make it a bit tougher for opponents to get around (or over) your blockers. To Shadows and Redirect provide some options for dealing with bigger units you can't easily block, while the combination of Stasis and Tranquility can disable units for multiple turns.
Getting the spellboard set up early is a priority for every First Five in this deck, but it has to be balanced with the ability to stabilize against aggression from the other side of the table. Getting your three books and going alongside Sunshield Sentry gives you a sturdy 4 blockers in Round 1. Depending on the opponent, you can consider flexing Titan for another ally, or digging into your deck even faster by starting Generosity. |
|
|
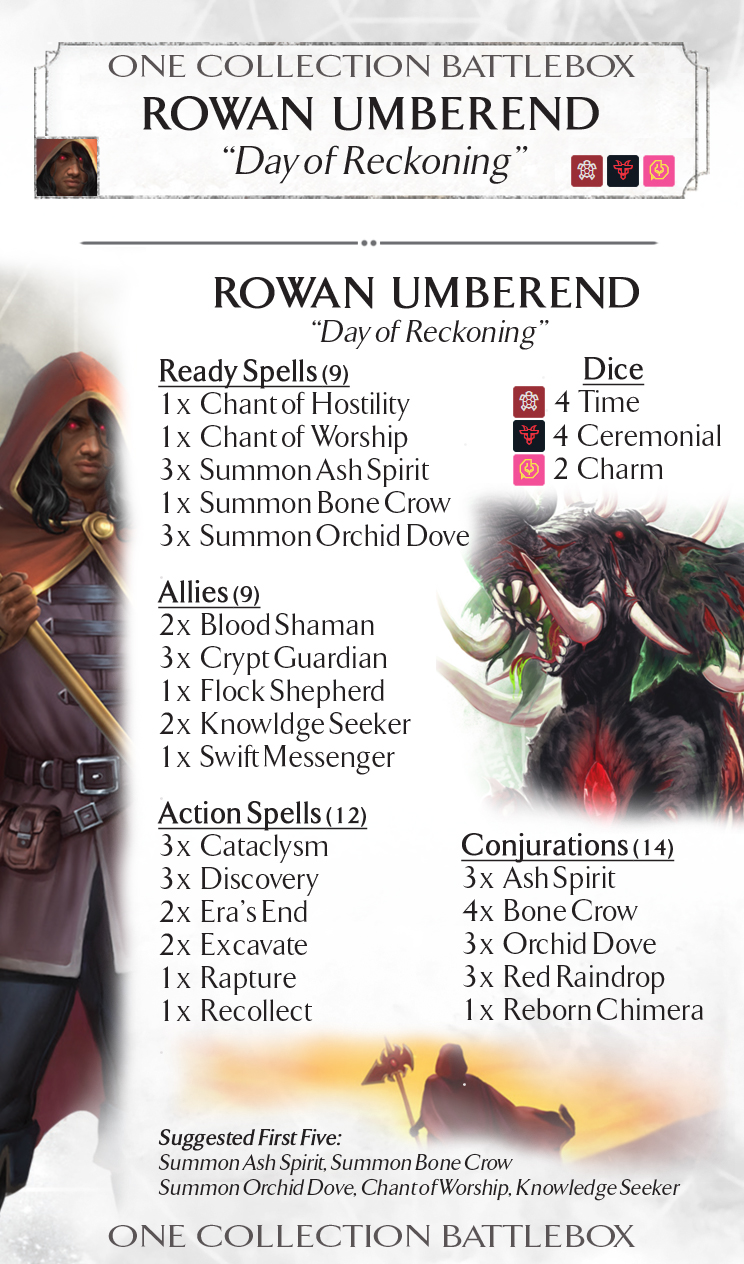
Rowan: Day of ReckoningThis control deck is built on a slow but inexorable fatigue engine, backed by Rowan's lethal end-of-round synergy effects.
The deck's plan revolves around stalling with units and removal, slowly grinding the opposing Phoenixborn by means of Orchid Dove and Ash Spirit, and eventually getting Reborn Chimera online to end to game. A cornerstone is the powerful Era's End spell, which will trigger a range of "end of round" effects, including those on Red Raindrops, Ash Spirits, and Crypt Guardian, and potentially spawning the Reborn Chimera.
The rest of the deck works in service of that goal. The many card draw and filtering effects help you search for Discoveries, while the remaining allies and spells give you tools to deal with opposing units and slow down the opponent's deck. Rowan's unique Cataclysm spell is especially effective in this regard, both clearing units and providing you additional blockers. Excavate is useful as both removal and to search for key cards, and Rowan's exhume ability ensures you can always summon bone crow and charge your chants, in addition to getting second use of your allies' abilities.
First Fives for this deck are fairly flexible, with the suggested one focusing on setting up a stable base rather than rushing for early Discoveries. Knowledge Seeker and Chant of Worship can be used to sort draws going in to the second round, which will normally see the 3 raindrops come online in Round 3. |
|
|
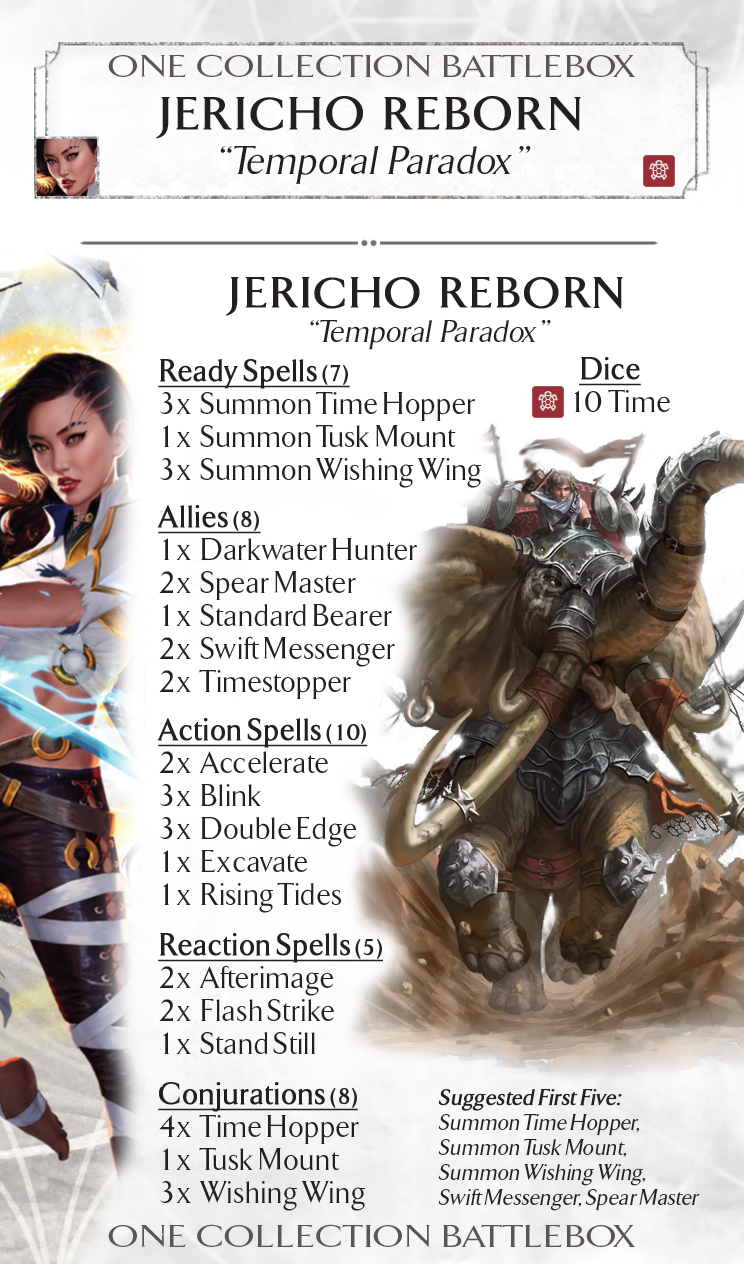
Jericho: Temporal ParadoxThis aggressive tempo deck aims to put the opponent on the defensive immediately, and a high density of side action and reaction effects make its plays wildly difficult to predict.
Front and center are its 3 conjurations. Tusk Mount threatens to turn any ally in to a monstrous threat, and if you have an unexhausted ally on the table at the beginning of the turn, it can be summoned on a side action and swing immediately. It's also a prime target to refresh with Blink, and its attack presents the opponent with a choice of two bad options: take a whopping 5 damage, or throw something in front of it and give you two extra units. Meanwhile the combination of Wishing Wing and Time Hopper, which work together to build potent swings and a ton of card draw, widen the battlefield and give you ways to handle smaller units.
The allies provide many choices for Tusk Mount riders, and with Swift Messenger and Timestopper coming out at reaction speed you can get an ally when you need it. Spear Master and Standard Bearer are both effective users of any extra status tokens produced by the Time Hoppers, and the many tokens also make Flash Strike a lively threat. And with so many allies, Afterimage is a potent deterrent, providing not only removal but the chance to use those allies again and again. Accelerate is an all-star in this deck, as it dramatically opens up the options for what you can accomplish in a single turn with the deck's many side actions. Finally, Jericho's two uniques offer the potential for incredible efficiency and, with Stand Still, further ways to bypass blockers.
The Suggested First Five sets up the spellboard and brings Swift Messenger as both a mount ally and an easy way to draw a card set up with Prepare. What to Prepare varies by matchup, but common choices include a second Double Edge or Blink, a second Time Hopper book, or another ally. |