One Collection Battlebox Decks

One Collection Battlebox (OCB) is a format designed for quick pickup play, using a complete collection of Ashes Reborn cards as of the end of the Red Rains cycle (11/2025). It includes a fixed, preconstructed deck for each of the 28 Phoenixborn printed up to that point, and requires only the cards available in a single collection. There are no overlaps in the cards used by each deck, so a player can have all of them built at the same time.
These decklists are based on several physical battleboxes of this type created by veteran players in the Ashes community. Each of the decks have been heavily tested in both PVP and PVE game modes by the discord community, but I anticipate continuing to refine and update them in the future.
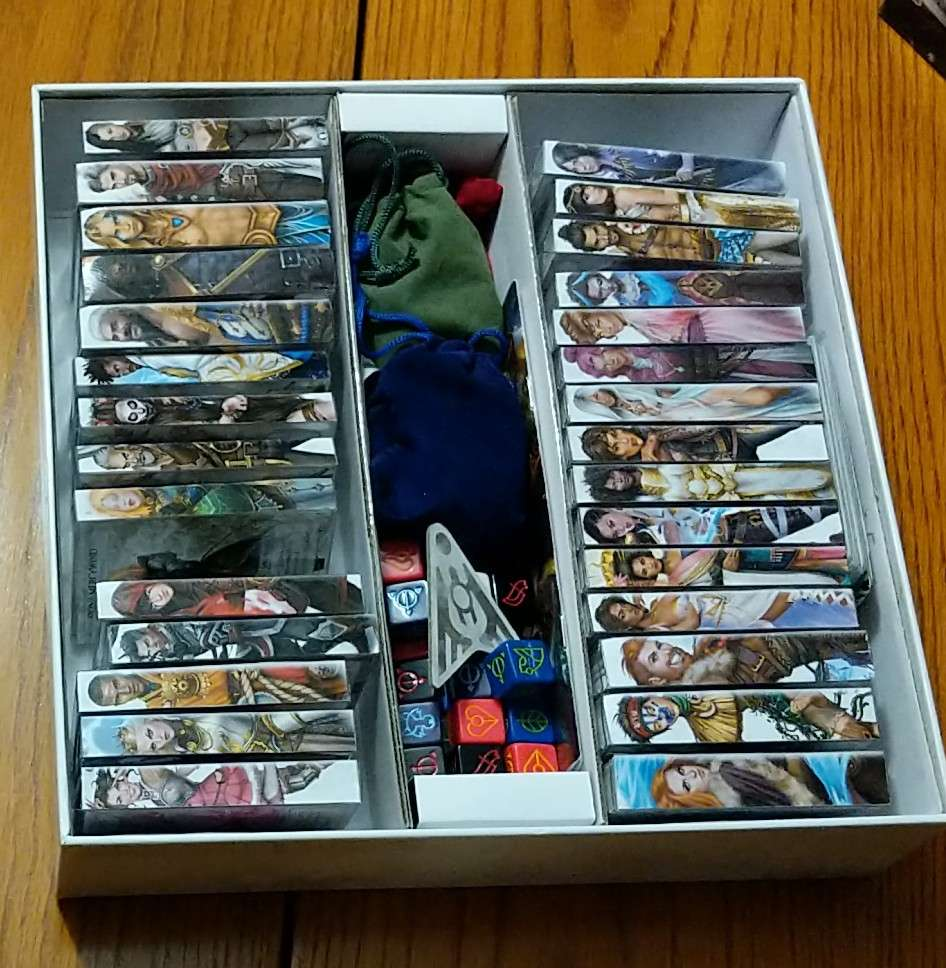 The assembled battlebox ready to hit the table!
Because this is a preconstructed format, OCB deviates in a couple respects from standard constructed play:
#1 - Any Chains or Bans From The Organized Play Document Are Not In Effect
Simply put, the balance controls used for constructed play are not required here. Problem combos or balance issues that make themselves known can be addressed by simply adjusting the decklists.
#2 - Restrictions on Phoenixborn Uniques Are Not In Effect
This means it is permitted for these decks to include more than 3 total uniques (ie phoenixborn signature cards), and it is permitted to put two different uniques in your First Five. This is a pragmatic change; Allowing more unique cards to be played in total means that, in effect, the cardpool has 28 more basic-costed cards than it would otherwise contain. A bonus is it also gives veteran players a chance to explore combinations that are not available in other formats.
The Decks
Each of the decklists below is given on a printable reference card. These are the same dimensions as the dividers that come with the Ashes Big Box storage. They can also be cut or folded at the dashed line to make them card size, for sticking on a deckbox or in a sleeve. I've included a quick overview and some tips for each of the decks to help players get started.
|
|
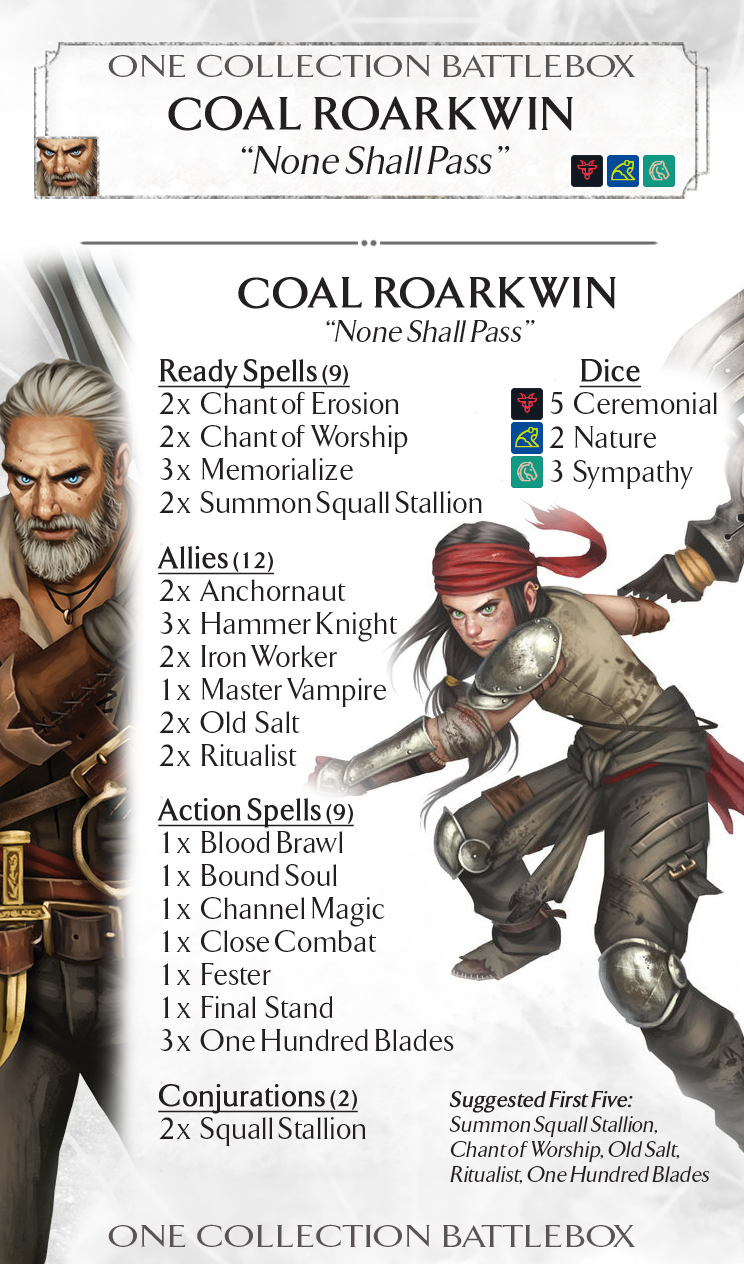
Coal: None Shall PassNo phoenixborn enjoys drawing cards as much as Coal, and this deck is built around letting you draw and use a ton of cards, put them back in your deck, and then draw them and use them again.
The deck is oriented to the battlefield, with Squall Stallions and beefy allies giving the opponent a lot of threats to worry about. They're backed up by a toolbox of spells, made more useful by the recursion engine letting you play the most needed spells over and over. Once the spellboard is set up, a single ally death will fill all copies of Memorialize and Chants. The spellboard provides plenty of Main actions, so Coal always has ample time to slash, build up stallions, or use memorialize. Ritualist is good for both chant search and recursion, and a chant that you can painlessly bring back with Ritualist is among your most reliable slash fodder. The deck has the ability to recur all of its cards in one way or another (provided you've played at least one Memorialize) and figuring out what to play, slash and recur is key to getting the best out of it.
Coal is capable of some incredibly cheeky plays late game by recurring then immediately drawing and replaying key spells to dig himself out of a hole. Humble spells like Channel Magic or Bound Soul start to feel like an engine if played repeatedly, and if you're in dire straits there's always the option to meditate or slash away your hand and play Final Stand a few times! If in doubt though, just keep bringing back One Hundred Blades - it's almost never bad.
The Suggested First Five a middle-of-the-road option, giving you the core of your draw engine with some units to hold down the fort. However, this deck's first fives are very flexible. Going aggressive with Hammer Knight and Master Vampire in Round 1 is an option, as is going slower by playing more of the spellboard. |
|
|
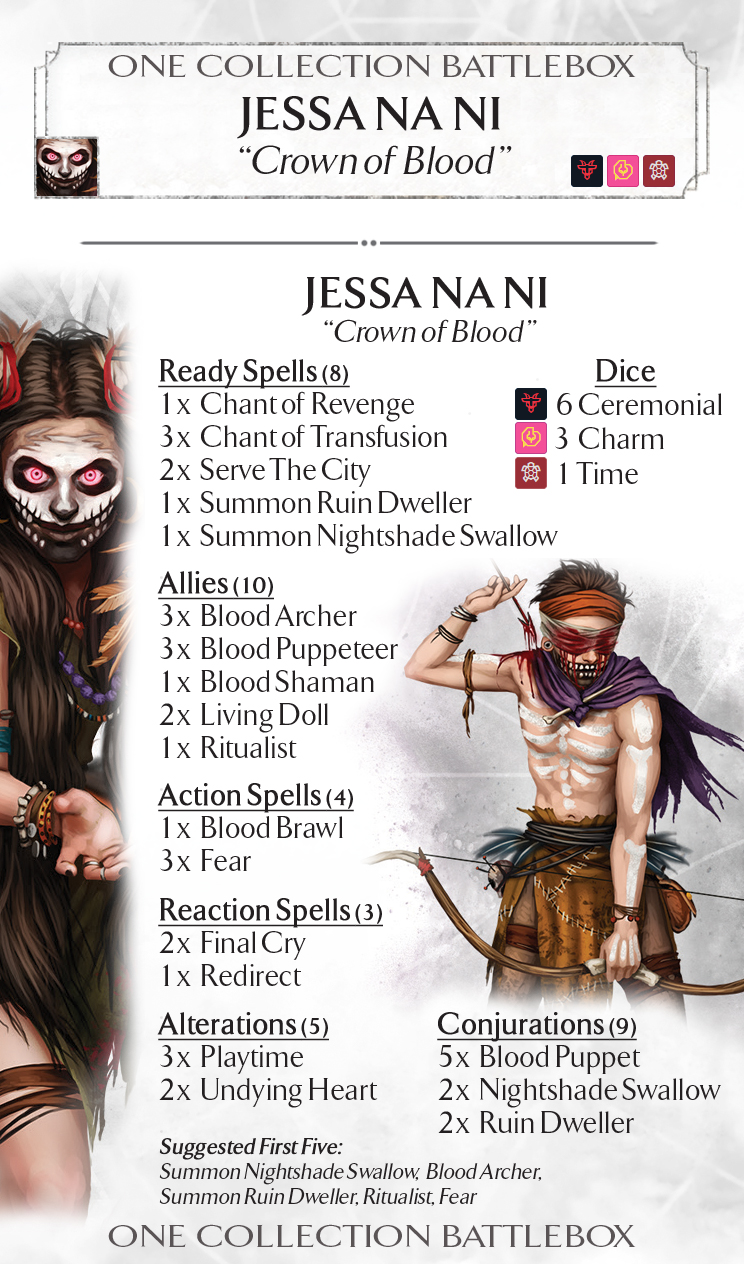
Jessa: Crown of BloodThis deck offers the most focused burn plan of any deck in the battlebox, rooted in Jessa's powerful Screams ability. That makes it very dangerous in PVP, although it also means the deck can be tricky to pilot against the chimera.
Jessa's gameplan relies on controlling the flow of the game and deal incremental damage to the opponent until they are in range to be finished off with Screams. Blood Puppets and Playtime offer the potential of burdening the opponent with ongoing damage, while Living Dolls combined with Serve The City and Chant of Transfusion can send wounds from the battlefield directly to the phoenixborn. Screams and Final Cry further punish the opponent as units are killed, making death slow but inevitable.
When dealing with aggressive opponents - especially the chimera - you'll need to do more than just burn. Chief among your control options is Blood Archer which can hand out a ton of damage, especially when combined with Chant of Transfusion. Given enough time, the archers can clear an entire opposing battlefield, and it's well worth using the ceremonial dice power or Undying Heart to get them back into your hand if they're killed. Nightshade Swallow is a solid defensive unit, and in a pinch the Blood Puppets from Puppeteer can be kept on your side to be used as blockers or spell fuel. Your ace is the Fear spell, which can be held back to deal with larger units that your allies can't effectively handle.
The Suggested First Five is one of several possible FFs this deck can run, and Jessa needs to be a bit more flexible than most - especially when shifting to PVE where the burn plan takes longer to deliver results. Blood Archer and Ritualist delivering Chant of Transfusion are likely to find their way into most Fives, but any of the other 3 cards can be considered for flexing out for cards like Blood Puppeteer or Fear. |
|
|
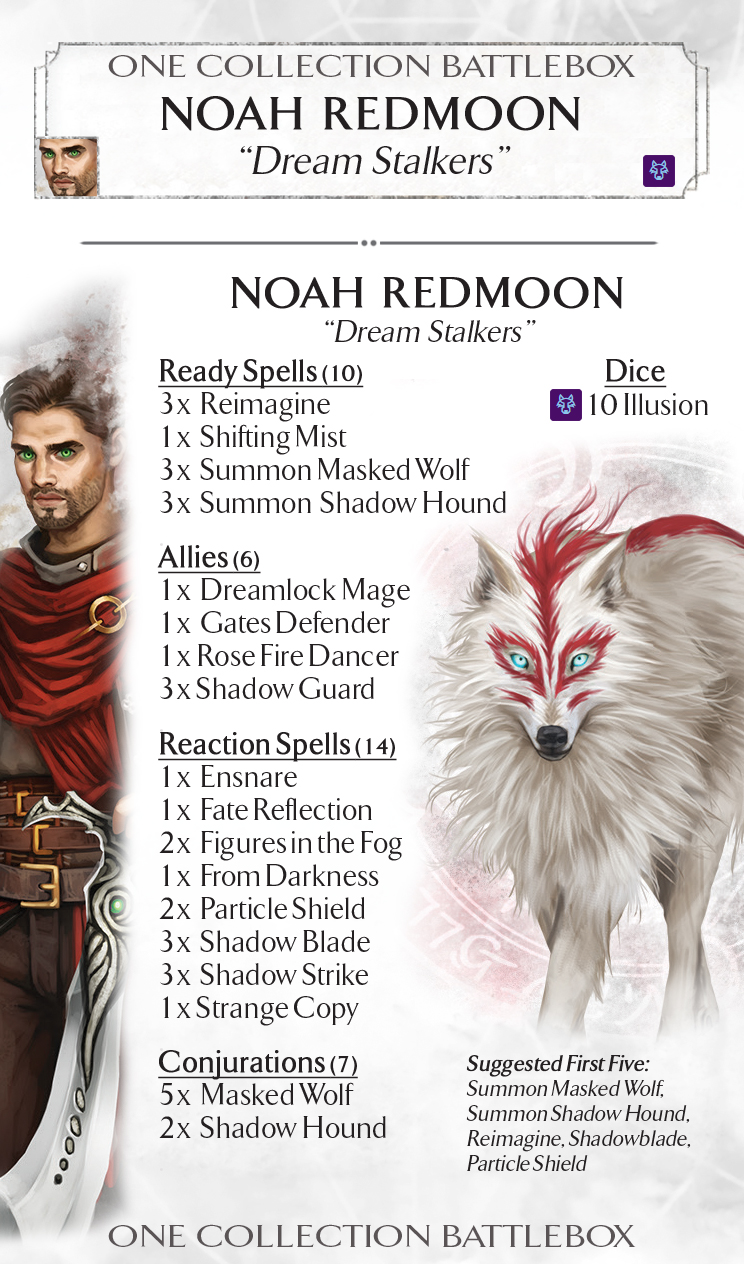
Noah: Dream StalkersFeaturing a whopping 14 reaction spells - plus 4 allies that can be played at reaction speed - Noah's deck leverages Reimagine's synergies with illusion dice to simultaneously dominate the battlefield and pressure fatigue via dice spindown.
The deck is relatively unit-light, but the units it brings pack a punch. Masked Wolf is one of the rare side-action summons, able to be declared as an attacker the same turn it comes in to play. They won't stick around long, but the Wolves are guaranteed to do some damage while they last. Shadow Hound, by contrast, is one of the hardest conjurations for opponents to interact with since it can't be targeted while unexhausted; but watch out for AOE effects that don't target. Shadow Hound becomes even deadlier late in the game, when the focus effect on its summon book can pick off small units for no extra cost. These two hunters are backed up by a small selection of allies.
Using Reimagine to stretch your dice is what sets the deck apart. The illusion dice power should be used aggressively provided you have reactions in hand to spend the stored dice; With a total of 18 cards that can be paid for with Reimagine, you usually will. Chief among these is Noah's lethal Shadowblade unique, but all the spells have useful applications. Don't forget that Shadow Guard and Gates Defender can also be paid for with Reimagine dice if they are played using their blue box ability! This combination is one the rare examples in Ashes where it's possible to get a unit on the table for less than its full dice cost, and doing so can quickly turn the tide in your favor.
The Suggested First Five for this deck only gives you a couple units to start, relying on Shadowblade to help check early aggression and draw in to more threats. Particle Shield, fueled by Reimagine, will also draw a card and help ensure both your wolf and shadow hound have a chance to do some damage. While most Fives will start the books, any of the other cards can be flexed out to add an ally or two for matchups where you expect to need more blockers in Round 1. |
|
|
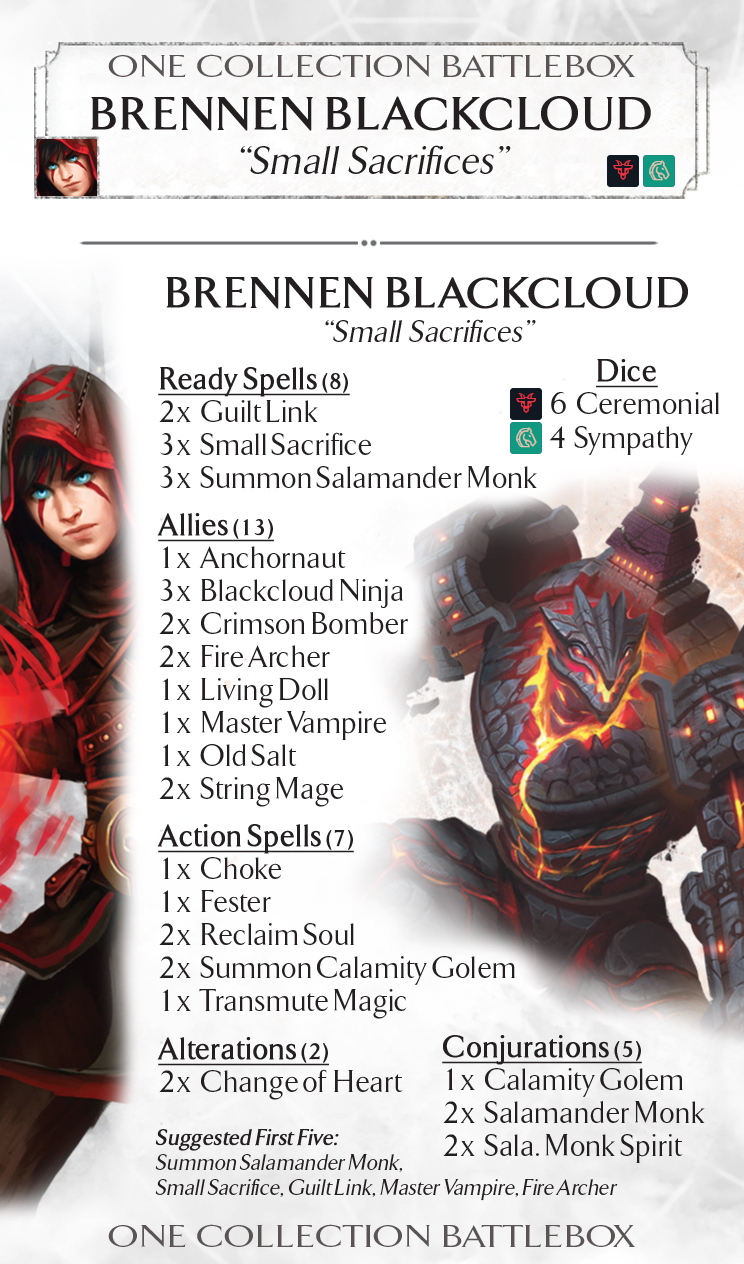
Brennen: Small SacrificesThe philosophy of 'easy come, easy go' is at the heart of this agile engine deck. Brennen can play a lot of units, but few of them will stay on the table long. The deck can play aggressively to the battlefield supported by synergistic removal tools, but it has a capable burn-based plan too.
Salamander Monk and Guilt Link form your first line. The Monks ensure a steady supply of blockers and spell fuel, and Guilt Link will both punish early aggression and give you a way to deal with big threats later. Small Sacrifice is the real star of the show though, especially working alongside String Mage or Living Doll who can throw the extra wound at your opponent in the same turn. This can be supported by Change of Heart throwing even more damage while letting you use allies' enter-play abilities over and over again. Note though that you won't always want to use Change of Heart; if your opponent is vulnerable to being burned down, Brennen's default ability Spirit Burn can be more useful.
An important aspect of playing the deck is recurring allies via the ceremonial dice power. You will almost always meditate and recur allies in Round 1 since, while the spellboard is inexpensive to set up, it does require three cards of your first five. Late game, recursion is important to keeping key allies like String Mage on the field. Reclaim Soul can provide the little bit of extra HP to recur more allies when needed. Calamity Golem won't see play every game, but can be a game-winner in some matchups, and Small Sacrifice and String Mage can move wounds on to and off of it as needed.
The Suggested First Five sets up the full spellboard, but it will require meditating for some allies to recur to make use of all your dice. An alternate First Five can be built around starting Change of Heart with an ally you'd like to play multiple times. It's also possible to open with Calamity Golem, which can put the opponent on the back foot right out of the gate. |
|
|
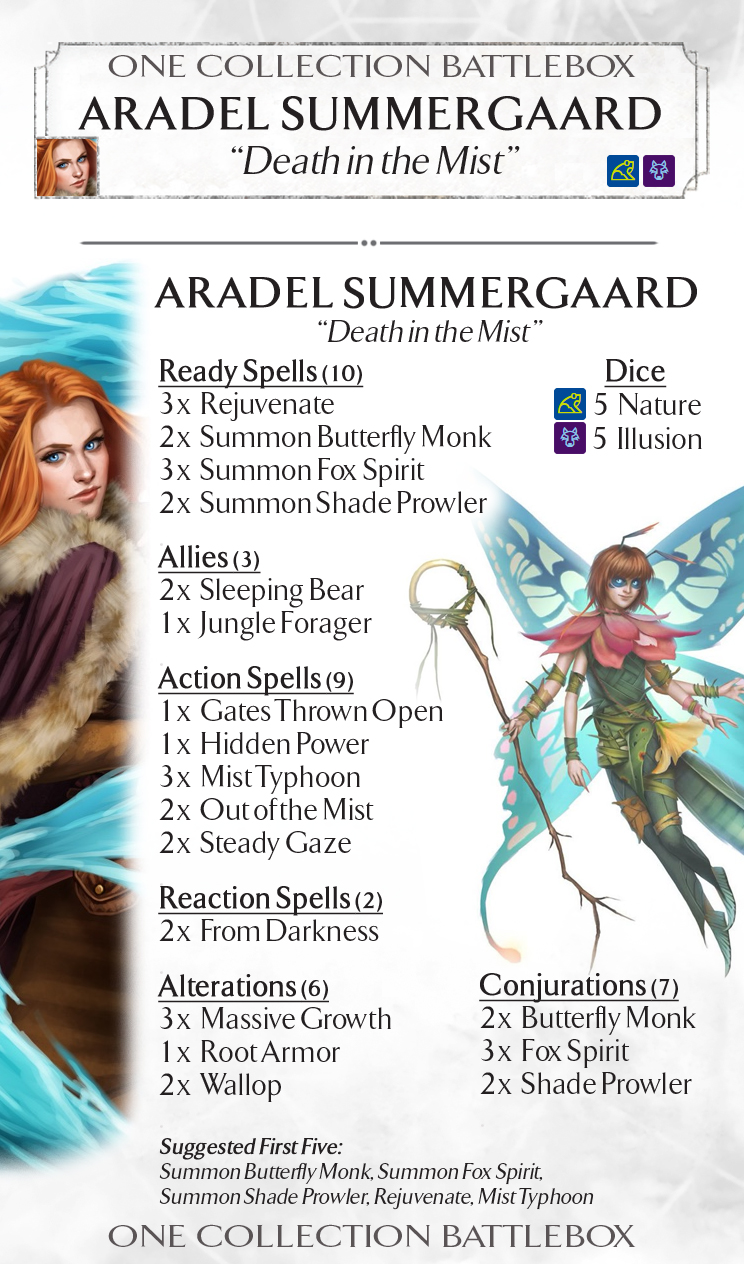
Aradel: Death in the MistAradel heads up a conjuration-centric battlefield deck. Its spellboard is very efficient, allowing you to out-value opposing decks simply by making more units every round, and frequently by removing their units for less dice than they cost to play.
The core gimmick relies on getting repeat value out of Shade Prowler using the Rejuvenate ready spell. Prowler is frequently able to kill two opposing units with a single attack, and since it disappears at the end of the round anyway the opponent does not have a strong incentive to clear an exhausted prowler. Don't worry about using Rejuvenate every round or on every prowler, but always be looking at opportunities to capitalize on the extra attack. If you get a lot of tokens on rejuvenate, it's possible to buff prowler with Massive Growth and get multiple swings with it - this can do a ton of damage very quickly.
The deck includes a selection of spells to help Aradel deal with threats her units can't easily handle. Mist Typhoon and Steady Gaze are straightforward answers to other swarms or taller threats. Meditate ahead if you plan to use Out Of The Mist; since it's a side action you can summon another unit and play a bigger OotM on the same turn. In a pinch, Hidden Power can also give you the dice for an untelegraphed OotM. From Darkness can give opponent's a nasty surprise fueled by a Sleeping Bear or a Massive Prowler that's already attacked. Mist Typhoon, OotM and Hidden Power also all draw a card, helping Aradel find more of the summoning books that fuel her battlefield.
The Suggested First Five works equally well for PVE or PVP. Lead with fox spirits, who will help by charging up rejuvenate for a prowler later. Mist Typhoon is generally useful, but don't be afraid to flex it out for another 2-cost card. Note you will have an extra die unless mist typhoon draws something useful; Keep an eye out for chances to make use of a dice power. |
|
|
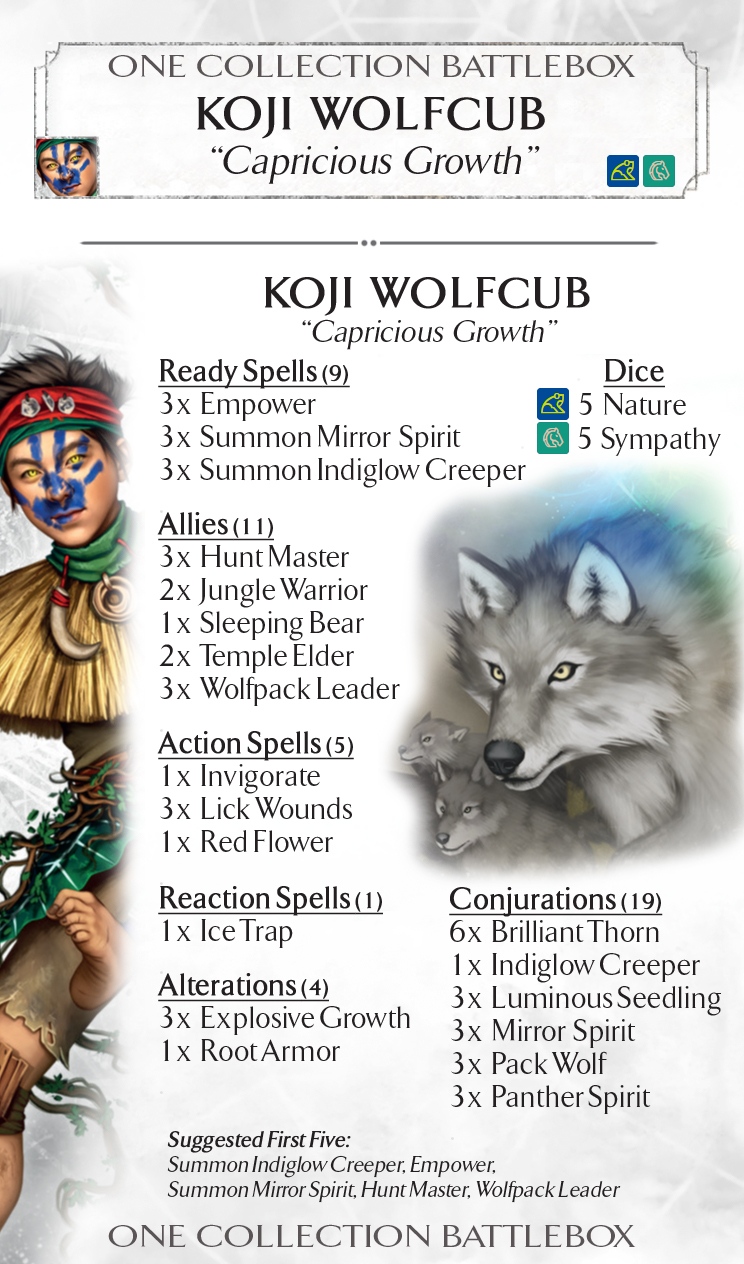
Koji: Capricious GrowthThe first true status token engine in the battlebox is Koji's army of medium-sized conjurations and allies, which starts slow but can quickly grow into an avalanche once the engine gets turning.
Central to the deck is Indiglow Creeper, which like a pokemon evolves from a modest beginning in to an unstoppable monster. The opponent has some limited opportunities to suppress the build up of creeper while it's in its creeper or seedling form, but once things get rolling and you have multiple seedlings on the table, it becomes almost impossible to check. Backing that up are the Mirror Spirits, a low-cost high-threat X/2 that serve as a useful outlet for any excess status tokens produced by the engine. Empower is included as an extra status token producer when you're in a pinch, and if it gets Focus online can double as a powerful source of direct removal.
Your allies and spells are there to keep pressure on, especially in early rounds, and to support the main plan. Hunt Master and Wolfpack Leader both bring additional conjurations with them, capitalizing on Koji's wide battlefield. Lick Wounds keeps Koji alive but it can also get an extra turn out of your units, and Explosive Growth threatens to turn any token-holding unit in to a one hit kill.
This straightforward First Five sets up your key engine pieces, and then gives you a couple allies to help protect them. You will generally open the round with either Indiglow Creeper or Hunt Master, and Mirror Spirit will usually be held until late when there are a lot of exhaustion tokens on the table to fuel it. If you can, try to get Empower down before the creeper dies, as it will allow you to fuel up the seedling in a single turn with Koji. The opponent is likely to focus on the more immediately threatening Wolfpack Leader and Hunt Master, which can provide an opening to use Blossom in Round 1. |
|
|
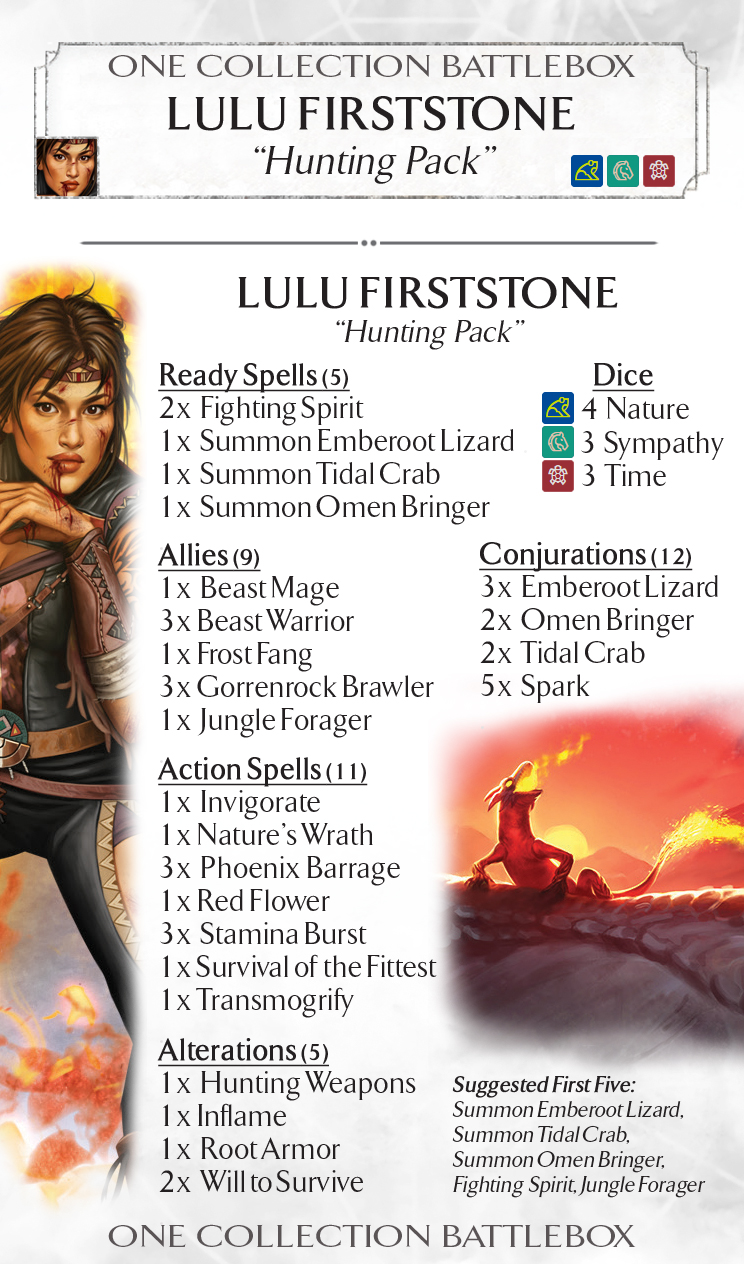
Lulu: Hunting Pack |
|
|
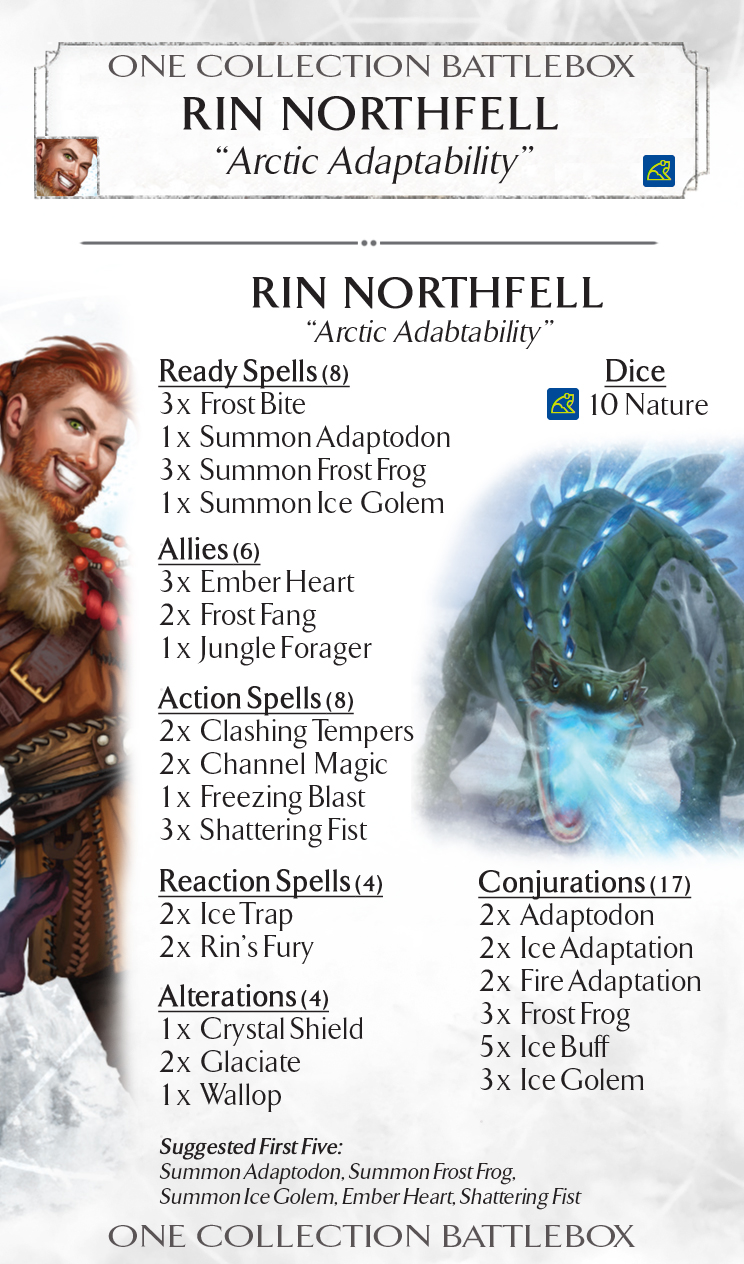
Rin: Arctic Adaptability |
|
|
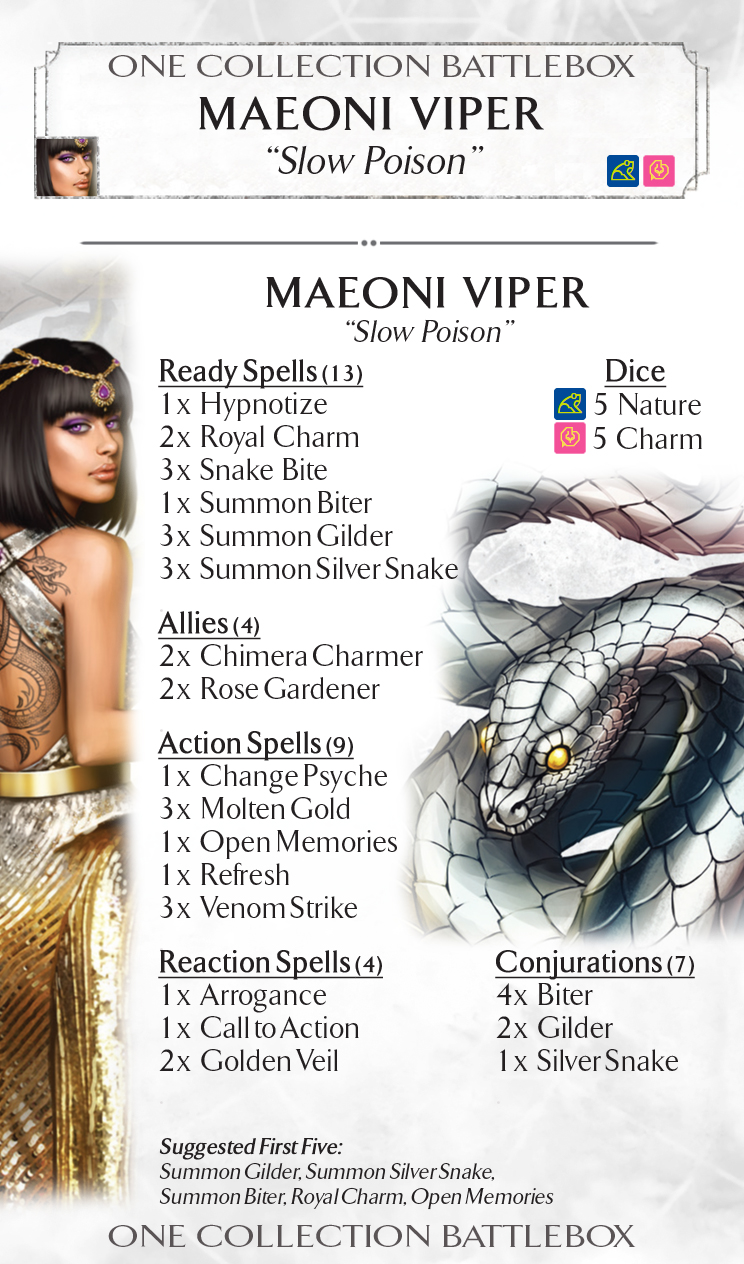
Maeoni: Slow Poison |
|
|
Saria: Enthralling Aura |
|
|
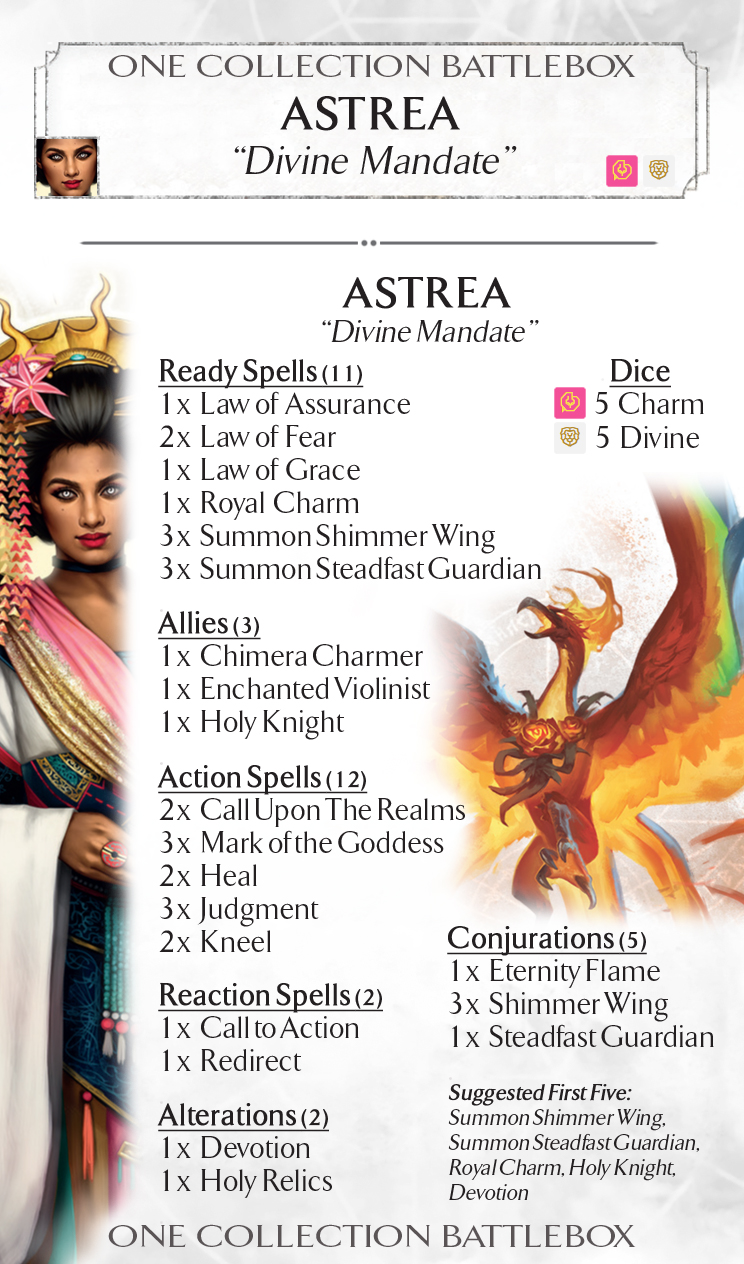
Astrea: Divine Mandate |
|
|
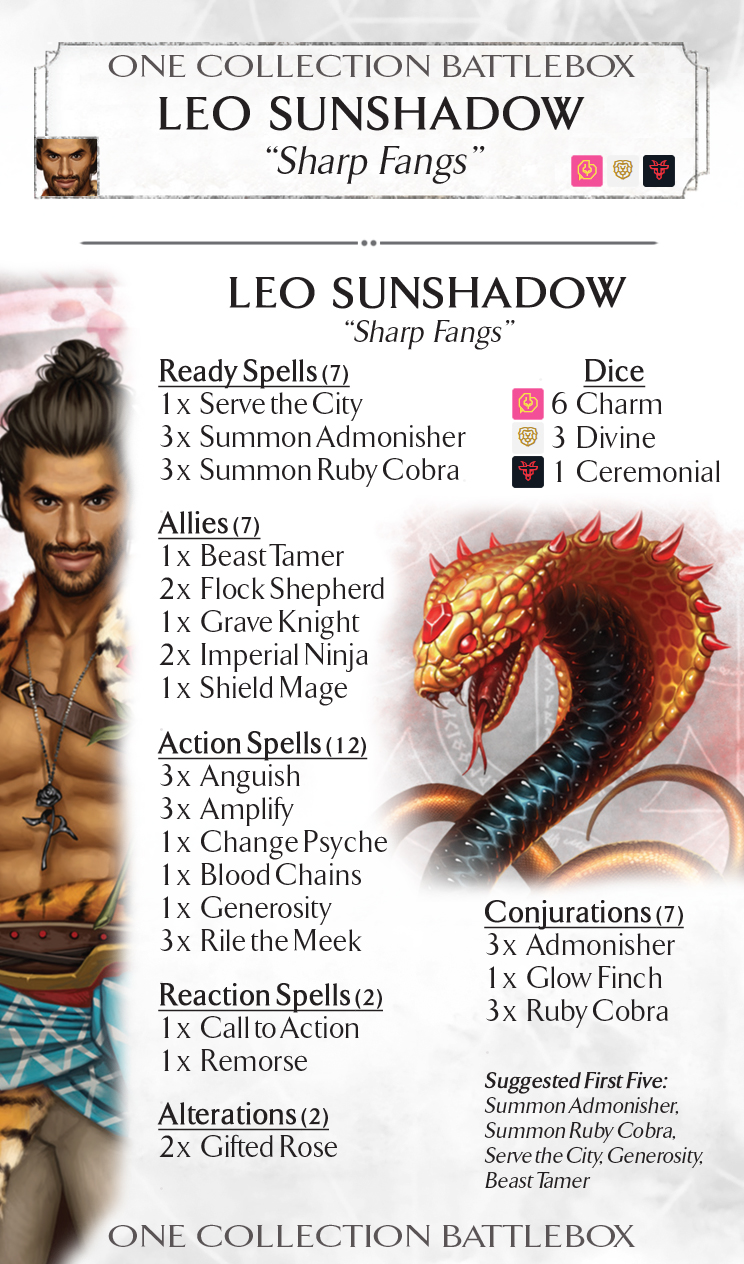
Leo: Sharp Fangs |
|
|
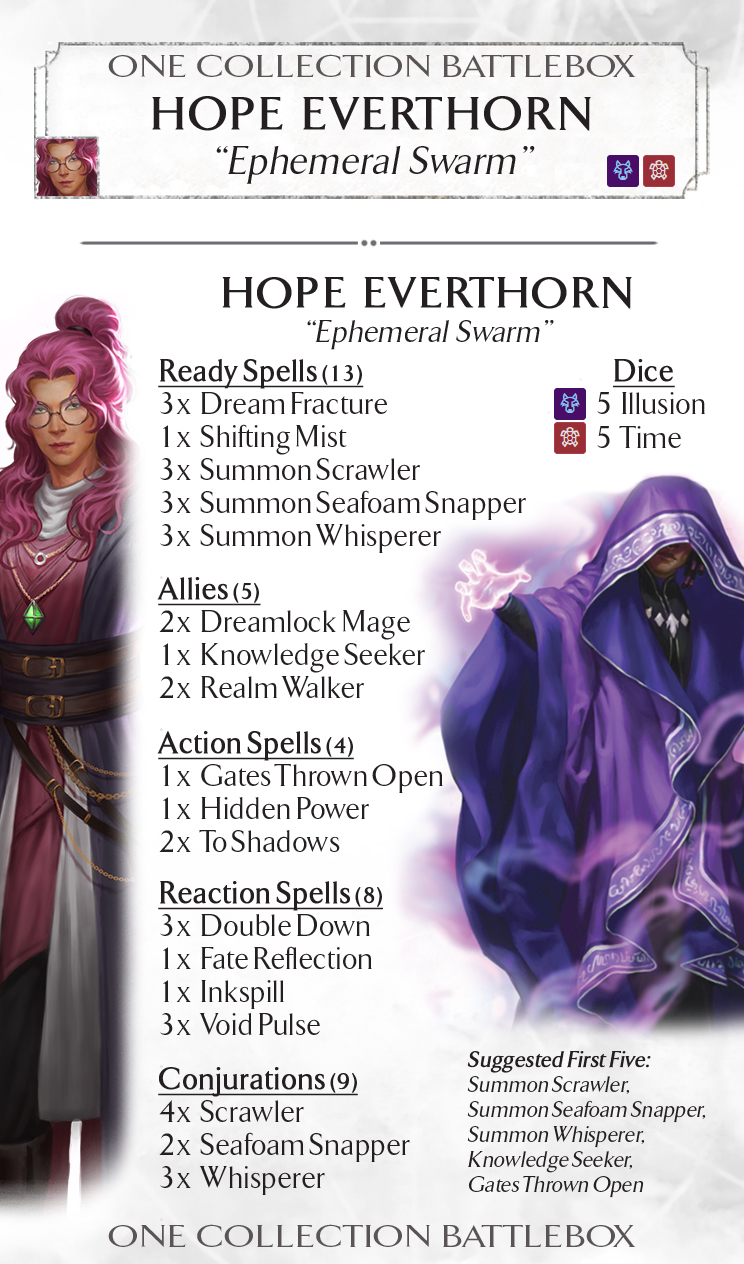
Hope: Ephemeral Swarm |
|
|
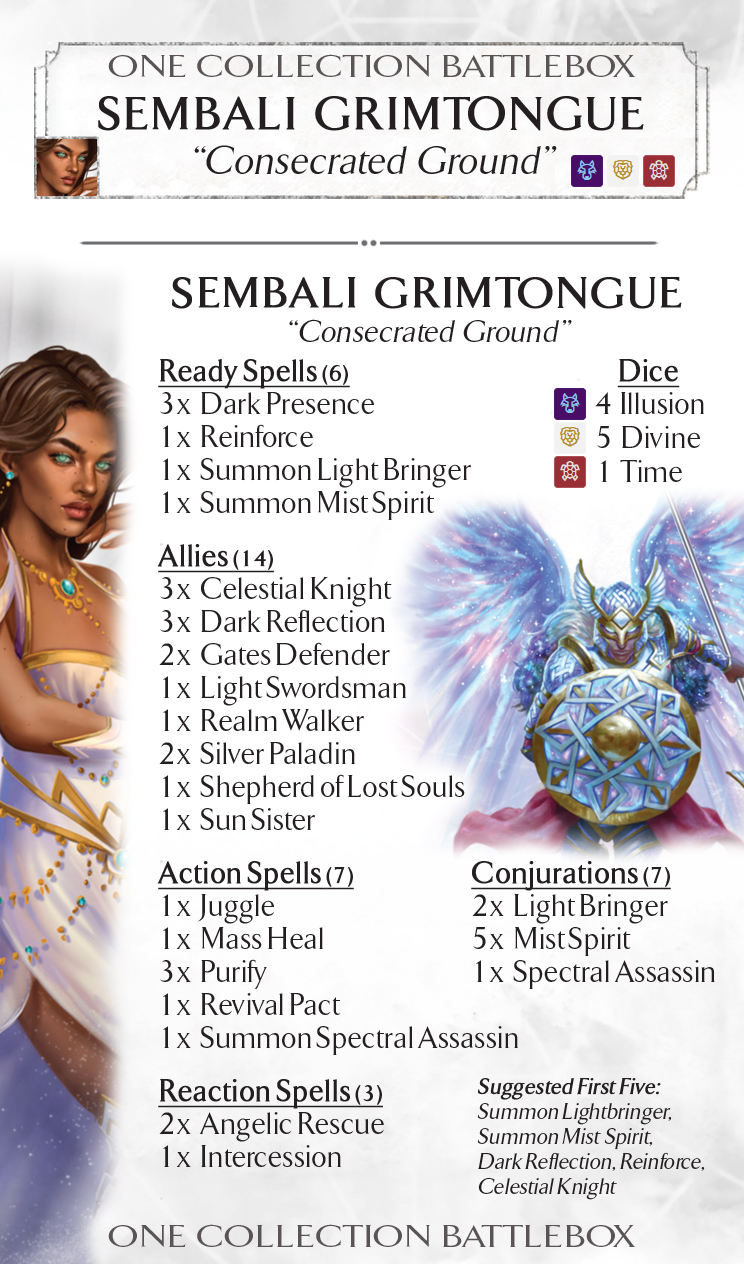
Sembali: Consecrated Ground |
|
|
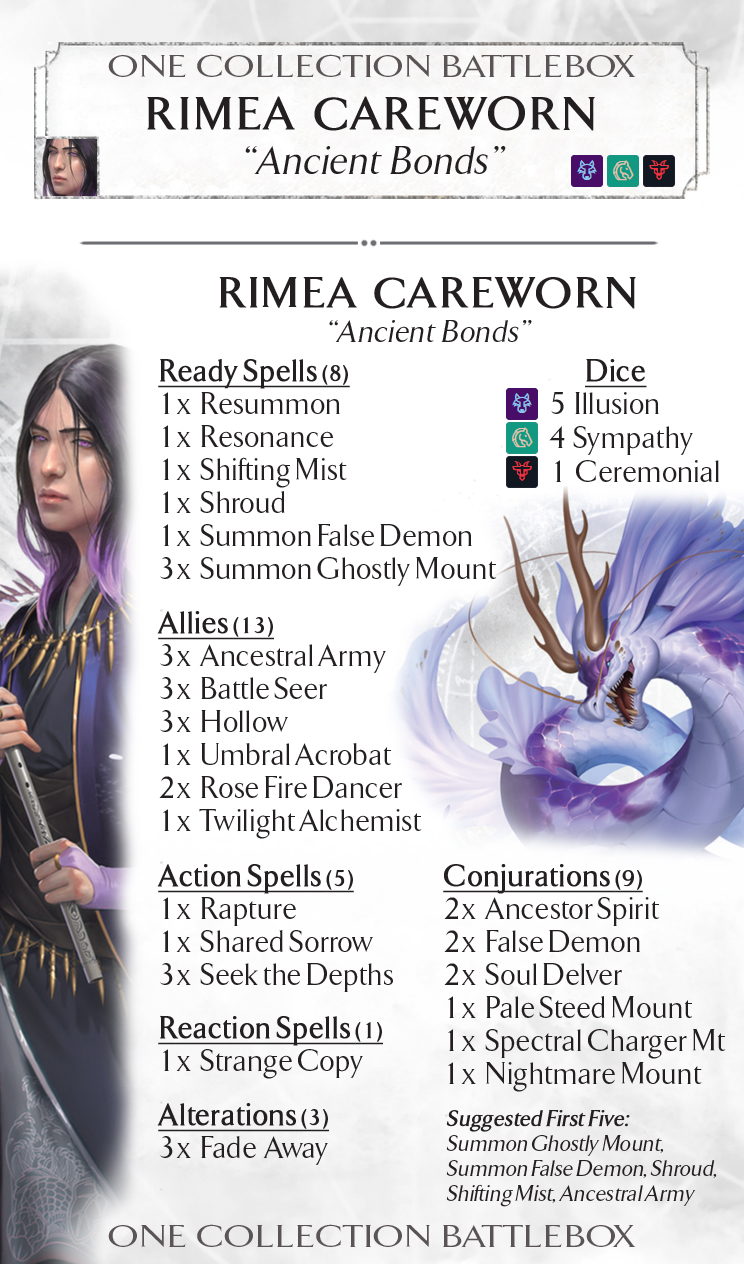
Rimea: Ancient Bonds |
|
|
Victoria: Knives in the Dark |
|
|
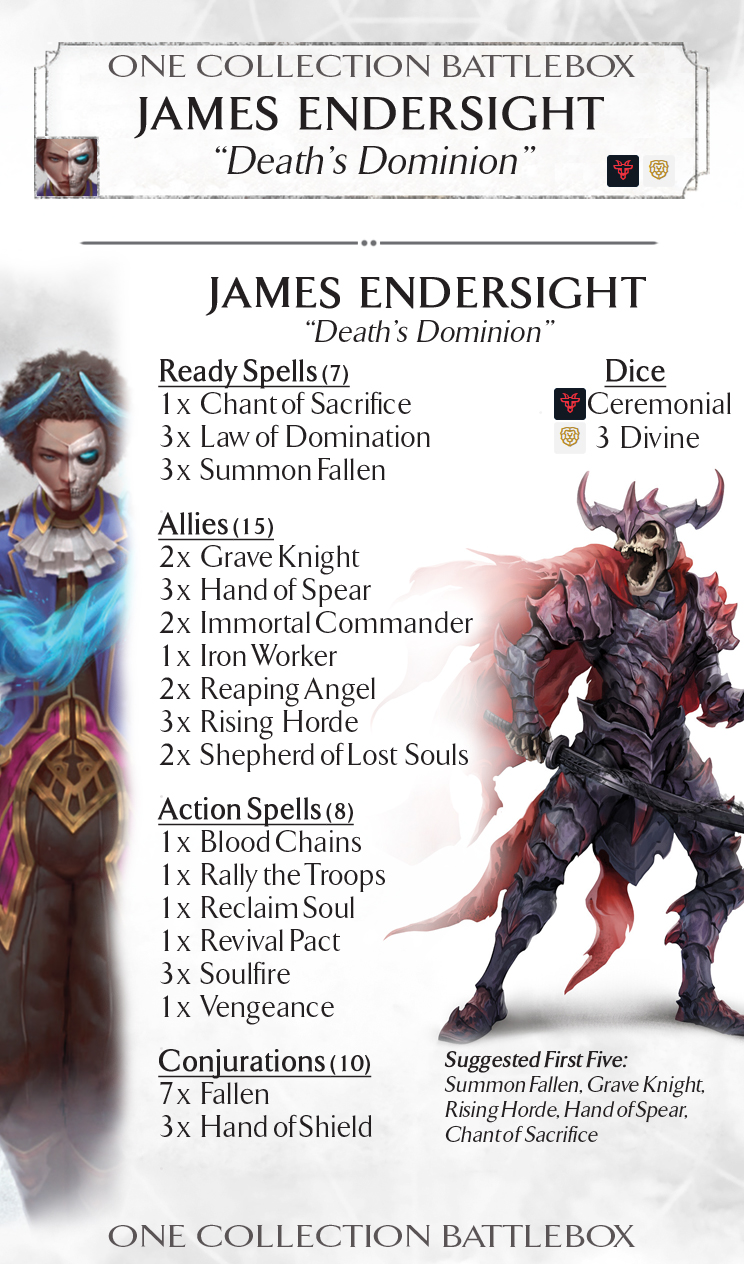
James: Death's Dominion |
|
|
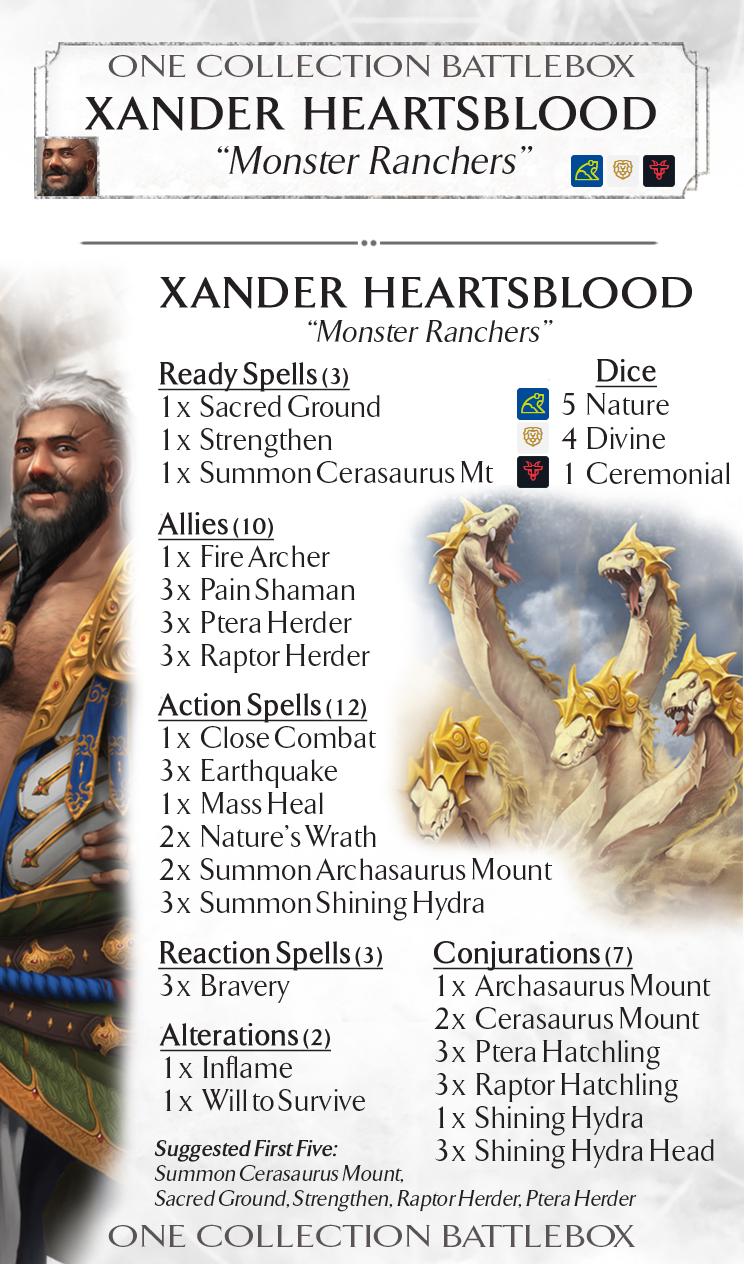
Xander: Monster Ranchers |
|
|
Dimona: Radiant Host |
|
|
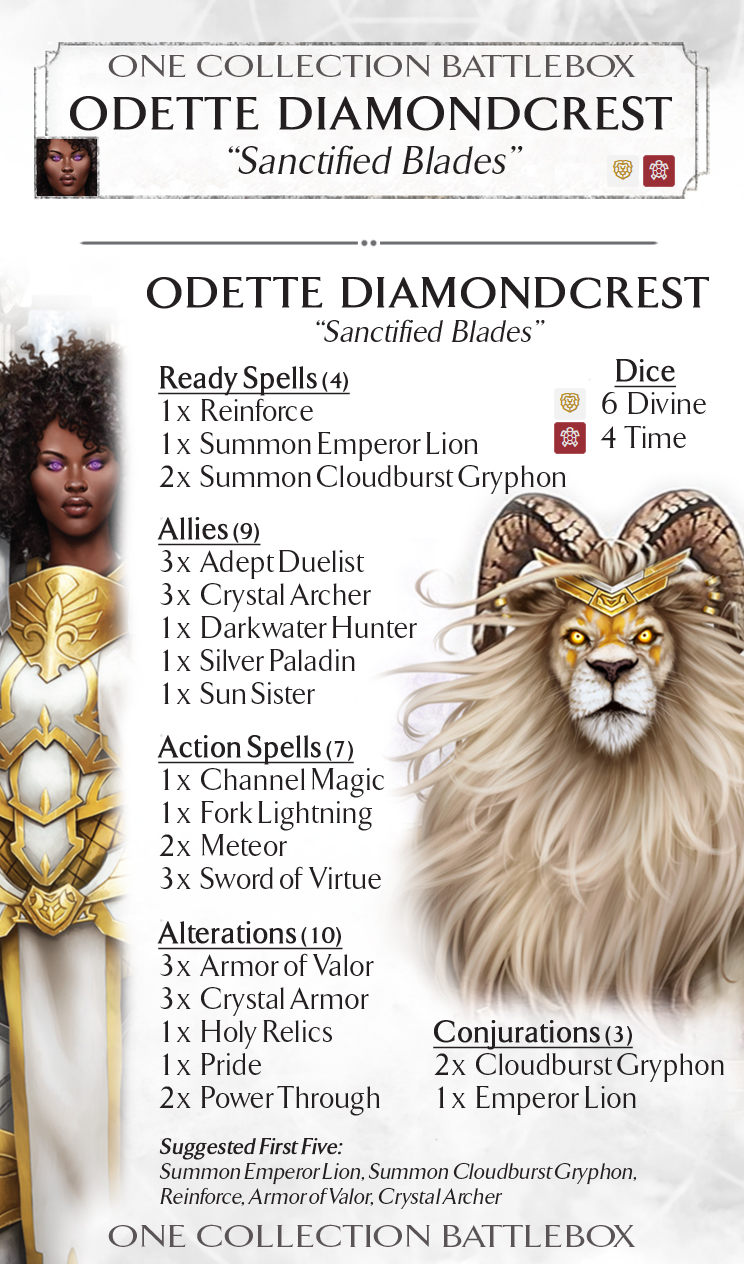
Odette: Sanctified Blades |
|
|
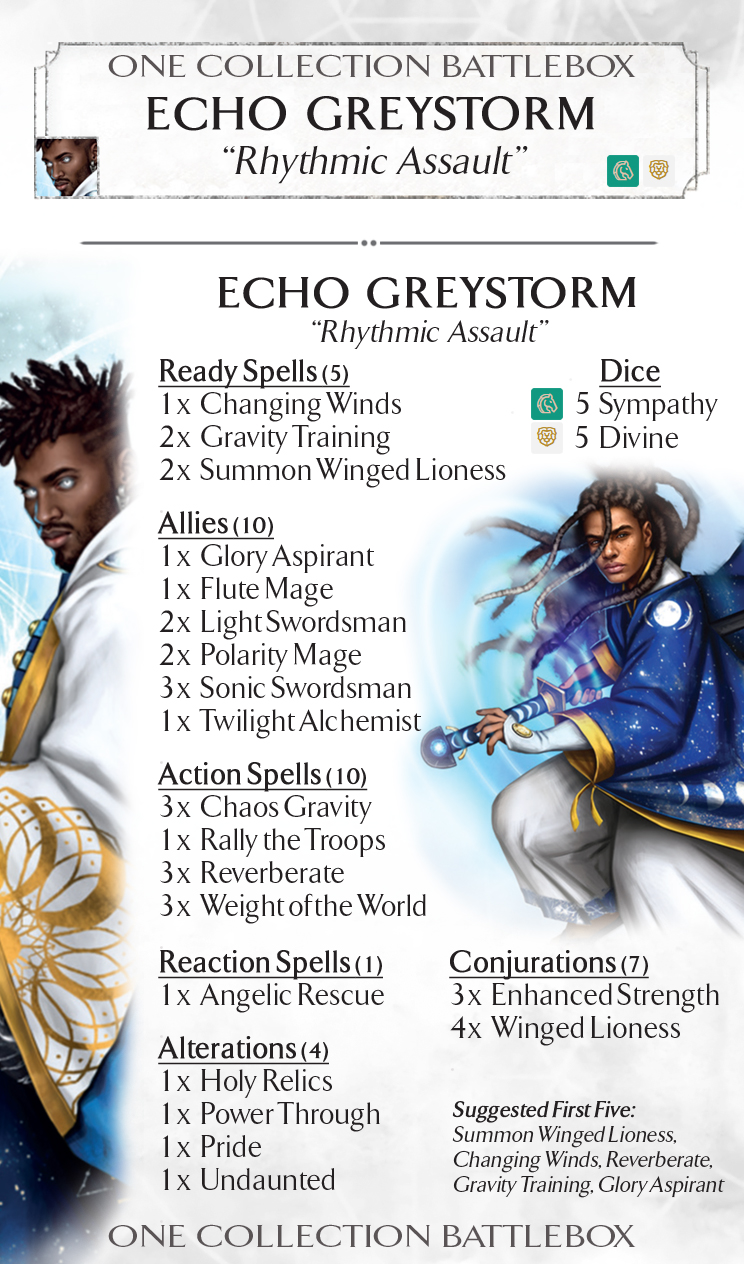
Echo: Rhythmic Assault |
|
|
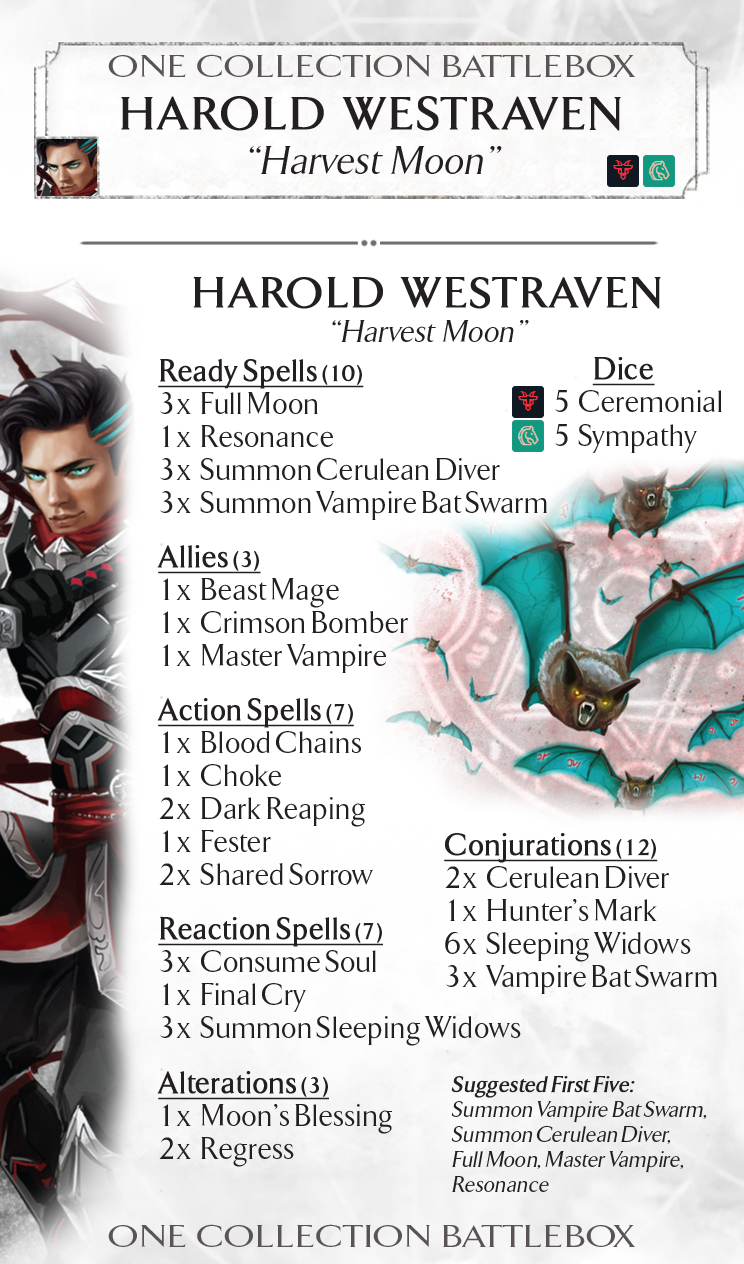
Harold: Harvest Moon |
|
|
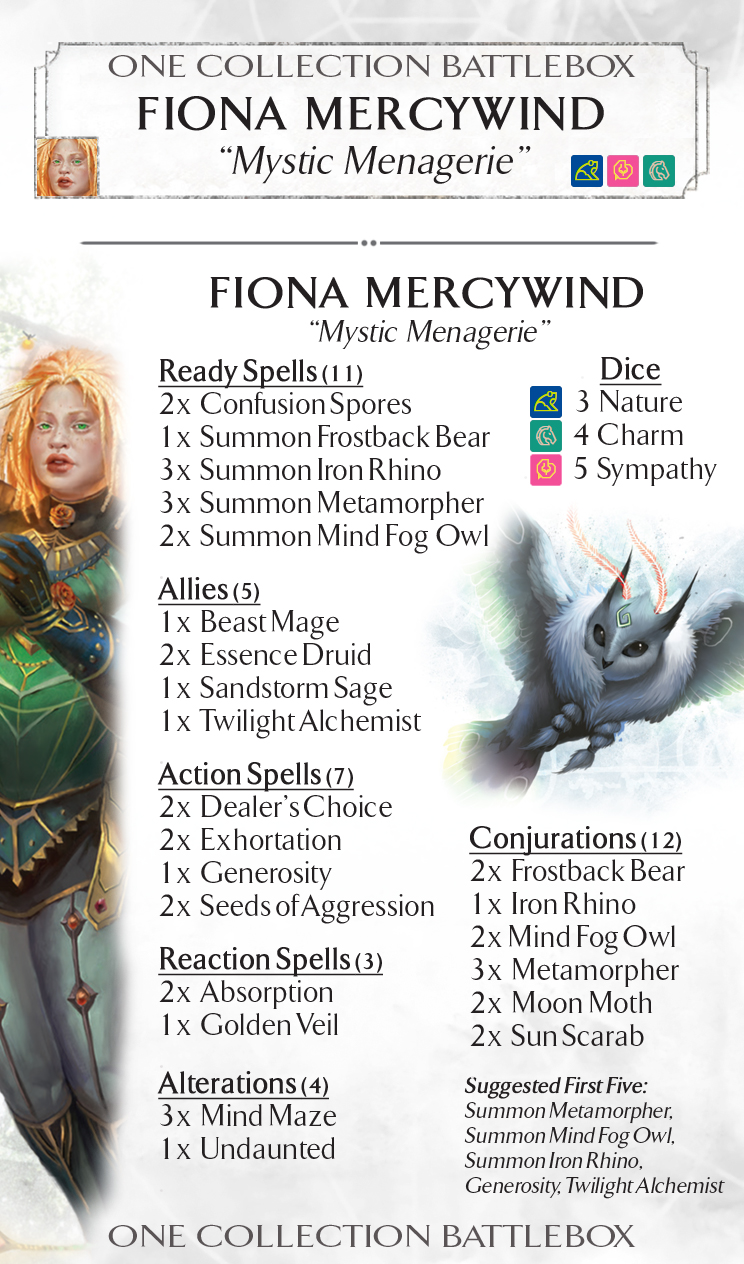
Fiona: Mystic Menagerie |
|
|
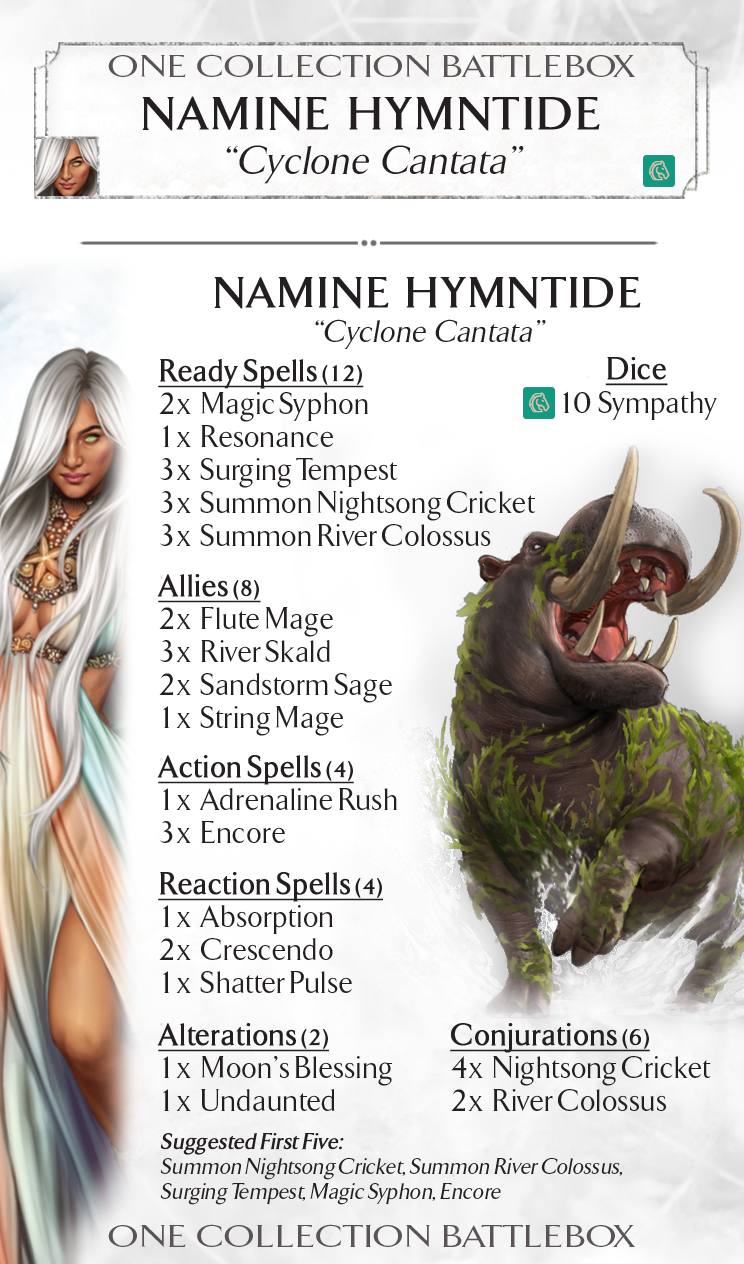
Namine: Cyclone Cantata |
|
|
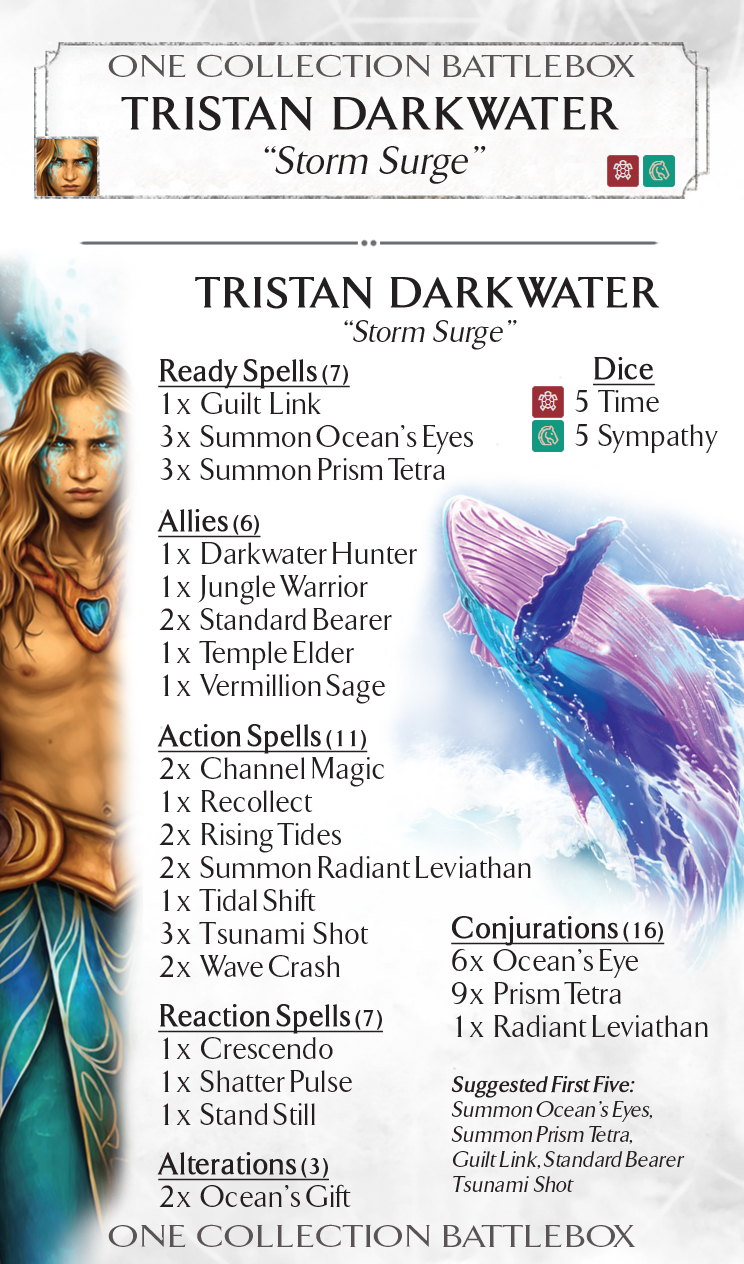
Tristan: Storm Surge |
|
|
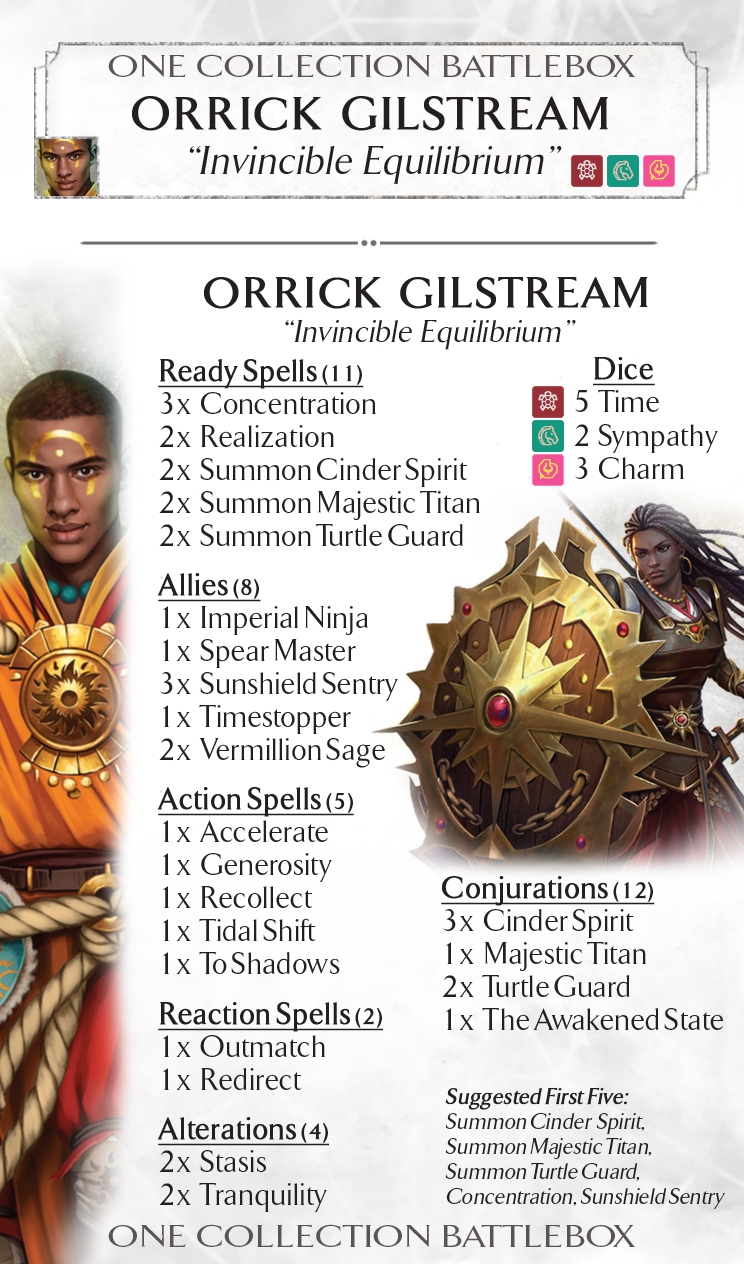
Orrick: Invincible Equilibrium |
|
|
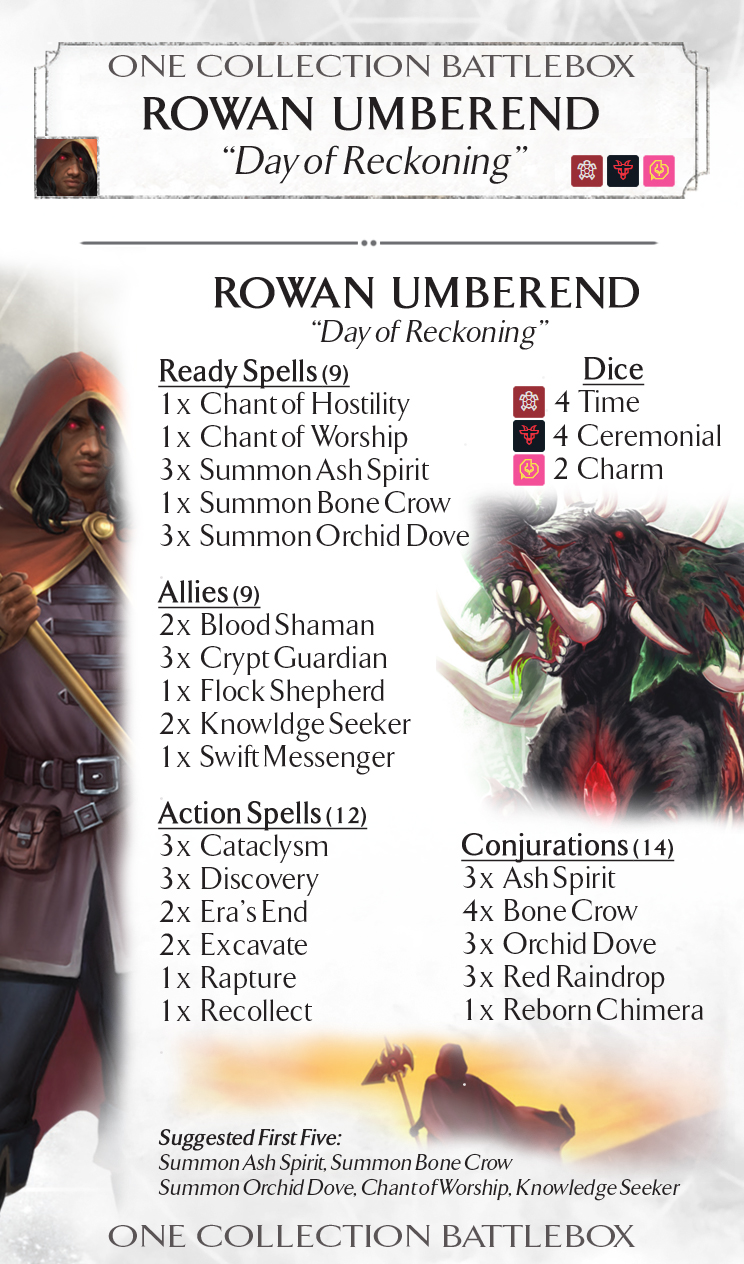
Rowan: Day of Reckoning |
|
|
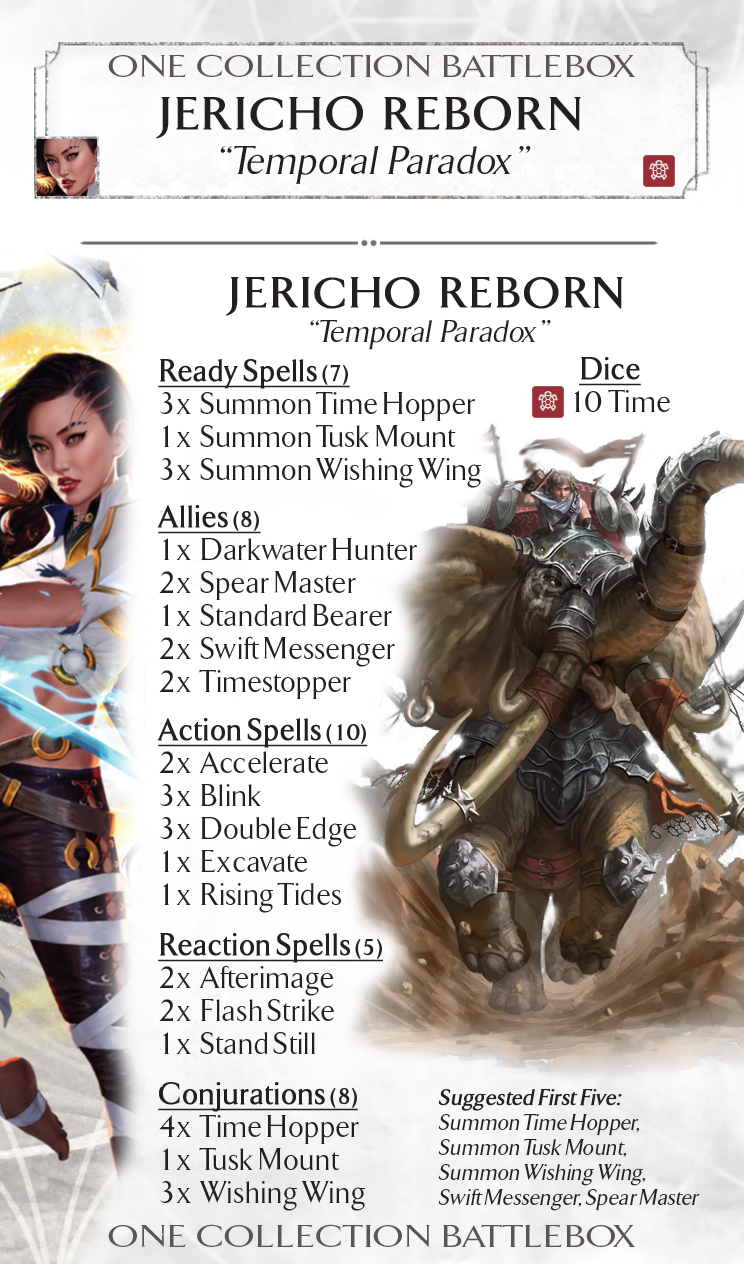
Jericho: Temporal Paradox |