Game Flow
Objective and Winning/Losing
Object of the Game
Ashes: Reborn (PvP)
In Ashes, you are a Phoenixborn—a powerful magic wielder battling other Phoenixborn in a duel of wits and magical prowess. Cast spells and summon allies in an effort to destroy your opponents’ Phoenixborn and win the game.[1]
Ashes: Red Rains (PvE)
In Ashes: Red Rains, you are a Phoenixborn–a powerful magic wielder battling a god-like monstrosity known as a Chimera. Cast spells and summon allies in an effort to destroy the Chimera and win the game.[3]
Winning and Losing the Game
Ashes: Reborn (PvP)
If a player’s Phoenixborn has a number of wound tokens on it equal to or greater than its life value, that Phoenixborn is destroyed. Their opponent has won the game![2]
Ashes: Red Rains (PvE)
If your Phoenixborn has a number of wound tokens on it equal to or greater than its life value, you lose the game. If the Chimera has a number of wound tokens on it equal to or greater than its life value, you win the game![4]
References
1. Ashes Reborn Rulebook v1.5, p3
2. Ashes Reborn Rulebook v1.5, p13
3. Red Rains Rulebook v1.5, p2
4. Red Rains Rulebook v1.5, p17
Round Order
Ashes is played over a series of rounds. Each round is divided into three phases that must be resolved in order. Most of the game takes place during the player turns phase.
1. PREPARE 2. PLAYER TURNS 3. RECOVERY
Ashes Reborn (PvP)
Prepare Phase
During the prepare phase each player simultaneously resolves the following three steps in order:
- Roll Dice: Roll all of the dice in your exhausted pool and place them to the left of your dice power reference cards. This is your active dice pool. On the first round of the game, the player who rolls the most basicsymbols chooses who should go first (the First Player), taking the first player token or giving it to their opponent. If there is a tie for most, all players must re-roll all of their dice until there is no tie.
- Discard Cards: You may discard any number of cards from your hand.
- Draw Cards: Draw cards until you have 5 cards in your hand.
- Fatigue Damage: Starting with the First Player, players alternate placing 1 wound token on their Phoenixborn until all players have placed wounds equal to the number of cards they should have drawn but could not.
Player Turns Phase
The player turns phase typically consists of many very short turns. Starting with the First Player, each player will take just one or two actions per turn. They will continue taking turns, back and forth, until both players consecutively pass on their turn.
On a player’s turn, they must take one main action and may choose to take one side action. These may be taken in either order. Once both players have taken Pass as their main action on consecutive turns, the player turns phase is over and the players move on to the recovery phase.
Recovery Phase
During the Recovery Phase, each player simultaneously resolves the following three steps in order:
- Recover: Remove a number of wound tokens from each unit you have in play equal to that unit’s recover value.
- Remove Exhaustion: Remove 1 exhaustion token from each card you have in play that has 1 or more exhaustion tokens on it. Rotate your Phoenixborn so that it is upright.
- Exhaust Dice: Move any number of dice from your active pool to your exhausted pool.
End of Round
Some effects take place after the recovery phase “at the end of the round.” Each player (one at a time, starting with the First Player) resolves all effects they control that occur at the end of the round, in the order of their choice. After all such effects are resolved, the player with the first player token passes it to their opponent andthe next round begins.
Ashes: Red Rains (PvE)
Prepare Phase
During the prepare phase resolve the following three steps in order:
- Roll Dice: Roll all of the dice in your exhausted pool and place them to the left of your dice power reference cards. This is your active dice pool.
- Discard Cards: You may discard any number of cards from your hand.
- Draw Cards: Draw cards until you have 5 cards in your hand.
- Fatigue Damage: Place 1 wound token on your Phoenixborn for each card you should have drawn but could not.
Player Turns Phase
The player turns phase typically consists of many very short turns alternating back and forth between your turn (the ‘player turn’) and the Chimera’s turn.
On your turn, you must take one main action and may choose to take one side action. You may take them in any order.
During the Chimera’s turn, it will also take a main action and possibly a side action, determined by game state and the behavior die.
Play will continue to alternate back and forth between you and the Chimera until you both Pass on consecutive turns. At that time the player turns phase will be over and play will move on to the recovery phase.
Battlefield Management
When you place units on any battlefield, they must be placed to the right of all other units on that battlefield and the position of units cannot be changed relative to each other. As units leave the battlefield, slide the remaining units to the left to fill in gaps. The Chimera will attack and resolve effects based on the positions of the units, so positioning and sequencing will be a crucial skill to defeating it!
- Players take a shared turn, with a main and side action each, in any order. Players are each allowed to play one reaction on each shared player turn and each Chimera turn.
- Card effects may target cards on ANY battlefield, spellboard, etc.
- Passing: The Red Rains halt for no one! If you take a Pass main action while there are 1 or more face down aspect cards on the opposing battlefield, the Chimera raises 1 basic rage die one level.
Recovery Phase
During the recovery phase, resolve the following steps in order:
- Recover: Remove a number of wound tokens from each unit in play equal to that unit’s recover value. Aspects do not recover.
- Remove Exhaustion: First, remove 1 Red Rains token from the Chimera for each exhaustion token on the Chimera and Ultimate cards. Then, remove 1 exhaustion token from each card in play that has 1 or more exhaustion tokens on it. Rotate your Phoenixborn so that it is upright.
- Exhaust Dice: Move any number of dice from your active pool to your exhausted pool.
- Place Red Rains: Place 1 Red Rains token on the Chimera for each aspect in play, resolving the Ultimate card if applicable.
- Replenish Aspects: Add face down aspect cards to the Chimera’s battlefield (on the right) until its battlefield has a number of aspect cards equal to its threat value (face up or face down).
- Replenish Status Tokens: For any aspects with status abilities, if they have fewer status tokens on them than there are pips on their status ability, refill their status tokens until they are equal to the number of pips.
End of Round
The first player (you or the Chimera) resolves all ‘end of round’ effects they control, then the other player does the same. The Chimera resolves from left to right, and you resolve in the order of your choice. Then, the first player token is passed.
2-player: When the first player token is passed to the Chimera, point it at the player who did not just have it. The Chimera will pass the first player token to that player at the end of the next round.
Main Action
Pay a Cost
To take this main action, play or activate a card where the symbol appears in the play or activation cost.
Playing a Card
Many turns in Ashes consist of playing a card or activating a card that was played on a previous turn. It is common for your entire turn to consist of playing or activating just one or two cards. To play a card from your hand, first pay its cost [1] , then place it as directed by the card’s placement [2].
Paying Costs
There are 5 different types of costs:
Main Action: Take your main action for the turn.
Side Action: Take your side action for the turn.
Exhaust: Place 1 exhaustion token on this card.
Discard: Discard a number of cards from your hand equal to the number shown.
Magic: Exhaust dice of the appropriate type and number by moving them from your active pool to your exhausted pool. That number is known as the magic play cost. Remember that higher level dice can be used to pay for lower level costs.
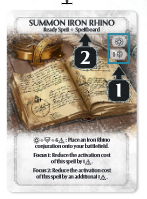
Example: Paying Costs
 To play Summon Iron Rhino to your spellboard, take your main action for the turn and exhaust 1 or die.
 To activate its effect, take your main action, place 1 exhaustion token on the card, and exhaust any six dice (any die can be used as ).
Parallel Costs
Some cards have two or more connected costs in their play cost or their activation cost. These costs are called parallel costs. To pay a parallel cost, pay one of the options, plus any other costs.
Attack
When you Attack, 1 or more of your unexhausted units will enter battle.
Unexhausted: A card with no exhaustiontokens on it.
Battle: In battle an attacker deals damage equal to its attack value to a defender. Sometimes the defender will counter. After the battle, 1 exhaustion token is placed on the attacker, and 1 on the defender, if it countered, unless it is an aspect.
Counter: When a defender counters, it deals damage equal to its attack value back to its attacker. Attack and counter damage occur simultaneously. Aspects always counter if unexhausted, and they do not exhaust as a result of countering.
Blood Value: When an aspect is destroyed or discarded from the battlefield, place a number of wound tokens on the Chimera equal to its blood value.
Ashes: Reborn (PvP)
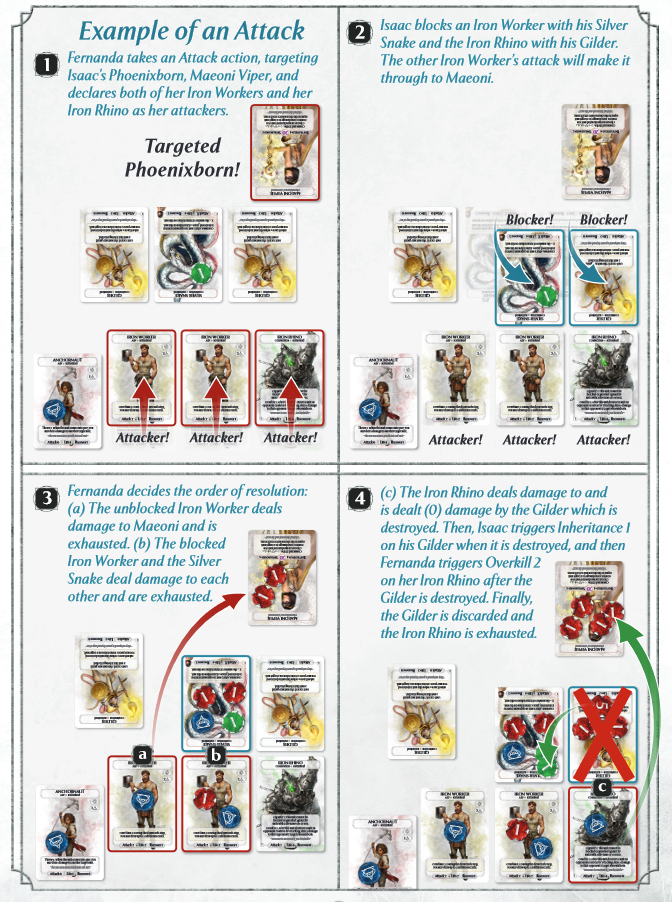
To take an Attack action, first target an opponent’s PHOENIXBORN or UNIT.
If you target a PHOENIXBORN do the following in order:
- Declare Attackers: Choose ANY NUMBER of unexhausted units you control to be attackers.
- Opponent Declares Blockers: Your opponent may block each attacker with up to one unexhausted unit they control.
- Resolve Battles: Each attacking unit is now in battle with the corresponding blocking unit, if it was blocked. All unblocked attacking units are now in battle with the targeted Phoenixborn. One at a time, resolve each battle in an order of your choice.
- If Blocked: The attacker battles its blocker and the blocker counters.
- If Unblocked: The attacker battles the target Phoenixborn.
Note: Resolution order matters! If a blocker is destroyed before it battles, the attacker it was blocking becomes unblocked.
If you target a UNIT do the following in order:
- Declare Attackers: Choose ONE unexhausted unit you control to be the attacker.
- Opponent Declares Guard: Your opponent may guard with their Phoenixborn or with an unexhausted unit they control with the Unit Guard ability. Note: A Phoenixborn can only guard once per round, but may guard even if it is exhausted.
- Resolve Battle
- If Guarded: The attacker and guard are now in battle, and, if the guard is a unit, the guard counters. If the guard is a Phoenixborn, it is rotated 90° to indicate it is unable to guard again this round.
- If Unguarded: The attacker and the target unit are now in battle. If it is unexhausted your opponent may counter with it.
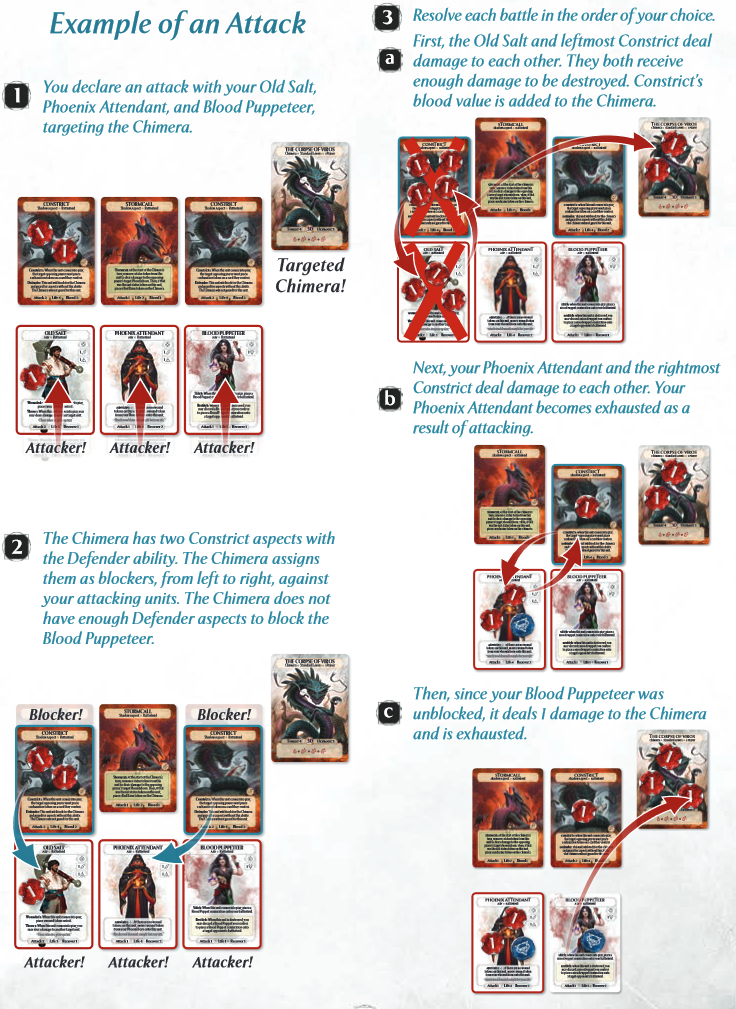
Example of an Attack
Ashes: Red Rains (PvE)
To take an Attack action, first target the CHIMERA or one of its UNITS.
If you target a CHIMERA do the following in order:
- Declare Attackers: Choose ANY NUMBER of unexhausted units you control to be attackers.
- Declare Blockers: If the Chimera has an unexhausted aspect with the Defender ability, it will block the leftmost attacker with that aspect. If there are multiple Defender aspects, it will assign one blocker to each attacker from left to right. Excess Defenders and Defenders on another battlefield do not block.
- Resolve Battles: Any unblocked attackers are now in battle with the Chimera. Blocked attackers are in battle with the aspect that blocked them. One at a time, resolve each battle in the order of your choice.
- If Blocked: The attacker battles its blocker and the blocker counters.
- If Unblocked: The attacker battles the Chimera.
If you target a UNIT do the following in order:
- Declare Attackers: Choose ONE unexhausted unit you control to be the attacker.
- Declare Guard: The Chimera and its Defender aspects only guard aspects.
- If there are one or more unexhausted units with the Defender ability on the same battlefield as the targeted aspect, the leftmost one which can guard the attack is declared as a guard.
- If no Defender is declared as a guard, roll the behavior die. On a result of 9+, the Chimera guards, if able. Unlike Phoenixborn, the Chimera may guard any number of times per round.
- Note: The Defender ability states that the Chimera will not guard for Defender units being attacked. Since exhausted units have no ability text, the Chimera may guard for an exhausted aspect with the Defender ability, since it is currently not considered a Defender.
- Resolve Battle:
-
- If Guarded: The attacker battles the guard. If the guard is a unit, it counters.
- If Unguarded: The attacker battles the target unit. If it is unexhausted, it counters.
-
Countering
Aspects always counter if unexhausted, and they do not become exhausted as a result of countering.
Blood Value
When an aspect is destroyed or discarded from the battlefield, place a number of wound tokens on the Chimera equal to its blood value.
Example of an Attack
Pass
When you Pass, your main action is to do nothing. You may still take a side action.
Ashes: Reborn (PvP)
If your opponent does not Pass on their next turn, then when it is your turn again you may take any main action. If both players Pass on consecutive turns, the player turns phase ends and players move on to the recovery phase of the round.
Ashes: Red Rains (PvE)
If a player/Chimera Passes but their opponent takes a different main action, both player and Chimera may continue taking turns. If you and the Chimera both Pass on consecutive turns, the player turns phase ends and play moves on to the recovery phase.
The Red Rains halt for no one! If you take a Pass main action while there are 1 or more face down aspect cards on the opposing battlefield, the Chimera raises 1 basic rage die one level.
Side Action
Pay a Cost
To take this side action, play or activate a card where the symbol appears in the play or activation cost.
Activate a Dice Power
For a side action you may exhaust a die that is on its power side to activate its dice power effect. The effect for each type of power symbol is detailed on the dice power reference card corresponding to that die. (To exhaust a die, move it from your active pool to your exhausted pool.)
Meditate
The Meditate side action allows you to raise the levels of your dice. When you Meditate, discard any number of the following, one at a time:
- Cards in your hand
- Cards off the top of your deck
- Ready spells from your spellboard
For each card discarded, you may change a die in your active pool to a side of your choice.
Resolving Effects
There are four rules when playing cards or resolving effects:
- Resolve the card text from top to bottom, one effect at a time.
- Resolve as much of each effect as possible.
- Resolve each card completely, even if it is removed from play.
- Card text always supersedes game rules.
A card can have multiple effects, and they will be separated either by periods or by the words “to” or “and.” If an effect on a card triggers another effect, pause resolving the current card until all related triggered effects have been resolved.
Example of Complex Effect Resolution

Damage, Wound Tokens, Destruction, and Blood Value
When a unit, Phoenixborn or Chimera is dealt damage, place a number of wound tokens on it equal to the amount of unprevented damage it received. After a unit, Phoenixborn or Chimera has a number of wound tokens equal to or greater than its life value, destroy it.
- When a unit is destroyed, it is discarded.
- When an aspect is destroyed, after it is discarded, place a number of wound tokens on the Chimera equal to that aspect’s blood value.
- When a Phoenixborn is destroyed, its controlling player loses the game.
- When a Chimera is destroyed, the player(s) win the game!
Note: A card’s life value is not reduced when wound tokens are placed on it.
Note: Deal damage -> Place wounds -> Destroy.
An effect that “deals damage” places wound tokens and destroys, but an effect that “destroys” does not deal damage or place wound tokens.
Discarding Cards
When a card in play is discarded or otherwise removed from play, set it aside along with any cards underneath it that are attached or face down. After resolving any triggered effects, return any tokens on any of these cards to the supply, discard the cards that are underneath, and place that card in its final destination. Discarded cards go to their owner’s discard pile.
Exception: Discarded conjurations and conjured alteration spells do not go to a discard pile but return to their owner’s conjuration pile.
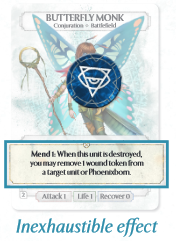
Exhaustion Tokens
Some game effects place exhaustion tokens on cards. When a card has 1 or more exhaustion tokens on it, it is considered to be exhausted. An exhausted card has no ability or effect text though it retains everything else including attack, life, and recover values (on units), and value bonuses (on alteration spells). In addition, exhausted units cannot attack, block, guard or counter.
Some cards have inexhaustible effects or abilities, indicated by a yellow box. These effects or abilities remain even if the card is exhausted. In this example, an exhausted Butterfly Monk does not have the Unit Guard ability but it retains the Mend 1 ability as well as its attack, life, and recover values.
Status Tokens
Status tokens can have various effects based on the cards that are in play. Those cards will detail how the status tokens are to be used.
ADVANCED TIMING CONSIDERATIONS
The rules in this section deal with the precise timing of certain game effects. Ashes can be enjoyed in a casual setting without reading these rules. In certain settings, however, the precise order of resolution is important.
Attack Resolution
During an Attack action that targets a Phoenixborn, an attacker or blocker may be exhausted or destroyed before their battle begins to resolve.
- If an attacker is exhausted or destroyed, it leaves battle and does not attack.
- If a blocker is destroyed, the attacking unit is no longer blocked and will deal its damage to the target Phoenixborn.
- If a blocker is exhausted, it still blocks but cannot counter (deal damage) and does not receive an exhaustion token.
Damage Resolution
Whenever damage is dealt, wound tokens are placed, or units are destroyed, enter the process below at the appropriate step. If damage of 0 is dealt, do not enter the process and do not trigger any effects.
Step 1: Deal Damage.
» Effects that trigger “after damage is dealt” may now be used. Most of these effects will prevent 1 or more damage from being received in step 2.
Step 2: Receive Damage and Place Wounds.
Place wound tokens equal to the damage received.
- If a unit has wound tokens on it equal to or greater than its life value, it will be destroyed in the next step.
- If a Phoenixborn has wound tokens on it equal to or greater than its life value, its controlling player immediately loses the game.
» Effects that trigger “after 1 or more wound tokens are placed” may now be used.
Step 3: Destroy Unit. Remove unit from play.
» Effects that trigger “when this unit is destroyed” may now be used.
» After all of the above effects have resolved, effects that trigger “after a unit is destroyed/leaves play” may be used.
Step 4: Discard the Destroyed Unit.
Simultaneous Effects
Sometimes game effects will seem to occur simultaneously. Here is how to properly order those effects.
Effects with the same trigger timing
If players have 1 or more responses to the same triggering game event, each player (starting with the Active Player—the player whose turn it is) has one opportunity to play any cards and activate any effects they wish to in response to that trigger, resolving them one at a time and then passing the opportunity to their opponent.
Effects that trigger “when” a game event occurs
Some effects occur “when” a game event occurs, e.g. “When this unit comes into play, you may deal 1 damage to another target unit.” In this case, complete the triggering game event (“unit comes into play”) and then resolve the triggered effect (“deal 1 damage”) along with any other effects with the same trigger timing as detailed above. After all “when a unit comes into play” effects are fully resolved, “after a unit comes into play” effects can now trigger.
Example: An Anchornaut with the above example ability comes into play. You may then deal 1 damage to a target unit. After that damage is fully resolved, and no player chooses to activate any other “when” effects, your opponent could play the reaction spell Ice Trap (“after a unit... comes into play”) and destroy the Anchornaut.
Units that deal damage to each other
Units that deal damage to each other, most commonly when attacking and countering, deal damage simultaneously. The Active Player then chooses which damage to resolve first, using the damage resolution process.
Effects that affect multiple units or other game elements (e.g. spells, cards, etc.)
Some effects can affect multiple units at once, e.g., “Deal 1 damage to all units.” In these cases, the player who controls the effect:
- Selects all units to be affected.
- Resolves the effect for one unit at a time in the order of their choice.
The resolution process may cause a selected unit to no longer fit the selection criteria, or may cause new selectable units to appear. In all cases, the original selection cannot change.
Example: Fernanda plays Mist Typhoon and deals 1 damage to each unit controlled by an opponent. She destroys one of Isaac’s units and he reacts with Summon Sleeping Widows and places 2 Sleeping Widow conjurations into play. These new units will not be dealt damage from Mist Typhoon.
Chimera Turn
To resolve a Chimera turn.
First resolve any status (green box) abilities on aspects on its battlefield, from left to right.
Then, the Chimera does one of the following, based on the game state:
- If there are one or more face down aspect cards, the Chimera will Roll:
(1) roll one basic rage die and then
(2) roll the behavior die and take the action(s) indicated on the Chimera behavior card.
» Note: Side actions on the behavior card are dice power effects. - If there are no face down aspects, but some Chimera units can attack, the Chimera will : Attack.
Himera attacks with the leftmost unit that can attack. - If there are no face down aspects and no Chimera units that can attack, the Chimera will : Pass.
When the player(s) and Chimera all choose Pass on consecutive turns, the player turns phase ends.
Chimera Reveals
When the Chimera Reveals, flip over the leftmost face down aspect. If the revealed aspect has a status ability, it comes into play with status tokens on it equal to the pips on the top of the green box.
After revealing, resolve any abilities on that card that trigger when it comes into play (if any), targeting the opposing player.
Chimera Attacks
When the Chimera Attacks, it declares one attacker: either the specified unit or the leftmost unit that can attack. Aspects will target the opposing player’s leftmost or rightmost unit (as indicated by the Claw icon on the left or right of the card), or their Phoenixborn (as indicated by the Jaw icon in the center).

If your PHOENIXBORN is targeted for an attack (jaw icon), you may assign up to one unexhausted unit you control as a blocker for each attacker.
- If Blocked: The attacker battles its blocker and the blocker counters.
- If Unblocked: The attacker battles your Phoenixborn.
If a UNIT you control is targeted for an attack (claw icon), you may guard with your Phoenixborn or an unexhausted unit with the Unit Guard ability. A Phoenixborn can only guard once per round, but may do so even if exhausted.
- If Guarded: The attacker battles the guard. If the guard is a unit, it counters. If the guard is a Phoenixborn, rotate it 90º to indicate it is unable to guard again this round.
- If Unguarded: The attacker battles the target unit. If it is unexhausted, you may counter with it.
After the Chimera attacks with a unit, place 1 exhaustion token on that unit.
Targeting:
Special Circumstances
Some card effects may prevent an aspect from targeting/attacking a unit. In such a case, the aspect will target the next left/rightmost unit. If it cannot target any unit for an attack, it will target the Phoenixborn instead.
The Chimera may end up in control of a non-aspect unit. When the Chimera attacks with a non-aspect unit, that unit will always target the Phoenixborn.
Fatigued Chimera
When the Chimera empties its draw pile, it becomes fatigued. During setup the fatigued card is placed on the bottom of the Chimera’s draw pile as a reminder of that and instructs what to do when the Chimera becomes fatigued and the ongoing effects of its being fatigued.
Draw and Hand Effects
Because the Chimera has no hand of cards, when the Chimera is forced by an effect to draw cards, it will immediately discard those cards. When the Chimera is fatigued, it cannot draw cards.
When an effect would affect the hand of the Chimera, set aside the top 5 cards of the Chimera’s draw pile (or as many as you can) to create a hand. After resolving the effect that affects the Chimera’s hand, return the set aside cards to the top of the Chimera’s draw pile in a random order.
Red Rains Tokens and the Ultimate Card
Red Rains tokens represent the Chimera’s growth in power as it prepares to progress to its next phase. They are placed when there are still aspects during the recovery phase, when raising rage dice, and as otherwise directed.
After placing Red Rains tokens, if there are Red Rainstokens equal to or greater than the Ultimate value on the Chimera card, resolve the following steps in order as they are listed on the Chimera’s current Ultimate card:
- Remove Red Rains tokens equal to its Ultimate value from the Chimera.
- Discard all cards on the Chimera’s battlefield(s) that it does not own.
- Resolve the phase-specific effect printed on the Ultimate card.
- Remove the topmost Ultimate card and behavior card from the game to reveal the Chimera’s next phase (unless it is already at phase III). The Chimera is now stronger!
- Note: Increase the Chimera’s Ultimate value by 1 for each exhaustion token on the Chimera or the Ultimate card.
Laws of the Chimera
There are some effects in Ashes Reborn that do not translate directly into the Red Rains game mode. The following rules are adaptations of these effects:
- Choices: If a player’s effect would require the Chimera to make a choice between multiple options, that player chooses which option the Chimera selects.
- Card Draw: After the Chimera draws cards from an effect, immediately discard those cards. When the Chimera is fatigued, it cannot draw cards from effects.
- e.g. Abundance draws 2 cards for the Chimera, which are immediately discarded. Once the Chimera is fatigued, Abundance instead deals 2 damage to the Chimera since it cannot draw cards.
- Hand: When an effect would affect the hand of the Chimera, set aside the top 5 cards of the Chimera’s draw pile (or as many as you can) to create a hand. After resolving the effect that affects the Chimera’s hand, return the set aside cards to the top of the Chimera’s draw pile in random order.
- Blocking: If a card effect forces the Chimera to block an attacking unit and it has no eligible Defender units, it will block with the first eligible non-Defender unit, assigning from left to right. If a unit can choose its blocker, you may choose any eligible unit, including non-Defenders.
- Guarding: If a player’s attacking unit cannot be guarded against (such as from the Bypass or Stalk ability), the Chimera does not roll to guard. If a Defender unit cannot guard due to effects like Terrifying or Gigantic, select the leftmost Defender that can be declared as a guard, if any.
- Countering: Aspects always counter if unexhausted, and they do not become exhausted as a result of countering.
- Type: While playing the game, aspects are considered to be allies, conjurations, and units, and the Chimera is considered to be a player, opponent, and its own Phoenixborn.
- Non-aspect units on the Chimera’s battlefield: Units like Blood Puppet that can be placed onto any battlefield can always be placed onto the Chimera’s battlefield. During the recovery phase, non-aspect units are not counted when adding Red Rains tokens to the Chimera or aspects to the battlefield.
- Targeting: When an attack or effect from the Chimera or a card it controls targets a leftmost or rightmost unit the opposing player controls but cannot target the specified unit due to another effect, it targets the next left/rightmost unit.
- Area of Effect (2p): When resolving an effect that affects all/each/every of something in play (e.g. dealing damage to all units), it only affects your own battlefield and the opposing Chimera battlefield. For example:
- Nature’s Wrath will deal 1 damage to all units you control and to all units on the opposing battlefield.
- Kneel will place 1 exhaustion token on each unexhausted unit you control and each unexhausted unit opposing you.
- When Abundance instructs all players to draw cards, only you and the Chimera are affected.
- Laws: A ready spell with “Law” in its title only affects (a) its controlling player and any cards they control and (b) the Chimera and any cards it controls when interacting with that player and the cards that player controls.
- Removed From Game: When adding aspects to the Chimera’s battlefield(s), if you have removed so many aspects from the game that it cannot add the required number, shuffle the aspects that were removed from the game and continue adding from those.