

Staring contest in 3...2...1...
By Archivist
While all 6 of the Phoenixborn in the Master Set are interesting, Jessa Na Ni catches a lot of players' attention. And for good reason; you don't often see her theme in fantasy games, and very rarely do you get to play the blood-wielding villain.
But if you've tried playing her deck, either in PvP or against the Corpse of Viros (or any other Chimera), you're probably wondering how it is she's supposed to win. Well, while I can't give you a lot of guidance for playing her deck in PvP, this guide should give you some help in fighting the Corpse of Viros. I'm going to go through this under the assumption you have the bare minimum to play: the Master Set and the Corpse of Viros PvE expansion, and have at least read the rules, even if you don't understand the finer details. This guide is going to focus on her Master Set deck ([The Bloodwoods Queen](https://ashes.live/decks/7688/ "The Bloodwoods Queen")), not the one in the Corpse of Viros expansion. Lastly, since the rules in the Red Rains campaign expect you to modify your deck for any game other than Standard level 1, I will mostly address navigating Standard Level 1.
Staring contest in 3...2...1...

Her deck has four units: Blood Archer, Blood Shaman, Living Doll, and the summonable Blood Puppet. Taking a quick look, you'll see that the only one with any attack value is the Archer; he forms the core of Jessa's strategy, both with his ability and combat values. Blood Shaman is usually going to be a target of one of your own sacrificial spells (like Fear), but he's also useful as a one time blocker. Living Doll is one of the ways Jessa can throw damage straight to the Chimera, but the Doll's ability will be lower priority in most cases. The Blood Puppets are where things get strange. The summon book says you can place it on "target player's battlefield," and in PvP, you will often place them on your opponent's field. Here, though, you're more likely to place it on yours, to eat an attack from the Chimera. Once you get the timing right, the Puppets will always be destroyed before their ability damages Jessa.
Next are the spells. [Fear](https://ashes.live/cards/fear/ "Fear") is your secondary removal behind the Archers, mainly because you only get 3 of them, and the Archers can be brought back using the ceremonial dice power. Ideally, you will use Fear with the Shamans, to regain 2 life (1 from the Shaman's recover value, and 1 from his ability), but the Dolls and the Puppets can also be used in a pinch. Archers should only be used if there is nothing else and you absolutely need to use one. [Final Cry](https://ashes.live/cards/final-cry/ "Final Cry") is just a burn spell. At 1 die, it's efficient, and they will help you win, but if you have to choose between it and playing a unit, go for the unit. [Redirect](https://ashes.live/cards/redirect/ "Redirect") is a way Jessa survives longer - but note that using Redirect does not change the source of the damage, so hitting a Shaman with the redirect does not count as using "a spell, ability, or dice power you control," and you don't get the benefits of Blood Ritual 1. She comes with 1 alteration spell: [Undying Heart](https://ashes.live/cards/undying-heart/ "Undying Heart"). This should be played on a Blood Archer, if able, to get them into hand faster after they are destroyed. Granting them 1 additional life also lets them use Blood Shot 1 more time before dying, which is a nice perk. This leaves her spellboard, of which we've already gone over 1 card ([Summon Blood Puppet](https://ashes.live/cards/summon-blood-puppet/ "Summon Blood Puppet")). [Blood Transfer](https://ashes.live/cards/blood-transfer/ "Blood Transfer") is difficult to use in Red Rains due to being a side action, but if you can use it to preserve an Archer by sacrificing something less important, then you should. Then there's [Cut the Strings](https://ashes.live/cards/cut-the-strings/ "Cut the Strings"). The rules say we can replace 3 cards with up to 3 copies of [Channel Magic](https://ashes.live/cards/channel-magic/ "Channel Magic"). So replace all 3 Cut the Strings with Channel Magic. Cut the Strings is mostly for opposing alterations, and the Corpse has none, making it a card you'll never want to see. Channel Magic, even if you don't like it, will always do something, so is better. The rules also say you can mix and match Phoenixborn unique spells, but I'm excluding Playtime because I regard it as part of the Corpse of Viros deck, not the Bloodwoods Queen deck. I also personally feel that Fear is the superior unique for fighting the Chimera, since it is not removed when the Ultimates trigger. You are also allowed to change any of your 10 dice for any other dice, but I find that the mix of 5 ceremonial and 5 charm works well enough for Jessa's base deck. Maybe going to 6 ceremonial and 4 charm works fine, too, but anything beyond that and I think you'll struggle to pay costs. ##### The First Five The first five cards recommended in the rulebook for the Master Set are Blood Shaman, Blood Transfer, Fear, Living Doll, and Summon Blood Puppet. I feel this is about as bad a set up as you can get against the Chimera, because it only removes 1 aspect, and ensures an Ultimate at the end of round 1. You also only use 7 dice in that hand, leaving the remaining 3 for either Screams or dice powers. As such, my recommendation for the first five is Summon Blood Puppet, Blood Shaman, Fear, Blood Archer, and Undying Heart. While this also uses only 7 dice, the intent is to get the Blood Archer killed and returned to your hand via Heart, then replay him. Ideally, this will result in all 4 aspects being cleared in round 1. More likely, you'll get 3, with a Blood Archer in play for the start of next round. To play this opener, you need 2 ceremonial power sides (don't forget that Blood Shaman can raise a die 1 level if you kill him with Fear), 2 ceremonial class sides, and 3 charm class sides. This leaves your last 3 dice as 1 ceremonial and 2 charm to pay for basic costs.


My recommended first five

If you're wondering why Lurk is in the "annoying" group, it's because I view it primarily as a rules check: do you understand the interaction between exhaustion and abilities? If you do, then Lurk's threat diminishes the more used to losing units you get. If you don't, then here's the interaction: exhausted units' abilities are treated as having no effect, unless they're in a yellow or green box (ie, Iron Scales and Stormcall). This means that after Lurk is exhausted, it can be targeted by abilities like Blood Shot, Throw, or the natural dice power. Or, attacked, like any other aspect. Even before Lurk is exhausted, it can be hit by cards that affect units without specifically targeting them (Mist Typhoon and One Hundred Blades do this - this kind of card is often called an "area of effect," or "aoe" spell). So while a Root Armored Hammer Knight or Blood Archer will still survive a Lurk attack and be able to counter, it isn't the only way to kill the aspect. Sequencing your turns in preparation for a Lurk is also generally a good strategy; you usually want to see as many of the Chimera's cards as you can before you run out of your damage sources, so holding onto a single damage effect until late in the round becomes pretty natural.
Moving on to apply Jessa's strategies to handling the Corpse's aspects, we see that the high priority aspects are comprised of 3 aspects with 3 life, and 2 with 2. Of them, I'd say that Frozen Fear and Dark Descent are the highest priority, with Firebelly and Stormcall being next, then lastly Hunting Instincts. The reason for this ordering is that both Frozen Fear and Dark Descent will take massive chunks out of Jessa, and both can be difficult to block and kill effectively - Blood Archer is it for Frozen Fear, and you need at least 2 units to block the Descent. Firebelly will simply eat your units, and also cut down on the number of Blood Shots you get in a round. Since that's a large chunk of your damage to aspects, you want to avoid that as much as possible. Stormcall will eat through Jessa's life surprisingly quickly; one might not seem like a lot, but once there's two out, you start feeling the burn really quick. Hunting Instincts is a threat due to its 4 damage and Red Rain token generation - both of these can hurt Jessa's small board immensely if not handled promptly. Ideally, you'll be attacking exhausted versions of the 2 bloods with your Archers. However, putting the Archers in front of them (when able) to counter is more reliable, even with losing your Archer as a result. You can often see when this is going to happen, so try to Blood Shot the Archer down to 1 life remaining to get the maximum benefit of the 3 dice you spent for him. Speaking of, those 1 bloods make great Blood Shot targets.... Blurriness in priority happens when you get to Lurk and Whiplash. Blood Shot can take them out with a mere 1 activation, and reduce the number of tokens the Chimera will get at the end of the round, so it might not be a bad idea to do that when you can't get a kill on a 2 life aspect, either due to a lack of main actions, or not having enough Blood Shots left in the round. The grunts are somewhat of a "when you get to them" set. Your Archers will eventually get around to them, but it will take some time, or a bit of luck in revealing nothing else of higher priority. ##### When to scream and (Final) Cry Before the round gets underway, count the dice you'll need to get a defense set up. If you have 1 or 2 dice left over, you have room to use Screams of the Departed or Final Cry. In my experience, you'll really only use Screams two or three times the entire game, and usually in the last round, when you're trying to push enough damage through to win. Final Cry is a little stronger, since it does 2 damage for 1 die, but you'll still probably find yourself holding onto it until near the end of a round, as that's when you'll have a better idea of how much defense you need. ##### Plan ahead Due to Blood Shots, Pain Links, and meditations, The Bloodwoods Queen is very side action heavy. You need to try to predict what dice you'll need early so you can get your meditation out of the way early in the round, and not feel like you need to meditate mid-round instead of doing something that affects the field more directly, like using Pain Link so your Living Doll will survive the next attack. ##### Rules Clarifications The Bloodwoods Queen has a few rules quirks that can be easily missed by newer players. There's the aforementioned Redirect interaction (or lack thereof) with Blood Shaman, which is even in the official FAQ. Then there's Jessa's ability and Final Cry. Her ability is a "triggered" ability, not a "reaction ability," which, for Ashes, are two separate things. This does mean that you can use both Screams of the Departed and Final Cry (or Redirect) in the same turn. However, it must be in the Player Turns phase of the game - if the Chimera triggers the Ultimate during the Recovery Phase, you can neither activate Jessa's Screams nor play Final Cry, regardless of your dice, as the Recovery phase is not the Players Turns phase. Similarly, Redirect can't be used during the Recovery phase. The Blood Puppets also provide some interesting interactions. Since you can play them to any battlefield, you can very easily end up with one on the Chimera's field. Fortunately, the rules for handling it are very simple: it's just a conjuration on the Chimera's field. Since it doesn't have defender, it doesn't block for the Chimera or guard for other aspects. If it is attacked, the player attacking it can determine whether or not it counters, as players make all decisions for the Chimera. A Puppet attacks the opposing Phoenixborn if it is the leftmost aspect and the Chimera takes an attack action (usually, this is Jessa, but if you're playing multiplayer, it could wind up on a field opposing a different Phoenixborn). As a conjuration, it is not an aspect, so does not count for adding Red Rains tokens during the Recovery phase, but that also means it doesn't count against the Chimera's Threat. It is theoretically possible to have the Chimera have all 5 Blood Puppets on its field, as well as the full threat of aspects. Lastly, the timing for the Blood Puppet's damage is after the Chimera has added Red Rains tokens - which means that the Ultimate would trigger before the Puppet would deal damage for a round. ##### Moving past Standard 1
Okay, that's a lot! But Jessa's deck is not a simple deck to pilot, so a lot needs to be said. Below here is a sample round 1 I've played using the base deck, with the changes I've listed above (Channel Magic and first five), but before that, what about games 2 and 3 of the campaign?
Fortunately, the base set gives a lot of good cards to pull from, and most of the cards in the Corpse of Viros player deck will also bolster Jessa's game. It really depends on which direction you want to take her in. For more allies, you'll want to look at Coal and the Corpse's deck. For better summons, Aradel has two that can be brought in, but Noah's False Demons are a good choice, too. Until you get expansions, Aradel's deck is the only one with an importable "area of effect" card (Mist Typhoon) which Jessa can make use of. There's a surprising amount of usefulness in the cards, despite having so few by name. Just as a note, Root Armor does not stop a Blood Archer from placing the wound on himself due to Blood Shot. This is due to what step the damage prevention of Armor 1 affects: deal damage (Root Armor triggers here) -> place wounds (Blood Shot starts here for the Archer). This can be found on page 16 of the Master Set's rulebook. Root Armor will, however, stop Firebelly from dealing any damage to him. After that, it's entirely up to you what to do. Done with the game? Okay, hope you had fun! Want more? There's lots more, including more Chimeras (that also come with another player deck)! Either way, best wishes.
By Archivist
Noah Redmoon does a fantastic job of looking the part of the evil, sword swinging wizard. Which is good, because he very much is, if you look into his lore (which can be found elsewhere on this wiki). You also might have noticed that he's labeled as the "Phoenixborn of Viros" on his card, which means that he and the Corpse of Viros share a stomping ground. But, "there can be only one" and if you're struggling with Noah fighting the Chimera invader, hopefully, this article will help.
My assumption with this is that you only have access to the Master Set and the Corpse of Viros. This guide will only specifically cover the Shadows of Viros deck.
##### Preface: rules interactions
The Shadows of Viros has a few rules interactions that you need to understand before proceeding. The first one is around Noah's ability, Shadow Target. The Corpse of Viros - and all other Chimera so far - has only 1 Ready Spell: the Ultimate. The rules for an exhausted Ultimate are in the Chimera rulebook on page 12, or the Red Rains rulebook on page 17. Of importance to note is that this happens before red rains tokens are placed during the Recover phase.
Another interaction is that of Firebelly and Summon Sleeping Widows. As per the rules on page 17 of the Master Set rulebook, playing Summon Sleeping Widows after the Red Wrath 1 ability has triggered means that the new Sleeping Widows are not affected by the ability, and will stay around.
Stormwind Sniper is the last card that has any sort of tricky rules interactions, and he has several. The easiest one is that the Chimera counts as a Phoenixborn for the purposes of Ambush 1. The remaining interactions regard Concealed. If the Sniper is exhausted, Concealed is no longer in effect, as per rules on page 15 of the Master Set rules (or page 19 of the Red Rains rules). While unexhausted, however, abilities like Dark Descent do not affect the Sniper, nor does Whiplash, and attackers will skip over him and go to the next unit, or the Phoenixborn (Noah) if there are no other units (Red Rains, page 16). In contrast, Stormwind Sniper will be affected by the Firebelly ability regardless of exhaustion, as it does not target the Sniper.
##### Starting Off The Corpse of Viros plays everything to the battlefield, boasting a solitary ready spell, and no conjurations or alterations. His base form is just aspect units from either of its two Aspect decks. This means it puts a heavy emphasis on the battlefield, but the Corpse does have a fair number of abilities that target the opposing Phoenixborn's life total directly (often called "burn" if you're new to card games). The Shadows of Viros is in a somewhat unique position compared to the other Master Set decks, as all of its units have a 2 attack value. However, most of the units in it are fragile, like with The Mist Guardian (Aradel), and it shares many of the same vulnerabilities. One of those vulnerabilities is Noah's low life. At 16, he's just a mere 1 life point higher than the lowest allowed for a Phoenixborn, and he doesn't boast any healing in his original deck. This puts him in a position of needing to guard infrequently, which, fortunately, is just fine. His ability, Shadow Target, is situational in both PvP and PvE; more often than not, you'll find yourself not using it against a Chimera, but when you do, it can stave off an Ultimate for just long enough to prepare for what happens after that Ultimate resolves. In a stark contrast to The Bloodwoods Queen, The Men of Iron, and The Corpse of Viros player deck, Noah's ceremonial package is rather light on allies, bringing just the Stormwind Sniper. He is a decent ally for his cost, not outstanding, but thanks to his Concealed, can make for some interesting play lines, such as blocking a Dark Descent while he's the only unit on the field.


My recommended first five
The Corpse of Viros has 2 aspect groups meant for preconstructed play: Fury and Shadow. Each one has certain aspects that bring trouble, and I tend to break them down into the following categories. If you've read my other guides, note that Noah's breakdown is a little different than the other Phoenixborns'.
Grunts: these aspects are ones that you can hit last. None of the aspects will make you happy to see them, but these are the least troublesome if left alone for a while. For Fury, this is Rampage and Whiplash. I'd put Constrict and Regenerate in here for Shadow. Whiplash falls into here due to its ability only triggering once; it's basically a single unit removal that sticks around to remove another one.
High priority: these aspects are ones you should focus resources into removing, or they will quickly kill whichever Phoenixborn you're using, and Noah is more fragile than most. In my opinion, the high priority target for Fury is Firebelly. For Shadow, it's Dark Descent and Stormcall.
Annoying: this is kinda where everything else goes. They're more obnoxious than the grunts, but not demanding of attention like the high priority aspects. All of Fury's two bloods are here, while Shadow has two: Lurk and Glare.
I feel the need to call out that Lurk's placement is due to the rules interactions it has. Since you should be familiar with how Concealed and exhaustion work thanks to the rules section above, you've probably realized that things like Small Sacrifice and Nightmare 1 can take out an exhausted Lurk with no issues. And, since your units are disposable, letting it hit an exhausted leftmost unit is no big loss. Now, you don't want to leave it unblocked very often, as it takes a mere 4 hits to down Noah, but it's still not a big threat.

What is a big threat is Firebelly. Only False Demons will survive the ability, and they'll die when they block (but it's worth the block, barring circumstances where you'll lose if you do). The only upside to Firebellies is that they are great for putting Widows into play, but really, all the Chimera's attacks are good at that, since Noah's units are so fragile. If you see a Firebelly late in the round, it can be worth using Shadow Strike on it to make sure you have units for the next round. That 1 "wasted" damage is a better loss than losing the game because you have no units available following the Firebelly's attack.
Next in line is probably Dark Descent, then Stormcall, then it's down to the annoying ones like Hunting Instincts, Glare, and Iron Scales, with Frozen Fear and Lurk taking up the rear before you get down to the grunts. The Descents will cause issues since Noah has very few units until you get his spellboard running, or luck into a lot of Widows, but you still don't really want to see them. Stormcall eats through Noah's sparse life total, and Channel Magic can only mitigate so much of that.
Hunting Instincts places fourth on the list due to adding red rains tokens that accelerate the Corpse into the 1 and 2 damage Ultimates. These tend to wipe Noah's board clean, and, unsurprisingly, you don't want that. Everything else, you'll get to. Handling these aspects is almost entirely a matter of blocking or attacking, then using the 1 damage effects from Nightmare and Small Sacrifice to clean up. You only have 3 Shadow Strikes, with no guarantees you'll draw any of them (but with Sleights and Channels, you have a good chance), so combat is your most reliable source. When able, use Small Sacrifice and Resummon on False Demons; this preserves your units as long as possible while still dealing that damage. A key strategy in a lot of illusion decks is to go for your opponent's exhausted units. Shadows of Viros is no exception, but you want to be strategic about which units of yours you exhaust and when. I alluded to it before, but if you see a Lurk about to attack an unexhausted unit, there's no reason to not exhaust that unit before the Lurk attacks, even if you're just attacking the Corpse itself (while it has no Defenders). Get value where you can; my typical advice for campaigns is "try to spend 1 die per blood, or 1 die per 2 unit damage" so if you can make your units punch up, do so. And don't be afraid to lose any of them. Shadows of Viros is a lesson in disposable units. Related to targeting your opponent's exhausted units is giving the opponent the opportunity to exhaust their units. I find that one way to do this is to have the Chimera go first in the game. While it isn't foolproof, it does give you a better chance of controlling the end of round 1 and setting up for a strong round 2. ##### Round 2 and beyond As mentioned before, a lot of Noah's difficulty comes from surviving past round 1. Due to the high unit volume I've assembled in the first five for round 1, you should be able to make it into round 2 with 1 or 2 units left on Noah's board, and this is crucial, since, also as mentioned before, he only has 2 reliable units per round. You can ceremonial power a Sniper back into hand, and should if needed, but you also want to get his Summons onto his spellboard as fast as you can. You'll likely never use the Wolves' focus ability, but having another 2/1 for 1 class is still useful enough. The rest, then, becomes a matter of managing the damage output you have and bleeding the Chimera down. Once you've beaten Standard 1, you have a lot of good options for imports. If you want allies, all 3 of the other ceremonial decks have good ones to pull, and the Corpse of Viros player deck also has a good spellboard card in Chant of Transfusion (most likely replacing Small Sacrifice, since you have to pay attention to spellboard size). Even Saria's deck has good allies, but they're more 1 life units, so you don't fix your Firebelly vulnerability there. For more conjurations, you can look to Aradel's deck, but they, too, are 1 life units. On the other hand, they make building your board back easier, and removing 1 wound here and there is also helpful. And Root Armor can help almost any unit it gets placed on; Firebelly won't damage a Sniper with an Armor, and he'll survive any of the 2 attack aspects. Massive Growth can also make one of your units much bulkier, letting it tank a Lurk and something else (but you'll probably want to kill the Lurk with a ping damage instead of the Massive unit, so don't counter). There's a surprising amount of options. Below here, I've included a sample round 1 using the deck and first five modifications above (so, 3 Channel Magics in, with 2 Fade Away and 1 Resummon removed - not that you see it with only 1 round). Other than that, best wishes!
By Archivist
If you've looked at Jayson's guide, or been on the Discord at all, you've probably heard that Astrea's original deck is one of the hardest decks to pilot against the Chimera. That's entirely true. As such, this guide is for those brave souls who want to make a go of it, and add the deck to your wins.
While Astrea does have a second unique card, this article assumes you have the bare minimum to play the Goddess of Ishra deck: the deck itself, some divine dice (or substitutes), the Master Set (for the charm dice), and the Corpse of Viros. If you also have the Blight of Neverset, the games against the Chimera become much easier thanks to Judgment. It is, however, winnable without.
##### Preface: Rules interactionsThe Goddess of Ishra has a few strange rules interactions with the Chimera, and one of those should be cut from your deck in favor of Channel Magics (more on that in a bit). Two others deal with Light Bringer, and Imperial Ninja.
For the Light Bringer, the turn after it comes into play, the Chimera must attack if able. As per rules in the Red Rains rulebook on page 15, status abilities are still resolved, then, the Chimera takes the Attack main action, as though it had no face down aspects. If the Chimera has no aspects capable of attacking (either because the face up ones are exhausted, or it has no face up aspects at all), it takes a turn as normal, rolling or passing based on the number of face down aspects.
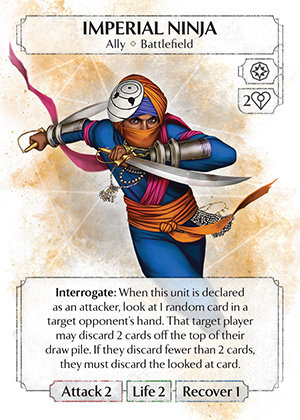
Ninja is a little trickier because there's two components to it, but still pretty easy. The first one is the choice of hand or deck; as a player, you choose. Given Astrea's difficulty, it's probably easier to look at the top 5 cards (the created hand - the other component to the Ninja's complexity - as per Red Rains rulebook, page 16), and decide if there's 1 particular aspect that will be problematic coming up, or if you want to just discard 2 aspects. I personally roll the behavior die, with odd being the discard from hand, and even being discard from deck. But you choose when you play.
The last ones all deal with Concealed, on Lurk. It does not protect against Kneel or Unit Guard (they don't target), nor Light Bringer's Infatuate (which targets the player), but does protect against Astrea's Beguile. Once Lurk is exhausted (via Kneel or attacking), it can be attacked, hit by Mark of the Goddess, or otherwise dealt with.
##### Astrea's StrategiesUnlike with the two Master Set decks, I'm going to focus on Astrea's deck's strategies instead of the individual cards. Individually, they're pretty abstract, and hard to understand in terms of game goals; as a strategy, they're much easier to understand.
One of her strategies is that of "discard from hand." Unfortunately, against the Chimera, the power of that tactic is dramatically reduced, since the Chimera never runs out of cards to play. While you can still accelerate a fatigue-based win with these plays, the strategy is definitely one of the weakest strategies that exists against the Chimera, since it doesn't have the same limitations a human player does. For example, it will never activate the side action of a Weeping Spirit, and it doesn't care to, because it doesn't have a battlefield limit. Similarly, Imperial Ninja isn't likely to hit a singular key card that would cripple the Chimera if discarded; at best, you'll weaken it for the next round. And then there's Kneel and Beguile, neither of which cause the Chimera to play more cards from hand to have units that can attack. So this strategy is one you should ignore.

Her other strategy is controlling combat. Not just the outcomes, as cards like Royal Charm affect, but also what can attack and when. Kneel, Beguile, and Devotion stop units from swinging, Light Bringer forces the attack, and Steadfast Guardian dictates what actually gets attacked (usually Steadfast). And then Sun Sister can clean up the wounds on any of Astrea's surviving units, except herself. Speaking of surviving units, Call to Action can give one another attack, and you will have no trouble hitting the trigger condition for the reaction. Lastly, even Mark of the Goddess can be considered dictating an attack - just using an opponent's unit for the attack instead of one of hers. This strategy does work against the Chimera, even if the cards themselves appear quite weak at supporting it. It's also a lot harder than many of the other strategies that don't have the same level of combat control, because the decision making is more detailed and the units are on the small side.
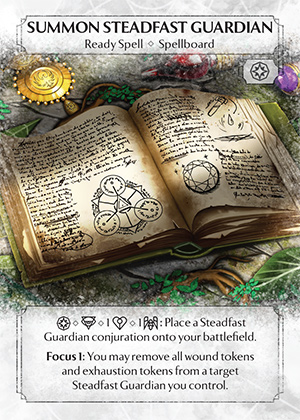
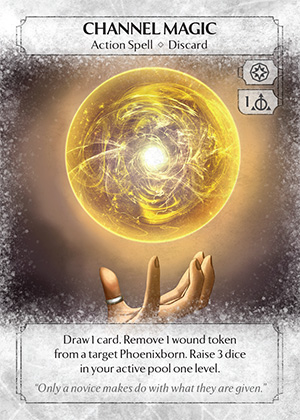
Since hand denial is out, you want to put Channel Magic into her deck, replacing the near-useless Summon Weeping Spirit. While you can use the Spirits on your own side to absorb an attack every so often, overall, The Goddess of Ishra would rather have more Royal Charms and more Summon Steadfast Guardians than Summon Weeping Spirits, at least against the Chimera. Having the extra life point per Channel Magic drawn doesn't hurt, and probably the best thing about it is that it raises 3 dice up one level, which helps Astrea trigger dice powers more often, giving her greater control over combat outcomes.
As mentioned earlier, if you own Blight of Neverset, you can replace Mark of the Goddess with Judgment, and, well, no one will judge you for it. And, let's be real: if you're using Print on Demand to get The Goddess of Ishra, you probably want 3x Judgment over 3x Mark, anyways. You'll use Judgment in PvP and PvE; Mark sees much less play.
Lastly, Astrea's allies are limited in number; a mere 6, with no way to bring them back in deck or dice. As an option, you can swap out 1 die for a ceremonial die. This isn't something I really recommend, as she wants to minimize meditating in order to not lose Summon Steadfasts, and with a single ceremonial, you'll probably be meditating to get that power side.
##### The First FiveThe Goddess of Ishra is somewhat of a rarity in that the strategy needed in the First Five is actually different between the Corpse's aspects. However, that difference comes down entirely to 1 card and how you spend your last few dice.
The base of the First Five is her two summon spells: Guardian and Light Bringer. Since both of these are key to her deck, you want a copy of each. Additionally, she does want more than just two 1 attack units, so Ninja and Sun Sister are also added to the hand. With these four cards, and Astrea's ability, that puts you at using 3 divine class dice, 3 charm class dice, and 2 basic dice. You have 2 dice left.
So what to do with them? There's 6 cards left you can choose from, and only 1 of them will actually cause you to use all your dice: Devotion. That does remove an attacker from your field, and Astrea really wants those early on, making it a subpar choice. The remaining cards all cost 0 or 1 die (Royal Charm is the 0 cost), but all of them also tend to further her strategy.
This is where the differences between the aspects comes in. Against Fury, Mark of the Goddess is effective removal against all the 2 bloods, because they all have 3 or more attack, and can be targeted before they attack. Mark of the Goddess seems a logical choice here, and that would leave you with 1 die to use on dice powers (and it'd be your choice which die, since you have 3 basic costs in that hand). Your worst case scenario, that of a triple Iron Scales opener, is fairly rare, and if you're concerned about it, you can opt for a different card.
Shadow is somehow more resistant to Mark - Lurk can't be hit until after it has attacked (and is better removed by a Light Bringer or Guardian attack so as to minimize damage waste), and Constrict only deals 2 damage to another unit. Which means, for Shadow, you'd be hoping for a 2 or 3 Dark Descent opening for Mark of the Goddess to work. As such, I don't feel like there is a 5th card choice that stands out from the rest. The presence of Constrict means you are likely to lose the use of something - possibly Astrea - and wind up with more "spare" dice to use on dice powers, which makes Royal Charm a risky choice. Devotion's abilities would get shut off by Constrict, but you at least still get to use the dice (and the stat increases), but, unless you rush the Devotion play, Constrict is likely to hit something else anyways. Channel Magic gives you a random card, but also probably puts you into the position of using dice powers or having "dead" dice (you could draw a Kneel you can't use well, for example). And, Kneel in round 1 is usually not a great pick.
This leads my preference to be Channel Magic. While having the spare die isn't ideal, one thing Astrea does want is more summons, more often. Getting 2 or even all 3 of the Steadfast Guardian summons boosts her game by a surprising amount. Even getting more Royal Charms helps her game; making her dice go further is always good, as is having additional targets for Constricts that don't take away from your removal or unit production.
One final option is taking a Kneel into the First Five, and then discarding it before round 1 and hoping for a random draw that's better. This gets into some rules trickery, but there are similar strategies used in PvP to get a "6th" card in the Five. In this case, since you have no way to recover the Kneel, it functions more as a "removing it from the deck so you don't draw it later" action. I don't actually recommend doing it, but you should know that it is an option.


My recommended first five
##### The Corpse of Viros
The breakdown for the Corpse's aspects interact differently with The Goddess of Ishra than against most other decks.
Grunts: the aspects you can hit last. Steadfast Guardian can usually soak them and stick around for another block or guard. For Fury, this is Rampage and Whiplash. For Shadow, it's Regenerate.
High Priority: these aspects should take the focus of your resources, so you have a better chance of surviving. Using Beguile on one of these is perfectly acceptable, so you can destroy it without losing any of your units. For Astrea, this list is Dark Descent in Shadow, and Frozen Fear and Hunting Instincts in Fury.
Annoying: the catch-all for everything else. For Fury, that's Iron Scales and Firebelly, and for Shadow, it's Lurk, Constrict, and Stormcall.
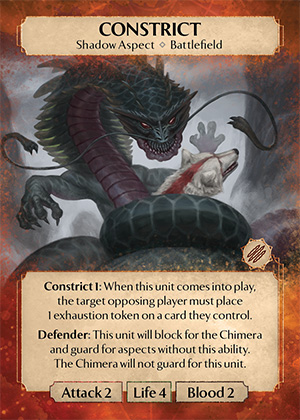
This is a bit of a different list than most other Phoenixborn, and that's somewhat due to Astrea's unique deck. Constrict and Iron Scales can be stifled by using Beguile, and then your attacks can focus on the bigger threats, while you chip away at these two with your units. If you have an empty board, you can also use a Light Bringer to force them to attack into it, essentially saving you a unit.
Firebelly is less of a threat here because the Guardian can get a divine die and block and kill it, and still be able to take 1 more wound, even before a Devotion. Additionally, Sun Sister can remove the wounds your units take from Firebelly's ability, preserving your units for longer. And, of course, the aforementioned Devotion can be put onto any unit to give it survivability even after blocking the Firebelly.
Lurk can be guarded against with the Steadfast Guardian. And then you can take it out with a Light Bringer without losing excess damage, but be careful about when that Light Bringer is played. Or, if you get somewhat lucky, you might be able to double Devotion a Guardian and block and counter the Lurk. But then you're likely to lose the Guardian and both Devotions to almost anything, even with a Sun Sister removing wounds.
Stormcall has trouble eating through Astrea's life, and, since she has two attackers capable of taking it out and surviving, shouldn't be much of an issue. What's more, you can slap a divine die on your other two units, and then they are strong enough to take out the Stormcall. Better still, you can time a Light Bringer to force the Stormcall into attacking when you want it to, ensuring you have a unit ready to counter and probably kill it.
Frozen Fear is probably your biggest worry aside from Dark Descent. Frozen Fear can exhaust Astrea, removing one of her primary ways of keeping herself and her units alive. You'll also usually want to boost a Steadfast Guardian with a divine die to be able to block it, as your allies are so few. Also, you can target it (or an Iron Scales) with a charm die to keep it from taking out an unwounded Guardian.
Dark Descent can also remove your units at a high rate. Astrea can have counterplay, though: if your leftmost unit is unexhausted, Call to Action can unexhaust the unit Descent would try to invalidate, but if the unit was already exhausted, Call can't do anything about it.
Those two are in different aspects, so if you're playing them unmixed, you'll only have one set of them to deal with per game.
Perhaps the most interesting thing is that, for The Goddess of Ishra, the harder aspect is actually Shadow. A lot of Fury can be handled through Beguile and careful attacks and guards, and Mark kills just about everything; Shadow removes a bit of that control due to the Dark Descents, and early Constricts can hurt Astrea more than a lot of other Phoenixborn because she is reliant on Beguile and her summons more than most of the preconstructed decks, which can get by without their Phoenixborn ability round 1. And there isn't a good First Five for her that can handle a double or triple Constrict round 1.
##### Round 2 and beyondMost hands you draw in round 2 will work in some way, but you will occasionally get hit with a hand full of Royal Charms and Call to Actions, without enough units to use them on. Since Astrea plays a defensive slow game, this will still work for her, as she'll likely have multiple turns after the Chimera has finished. She'll also probably take a fair chunk of damage that round, so you should mitigate that the best you can with the Light Bringer, a well-timed Beguile, and the Steadfast Guardian. The next few rounds might be a little more strained, but they're manageable.
Unlike a lot of decks, The Goddess of Ishra will probably end the game in round 4, even against Standard 1. This additional round is usually a matter of cleaning up, as you should have control of the game at that point, and simply were not able to produce enough damage to the Chimera to actually close the game out in round 3.
This longer game closure also means the Corpse is more likely to hit phase 3 than against most other preconstructed decks. This is no big deal, as Astrea's limited battlefield is a boon here, preventing you from losing too many units to the extra Ultimate.
As far as deck picks, Astrea has a lot of good directions to go in, even with just the Master Set. Aradel can give her Mist Spirits and Typhoon, both of which are good at dealing that last damage needed to some aspects, even though they're not in her colors at all. Coal's Hammer Knight is a great Call to Action target, attacking an exhausted (perhaps Beguiled) unit and then unexhausting to counter another. Anchornauts are a good pick, too, as the divine power can also give them 1 attack and make them worthwhile. Noah's False Demon works well with Beguile, too, and he has Bound Soul, which could help with returning the Ninjas and Sisters. Saria can complement the fatigue plan with Enchanted Violinist, and also provide a heavy hitter in Rose Fire Dancer.
All in all, I recommend trying The Goddess of Ishra once or twice. She's a good way to learn to manage what seems like inferior resources in a demanding environment, and those lessons work for all other decks.